Wednesday, 17 June 2020

Lucky You | Dust It Off Challenge | May Homemade Kit


Hi everyone! Today I am back to share another layout using my May homemade kit, and yes, it's another birthday layout! My wonderful hubby recently celebrated his birthday (just a quiet one at home), so I took the opportunity to snap a couple of photos of him with the kids when he sat down to open his presents.  

Here is my layout, "Lucky You"...
(Click on photos for a better view)


Besides creating a birthday page (so I could tap into some of the celebration themed embellishments in the kit), the only other idea I started this layout with was to use one of the sheets of Kraft cardstock I had included. (Yes, Tam Buckler - I used the Kraft!) I figured the best way to tackle the Kraft cardstock was by using the acrylic paints that were also in my kit. 


I used a spatula to smear some white, aqua and metallic gold paints randomly around my page, leaving some parts a little "chunky" for added texture, and then left my page to dry overnight. 
Once dry, I added some stencilled detail to the background using the Crazy Quilts Calm & Frenzy stencil from StencilGirl that I had included in my kit. I used a sponge dauber and some grey ink to add subtle depth, then I also added a little bit of stamping using black ink and my fave Doodle Dots stamp from Viva Las VegaStamps


I then began creating some papery layers, starting with a printed paper bag from my stash (it wasn't included in the kit but sometimes you have to take a little creative license, right?) It featured a gorgeous triangular pattern in shades of blue and I decided I had hoarded it for way too long! In addition to the paper bag, I decided to use tags instead of patterned paper on this page as this was also one of the items in the kit. I used a large foiled Kraft tag from Heidi Swapp, as well as some smaller printed tags from Rosie's Studio and Pretty Little Studio and tied the tops of each one using different coloured twines. 


To draw in some more gold onto the page and add extra interest to my layers under my photos, I also added a gold foiled chipboard frame from Crate Paper. Then, once my photos were in place it was simply a matter of adding my embellishments.
From the Crate Paper 'Confetti' chipboard sheet I used the large aqua balloon and the gold bow. From the Vicki Boutin 'Color Kaleidoscope' Thickers, I used the small memories tab, the circular arrow piece, the you are loved label, and the super cute teal bunting (which I cut into two pieces and placed either side of my bottom photo).


I also used a D-lish Scraps flair button; phrase stickers from a Simple Stories Carpe Diem sticker pack; a puffy heart sticker; and then finished off with the fabulous Studio Calico gold chipboard asterisks that I scattered around the page. Some quick handwritten journalling details and a stamped date and I was done!
So what do you think? Did I do the Kraft cardstock justice? 

Thanks so much for stopping by today so I could share this with you. Until next time, happy scrapping! X

Saturday, 13 June 2020

Hooray | Dust it Off challenge | May Homemade Kit


Hi friends! I am back again today with another layout using my May homemade kit. (Yes, I know it's June but May totally got away from me with the kids at home, and I am determined to use this kit I put together!) For this layout I decided to focus on the 12x12" chipboard sheet I had added into my kit, which was from the 'Confetti' collection by Crate Paper and scrap a birthday themed page. As my daughter recently celebrated her 12th birthday, I had some fresh photos and thought I would document a couple of her with her birthday cake. 


One of the other items in the kit was acrylic paints, so I thought I would put them to work and create a quick background with them. Using a sheet of white cardstock and my brayer, I simply rolled on some paint working from top to bottom and allowing the paint to fade away naturally towards the bottom of the page. The colours I used were a Mont Marte Dimensional paint in 'Naples Yellow' (these are beautiful full bodied paints); and 'Aquamarine Dream' Flutter Colour paint mixed with some Naples Yellow to get that gorgeous sage green. I then allowed my paint to dry naturally whilst I started working on my layers. 


I gathered together a variety of Crate Paper patterned paper scraps from my kit and layered them up with a small paper doily to form the matt for my photos. I also added a little frayed gauze on top then stapled the whole stack to my page. 


To embellish my layout I used some stickers from a small Webster's Pages sticker sheet that had a celebration theme, which I tucked into my layers above my photos. I also used a few pieces from the Crate Paper 'Confetti' chipboard sheet, including the candles, small heart, and the numbers for my daughter's age.


To the left of my photos I used a handmade chevron embellishment from Charms Creations, which I topped with the big smile phrase from the chipboard sheet. To the cluster on the right side I also added a flair button from Cocoa Vanilla Studio and a printed acetate heart from Heidi Swapp.


To finish off my page I used the vellum hooray title from the 'Confetti' ephemera pack; a couple of die cut butterflies from my Reject Shop ephemera pack; a fussy cut butterfly; and some small Carpe Diem tiny phrase stickers. I then stamped the date and a few tiny black ink splatters.

I love how this birthday themed layout came together and the fact I got to use up some things that I have been hoarding for FAR too long! 
Thanks for stopping by today so I could share this with you. Until next time, happy scrapping! X

Thursday, 11 June 2020

You Are My Sun | Cocoa Vanilla Studio


Hi everyone! Today I am sharing a mixed media layout I created recently for Cocoa Vanilla Studio using the 'Legendary' collection. I had these two cute photos of my equally cute boys dressed and ready for their end of year party day at school. 

Here is my layout "You Are My Sun"...
(Click on photos for a better view)


I began my page using a sheet of white cardstock and some 'Mowed Lawn' Distress Oxide. I used my go-to method of applying the ink to my messy mat, adding a little water, and then laying the cardstock over the top to absorb the ink. I then allowed it to dry before I repeated the process with some blue ink, then added some stamping with black ink using a stamp from Viva Las VegaStamps that featured tiny stars.

Once the inks were dry, I added a small tear along the top edge of the cardstock, then folded the edges of the tear back and fastened with tiny staples. I then backed the tear using some of the green print from the cut apart Total Legend paper. To balance it out, I then added a torn piece of the green striped print from the Explorer paper, adding a little torn marble print washi tape from my stash over the top.


 I then turned my attention to the main focal area of my page, adding pieces of layered papers to create a photo mat. The papers I used included the blue star print from the Offbeat paper; more of the green stripe; the bold orange from the One Way paper; and the multi coloured stars of the All Star paper. I also added some more of the torn washi tape, frayed gauze, and a charcoal coloured paper doily from my stash.


After fastening all my layers in place and then adding my photos on top, it was time to get busy embellishing! The first piece I added was my title piece, which I fussy cut from the Epic Tales cut apart paper. I don’t tend to add my titles before other embellishments, but because this was a large piece and it had to be placed to the left of my photos (to hide the straight edge along the right side of it), I needed to place it first.


Now it was time to add “the sprinkles” – because that’s what embellishments are, right?! The sweet little morsels we add to finish things off. First and foremost, my layout needed STARS! (What else was I going to use with a title like that?) I fussy cut a handful of various sized stars from the All Star paper and scattered them around my page, bending the points up for extra dimension.


To balance my title, I needed a cluster to the right of my photos so I added a moon, the incredible label and an arrow from the Die Cut Ephemera pack (using foam tape to pop them up a little from the background). Above my photos I added a little star banner (also from the ephemera pack) and the little hey there phrase from the Accessory Sticker sheet. I then finished off my page with a splattering of navy mist.

Thanks so much for stopping by today so I could share this with you, I hope you are feeling inspired to pull out your supplies and get creative to. Until next time, happy scrapping! X

Tuesday, 9 June 2020

Everyday Ordinary Life | Scrap the Girls June challenge


Hi everyone!
I am popping in today to share my take on the June challenge at Scrap the Girls. This month the challenge is a sketch (which was designed by ME) called "Welcome to the Party", and it looks like this...


And here is my take on it...
(Click on photos for a better view)


When it came to tackling the sketch, I aimed to incorporate the main structures of the sketch which were the vertical and rectangular elements; multiple photos; and embellishments placed to the left, but I used a mixed media background to achieve a more organic overall look. 


I began with my background which was leftover from a bubble painting session I did a little while ago. It was created using a mixture of acrylic paint and dish soap and I just knew the look of all those cells would help soften the structure of the page. Not to mention they immediately make me think of science, which is perfect for a school themed layout. I added further detail by stamping with a jumbled text stamp over the top.

For the papers and embellishments I dug into my precious Vicki Boutin stash, using the Color Kaleidoscope collection. I had already printed my photos in black and white, so aside from working with the blue on the background, I knew I had free run with my colour choices. The first thing I did was look through the collection and gather a few things that I thought would work for the theme of the page.


I started by creating the vertical elements as the base for my page using a piece of paper with patterned strips on it, a small grid print paper bag, and a border sticker featuring arrows. These formed the anchor for my design and gave me a point to build on. I then layered the larger square and rectangular pieces over the top, adding a small paper doily and some frayed gauze, before placing my photos on top.


For the embellishments I used a selection of die cuts from the ephemera pack which I tucked in around my page using the sketch as a rough guide for placement. To the left of the photos I added a Charms Creations handmade star embellishment, which I topped with a cute typewriter flair button. 


For my page title I chose the everyday ordinary life sticker, which I popped up from the page using foam tape. I also added the large die cut arrow to help draw the eye into the action in the main photo - where my daughter and our cat were both using the touch pad on her laptop together (so cute!) I then added my handwritten journalling, stamped the date, and added a few black ink splatters and I was done!

If you would like to play along with us at Scrap the Girls this month and have a go at my sketch I would love to see what you create! Our Aussie sponsor this month is the lovely Paige from BeeArty, and for our international players, our new sponsor Tanya Leigh Designz
Until next time, happy scrapping! X

Wednesday, 3 June 2020

Darling | Dust it Off Challenge | May Homemade Kit


Hi everyone!
I've got another layout using my May homemade kit to share with you today. For this layout I decided to scrap another photo from a recent series I took of my daughter dressed in one of her Cosplay outfits. (I have no idea where she gets her love of dressing up from?! hehe)

Here's a look at my layout...
(Click on photos for a better view)


This page was a little different to my usual style, in that I opted for more dusty, muted tones to work with the vibe of the photo. I began with white cardstock, adding a little bit of pale pink / coral mist by spraying it onto my messy mat and then laying the cardstock over the top to pick up the colour. 


I then went to work on the papers. I chose the peach patterned paper from Crate Paper as the anchor for my design - cutting a piece to run vertically down my page and then layering it with a couple of other papers and a paper doily before adding my photo on top. I then fussy cut the large floral piece from a Heidi Swapp paper (from the 'Wanderlust' collection) and tucked it in under the left edge of photo as a feature.


With all the main components in place, it was then time to add the embellishments. I used a few die cuts from a pack I got from the Reject Shop (a discount store here in Australia, in case any of my international friends were wondering). 


I mixed these with some Heidi Swapp printed acetate hearts, and a Crate Paper vellum heart. The large acetate title that I ran along the bottom edge of my photo was from the Crate Paper 'Confetti' ephemera pack.


I finished off my layout with some tiny splatters of black ink.
And there you have it - two layouts down from my homemade kit and a number of items used that would have otherwise still been collecting dust in my stash. Winning!
Until next time, happy scrapping. X


Monday, 1 June 2020

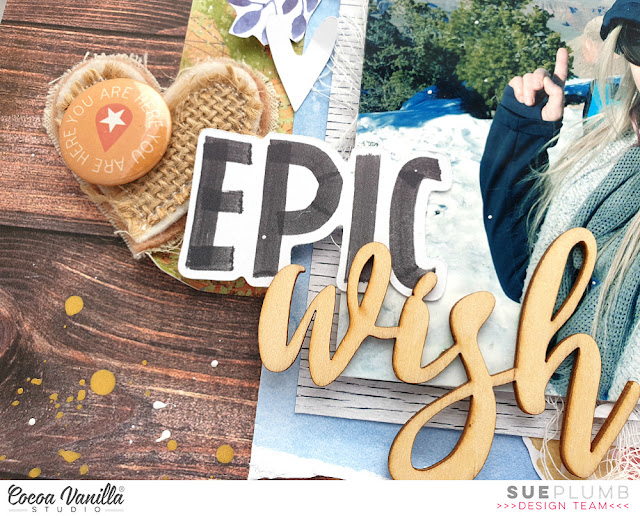
Epic Wish | Cocoa Vanilla Studio June Challenge


Hi friends!
I am super excited to be sharing this with you today - Cocoa Vanilla Studio now has a new monthly challenge that will be held in our Cocoa Vanilla Studio Community group on Facebook. (Yay!) Each month the design team will take turns to collate a mood board to be used as inspiration and I am so happy to say the June mood board was put together by me!

Here's a look at my "Rustic Trails" board...


And here is the layout I created that was inspired by the board...


I decided to draw on the travel theme that was represented in the board by documenting a selfie I took at the Grand Canyon. This was taken at the moment I first walked up to the edge, and was a moment I had dreamt of for most of my life. The Grand Canyon had long been #1 on my travel wish list, so to finally be standing there was almost beyond belief (and may have even caused me to shed a few tears). 


I began my layout with the wood grain paper from the 'Legendary' collection, which was inspired by the image of the gorgeous timber table on the board. (I love this paper so much!) I then set about adding some paper layers. First, a piece of the map print, which is the reverse side of the wood grain on the Outdoors Type paper. I trimmed down a rectangle shape so that there was only a little green showing and it was largely the warm, earthy orange tone I was looking for.


Continuing on with the wood theme, I used the white wood grain paper from the 'Wild at Heart' collection to mat my photo. I added a second layer, again using a paper from 'Wild at Heart', that featured a pretty blue watercolour to tie in with the blue sky in my photo. I also tucked a grey doily into my layers before stapling the stack together and sticking it onto the page. To add some texture, I added frayed gauze, then stuck my photo down on top. 


Now it was time to draw in those beautiful rustic flowers from the board by adding some fussy cut floral pieces. I used a floral paper (again from 'Wild at Heart'), and tucked them in under the edges of my photo to frame it. 

At this point, I really wanted to add an extra floral element, and I also wanted to draw in the white from the board, so I used the beautiful 'Bouquet' cut file from Cut to You. This is a fairly large piece, so I actually cut it into sections so I could tuck it into my layers and add to the diagonal flow of the page. I topped the cut file with a couple of vellum flowers from the 'Love Always' collection.


Now it was time for some smaller embellishments. First my page needed a title, so I used the word EPIC from the 'Legendary' die cut tile words combined with the wood veneer word wish from the 'Make a Wish' collection. I really wanted to draw in the hearts from the board, so I also added a few wood veneer hearts from the same pack, a Charms Creations handmade heart and a few white cardstock hearts I had left over from previous cut files. 


I found the perfect flair button in my stash to pop on top of the Charms heart, which came from the 'Made of Awesome' collection. (This boy collection is no longer available in physical form, but you can purchase it as a digital bundle to print and cut yourself at home HERE)

I finished off with some splatters of gold Heidi Swapp Color Shine and some splatters of 13Arts white acrylic ink. (And yes, some of them got on the photo but I don't care - I was standing in the snow anyway!)

If you would like to watch this page come together you can check out my process video on my YouTube channel here:


That's all from me today. If you love the look of my "Rustic Trails" mood board and would like to join our challenge, make sure you are a member of the Cocoa Vanilla Studio Community group. Simply upload your entry into the challenge album there to go in the running for a $25 store voucher.
Happy scrapping! X

Tuesday, 26 May 2020

Iso Hair | Dust it Off Challenge | May Homemade Kit


Hi friends!
Well it's official - after almost 9 very long weeks I was finally able to retire my teacher's hat and send the kids back to school yesterday. (I am not sure who was happier about it - them or me? hehe) So now I have the chance to get a bit of quiet time, it's time to get back to my "Dust it Off" challenge, and what better way than by getting stuck into a homemade stash kit?! 

So today I am sharing the first layout that I created from my May homemade kit, that I put together using Khristina Sorge's "For the Love of Homemade Kits" May recipe below. 


And here is my layout, "Iso Hair"...
(Click on photos for a better view)


I had these cute photos of my daughter with her dyed green "iso hair" to document, so I knew I had to use green to coordinate with them. I started my page with a sheet of white cardstock that I trimmed down to measure 11x11" then backed it with the My Minds Eye large grey spot paper to form a border. Next, I took my Dina Wakley 'Elephant' acrylic paint and used a wide brush to dry brush a small amount on my background.  


Now it was time to turn my attention to the papers in the kit, so I picked a variety of pieces to start creating some papery layers. The papers I used were a mix of Crate Paper, My Minds Eye and Heidi Swapp in varying shades of grey, green with a touch of pinky-peach thrown in. I cut the papers into an assortment of shapes and sizes and arranged them so the patterns and shapes were more horizontally dominant. I also added a grey paper doiley to my stack, then placed my photos on top and used some fussy cut chevrons to help draw the viewer's eye to them.


To embellish my page I used a variety of pieces from a die cut pack I got from the Reject Shop; a D-lish Scraps flair; and a tiny little banner from the Crate Paper 'Confetti' chipboard sheet.


I also added the Webster's Pages I'm so fancy sticker; a small flower button from the Cocoa Vanilla Studio 'Free Spirit' collection; and some Heidi Swapp acetate hearts (I used my tiny attacher to secure them to the page). I used two different Cocoa Vanilla Studio alpha stickers for my title and then added some tiny splatters of black ink and I was done!


If you would like a look at the full contents of my kit, you can watch my kit reveal video here:


That's all from me today, I'll be back soon with another layout to share.
Until then, happy scrapping! X

Friday, 22 May 2020

Life is a Beautiful Mess | Cocoa Vanilla Studio


Hi everyone! Today I am sharing a layout I created during the Cocoa Vanilla Studio International Scrapbook Day celebration event. It was such an amazing weekend - full of fun, friendship, and of course, inspiration! I am so proud of our team and all the work they put into the event, and to hear how much everyone who took part enjoyed it, really made it all worthwhile.

So the layout I am sharing here was designed for Gwen's "Grab 5" challenge where we had to include - a chipboard element; a die cut title; a flair button; enamel dots; and something fussy cut. I decided to document this fabulous photo of my daughter being hit with holi powder that was taken by a lovely friend of mine who is a photographer. And what better to pair a splash of colour with, than the beautiful 'Bohemian Dream' collection?


Given the "arty" theme of this photograph, I decided the best approach would be to have some arty fun whilst I created it. I started with a sheet of white cardstock that I cut down to measure 11x11" with the intention of mounting it on patterned paper later on. I pulled out my gelatos (if you don't have gelatos you can substitute any sort of water soluble pastel or art crayon). I chose some colours that would match with the palette of the collection, and used them to create a very simple "scribbled" background in a rough square shape. I then used my fingertip and a baby wipe to blend the colours out. 


With my background work complete, I then turned my attention to creating some layers for behind my photo. I gathered some scraps of the Gypsy Heart and Dreamer papers and added them behind my photo, tucking in a yellow paper doily from my stash as well. I also added a tag that I cut and the you brighten my world tag sticker from the Accessory Sticker sheet, both tied with twine.

For the fussy cut element of my page, I couldn't go past using the stunning floral print from the collection - Abundant. I cut three pieces from the paper, tucking each of them under the edges of my photo to form a triangle around it. I also added the live a colourful life sticker along the bottom edge of the photo.


By now I needed to tick off a few other items from my criteria list, as I only had one in place so far. I grabbed a flair button from the Flair Button pack, adding it on top of the floral cluster to the left of photo. The next element I wanted to add was the chipboard element, so I chose a few pieces from the coordinating Chipboard Accent Sticker sheet - a couple of small hearts and the beautiful pink moth. 

For my title, I knew exactly what I wanted it to say, so I grabbed the 'Happiness' Die Cut Titles pack and chose the words life is beautiful. To complete my title I fussy cut a mess from one of the cards on the cut apart Boho Bits paper, then mounted all the words down along the right side of my photo.


I finished off my page with a scattering of sweet enamel shapes (hearts) and a splattering of some navy mist. I was so happy with how this pretty page turned out!

If you haven't joined the INSD group yet, you can find it on Facebook HERE. Despite the fact the challenges have now closed there are still lots of things you can access to inspire you - a free online class from Zoe (including a printable digital kit); process, live scrap and instructional videos from different members of the team; and plenty of layouts to see too.

Thanks so much for stopping by today so I could share this with you. Until next time, happy scrapping! X