Thursday 31 March 2022

Pocket Page AND a Travellers Notebook Page | Cocoa Vanilla Studio


Hi everyone,
Following on from my recent post with the mixed media layout I created for Cocoa Vanilla Studio using the 'No Limits' collection, I also created a companion pocket page to go alongside it using the same range. (You can see how they look side by side in the photo above.) 


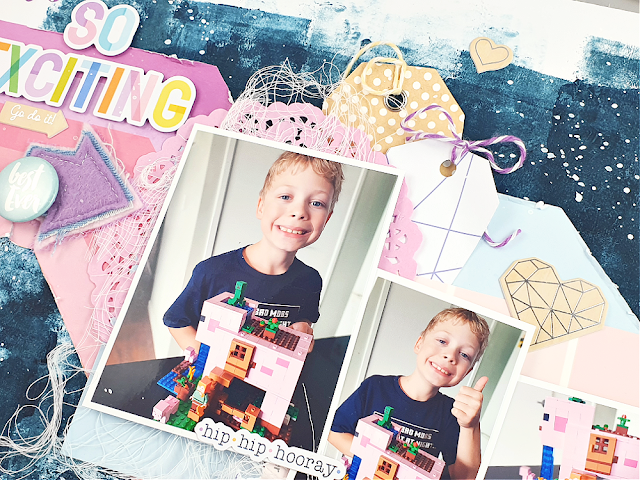
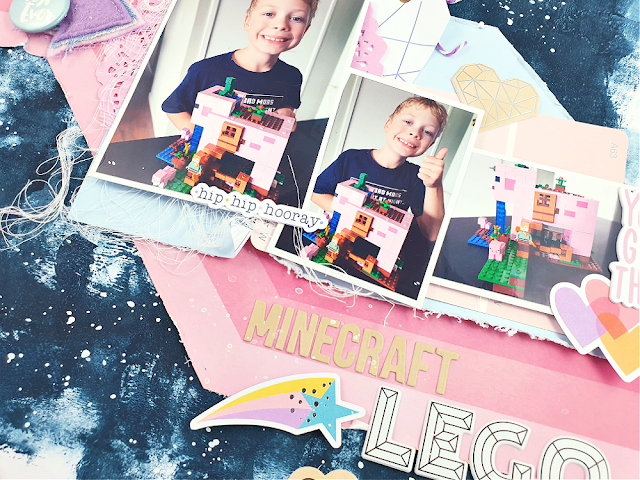
This pocket page was created to tell more of the story about my son helping his dad out in our garden. I love doing this style of page, as they not only give me the chance to record more details about a story, but also to get more photos off my camera roll and printed. 

The Cocoa Vanilla Studio 'No Limits' collection is not only perfect for documenting boys, but all kinds of adventures and moments. The fact that the range comes with Pocket Cards made it so quick and easy to put this layout together.

You can watch exactly how I did it in my process video:


If you haven't subscribed to my YouTube channel yet, I would love it if you did. I've been putting a lot of effort into creating and sharing scrapbook content so I can reach as many people as possible. (Any time you leave me a like or comment on my videos helps their reach so others can see them too.)

Here are the close-up images of my pocket page...


Before I go, I have one more quick and easy project to share. You may recall the traveller's notebook page of my son I shared recently? This is the page that I created on the other side of the spread in his book, which was also using the 'No Limits' collection...


A very quick and simple page, but another memory recorded in his book and that's what it's all about, right? 
If you want to see this one come together, you can watch my one minute video HERE

Thanks so much for stopping by today so I could share this with you. Until next time, happy scrapping!


Monday 21 March 2022

Hey Kid | Cocoa Vanilla Studio


Hi everyone, today I have another project using the awesome new 'No Limits' collection from Cocoa Vanilla Studio. (Loving this collection SO much!) This layout features a photo of my hubby and one of my sons that I took while they were busy doing work in our garden recently. (This boy loves to help his Dad with projects in the yard!) I decided to use the wood grain print from the Big Bang patterned paper as my background for this page, as I thought it would work well for the outdoor theme.


You can see I have added some light mixed media layers to my background paper. I used a combination of acrylic paint, a stencil with ink, stamping, and splatters.

I used a mix of layered patterned papers for the focal area of my page that included Stardust, Orbit and Latitude and I used distressing, tearing and some frayed gauze to add texture. I also tucked in a paint sample card from my stash to help draw in the green on my sons hat, which I thought also worked well with the DIY that was happening on the day.


I used Die Cut Title words for my page title, but then used the always be your awesome self quote card from the Universal cut apart paper below it as a subtitle. Both of these were popped up from the page like my photo to create dimension and help them stand out from the background.


To embellish my layout I used lots of fussy cut stars from the gorgeous Nebula paper, which I combined with pieces from the Die Cut Ephemera pack and Accessory Sticker sheet.


I also added a few pieces from the Chipboard Sticker sheet which also provided some extra dimension.


Of course I couldn't help but include some of my favourite embellishment from this collection - those stunning Puffy Stickers. (Seriously, I wish I had a million of these things!)

If you would like to see how this layout came together, you can watch my process video here:


Thanks for stopping by today, I hope you are feeling inspired to use up those scraps on your desk! Until next time, happy scrapping. X

Sunday 20 March 2022

We Are Awesome | Mix It Up Monday hop


Hi everyone,
Today I am popping by with some images of a layout I created recently for the "Mix It Up Monday" creative hop. The premise of this hop was to take a traditional scrapbook sketch and "mix it up" using mixed media / stitching / texture, etc. 

This is the sketch by Rochelle Spears that we were all working with...


And here is my take on it, which I did in my "girly grunge" style...


I have a process video for this layout available which you can view here:


There is a linked list to all the videos from the hop participants in my video description on YouTube, so please click over to my channel if you'd like to follow along.

Here are a few close-up photos of my layout...


If you missed my previous post containing the announcement about my blog, please click HERE

That's all from me today, thanks for stopping by. Until next time, happy scrapping! X


Saturday 19 March 2022

** Announcement ** And a recent small project!

 Hi everyone,

Today I wanted to make an announcement with regard to my blog. It is no secret that the popularity of blogs is not what it once was, thanks to the explosion of other social media platforms such as Facebook, Instagram and YouTube. 

I, like so many other creators, have noticed a huge decline in the number of visitors to my blog as people migrate to other sources for creative inspiration. It is for this reason that I will be reducing the amount of content that I share on here. I simply can't keep up with writing long blog posts for every project when I am also trying to keep up with producing content for other platforms. Having said that, I WILL still post photos of my projects here, but if you are looking for more detail about those projects, or how I created them, I would recommend watching my YouTube videos (which I will also share here). I'm sorry to all those faithful followers who still rely on my blog to learn, or for more details about my work, but I hope you will understand.

Today I am going to share with you a recent project I created - a page for one of my sons in my traveller's notebook using the new Cocoa Vanilla Studio 'No Limits' collection...


If you haven't visited my YouTube channel before, please consider popping over and watching the video for this project. In only one minute I will show you how this page came together, and I hope you might also subscribe to my channel and have a look at some of my other longer process videos whilst you are there.


Thanks so much for stopping by today, I hope to see you on some of my other platforms linked below:


Until next time, happy scrapping! X

Thursday 10 March 2022

Good Things Ahead | January 2022 Hip Kit


Hi everyone! So excited to be sharing another new layout with you today using the January 2022 Hip Kit. This kit features a pretty Hip Kit Club exclusive collection called 'Kaleidoscope' and I have loved working with it so far. (And yes, I am a subscriber and I buy my kits.)

Today's layout was created for the Hip Kit Club weekly challenge which is hosted each week in the Hip Kit Club group on Facebook. You don't need to be a subscriber to join the group, nor do you need to use one of their kits to enter the challenge. This week the challenge is a sketch that looks like this...


And this is my take on it...


I couldn't resist scrapping these recent photos of my daughter. I don't seem to get many of her these days, so I grab them whenever I can. I printed them in black and white as it gave me the freedom to use anything from the kit without any colours clashing. 


I used a mix of three different Distress Oxides to add subtle blended colour to my cardstock, then I stamped over the top with a fourth colour.
I used a mix of papers to add torn pieces along the top and bottom edges of my layout, then another piece from the same paper to define the focal area of my page. I also cut some tags from patterned  paper that were tucked into my layers under the photos.


I used a variety of pieces from the ephemera pack and the chipboard stickers to embellish my page. I also mixed in a number of items from my stash including a Charms Creations handmade heart, a small resin heart / rainbow; a flair from Cocoa Vanilla Studio; and some really pretty washi tape. 


I actually impressed myself with how accurately I was able to represent the sketch. (Usually when I do sketch challenges they end up looking nothing like the sketch!)


If you love this layout and would like to see how it came together (or even if you are just curious about how I did it), then make sure you watch my process video:


If you like what you see over on my YouTube channel, I would appreciate it if you gave my video a thumbs up and subscribed to my channel. 
Hopefully I'll be back soon with another project to share. Until then, happy scrapping! X

Monday 7 March 2022

So Epic | Cocoa Vanilla Studio


Hi everyone,

Today I am popping in to share my latest design team layout for Cocoa Vanilla Studio which was inspired by this month's mood board challenge. The mood board is called "Explore and Discover" and it looks like this...


My initial inspiration came from the painted image in the top left, which made me decide to create a mixed media layout. And of course I chose to use the new 'No Limits' collection, because it is freakin' amazing!


I chose to mainly focus on the yellow, blue and black tones from the mood board for my layout. I used a bright yellow Distress Oxide for my painted background to tie in with the photos of my son and his cube that I was documenting. I also added navy blue stencilling, black stamping and some torn washi tape too.


I added layers of patterned paper behind my photos, as well as a yellow paper doily and some frayed gauze.


I used a mix of Die Cut Ephemera and Accessory Stickers as the basis of my embellishment clusters. I also used a mix of stars that were fussy cut from the Nebula paper. These pieces all tied in with the stars from the mood board. I added foam tape under some of the pieces for dimension.


I used words from the Die Cut Titles pack for my page title. These were also raised up from the background using foam tape.


I added three small buttons from the Wood Buttons pack and then scattered some of the amazing (my fave!) Puffy Stickers around the page to finish off.

If you would like to see how this layout came together, or want more details, you can watch my process video below:


That's all from me today, I hope I have inspired you to play along with this month's Cocoa Vanilla Studio challenge. There is a $25 store voucher up for grabs for one randomly chosen winner, and you can enter via the Cocoa Vanilla Studio Community group HERE

Until next time, happy scrapping! X

Friday 4 March 2022

Minecraft Lego | January 2022 Hip Kit


Hi everyone! So excited to be sharing another new layout with you today, and this one is using the January 2022 Hip Kit. This kit features a Hip Kit Club exclusive collection called 'Kaleidoscope' and it is really pretty! (If you want to see exactly what is in the kit, you can watch my unboxing video HERE)

Here is my layout...


For this page, I was documenting some photos of one of my boys with his Minecraft Lego. He was so excited to get this as it combines two of his favourite things. One of his other favourite things at the moment is the colour pink, so I wanted to make sure I got plenty of pink on this page for him. 


My mixed media background was created using acrylic paint applied with a brayer over plain white cardstock. The white dots are splatters of Dylusions ink spray.
I challenged myself to use only one patterned paper from the kit and chose this one with a bold striped pattern. I fussy cut part of the pattern and that formed the base for the design of this page.


I used a mix of the exclusive Hip Kit 'Kaleidoscope' embellishments from the kit including faux wood veneer chipboard stickers; die cut ephemera and chipboard stickers. I also added a few items from my stash, as I had gathered together a selection of coordinating pieces prior to starting my page. These included a Charms Creations arrow, paint sample card and enamel dots, amongst others.


I love mixed font titles, so I chose some small Pinkfresh Studio alpha stickers to mix with the larger puffy geo print alphas from the kit.


If you would like to watch me create this layout and hear me talk more about it, you can watch my process video below:


That's all from me today, thanks for stopping by. Until next time, happy scrapping! X