Showing posts with label birthday. Show all posts

Wednesday, 28 October 2020

Super Totally Rad | Cocoa Vanilla Studio


Hi everyone!
I've got a bit of a catch-up project to share today as it seems during my recent focus on the 'Daydream' collection from Cocoa Vanilla Studio, that I overlooked sharing this page. Prior to the arrival of the new collection, my fellow design team members and I were all busy doing some stash-busting. So I decided to have a dig into my own stash and see what I could find to use up. I finally settled on the 'Totally Rad' collection
For those of you who have been Cocoa Vanilla fans for a long time, you might have some of this hiding in your stash too? And for everyone else who missed this range the first time around, you can now purchase it as a digital collection HERE

Here is my layout "Super Totally Rad"...


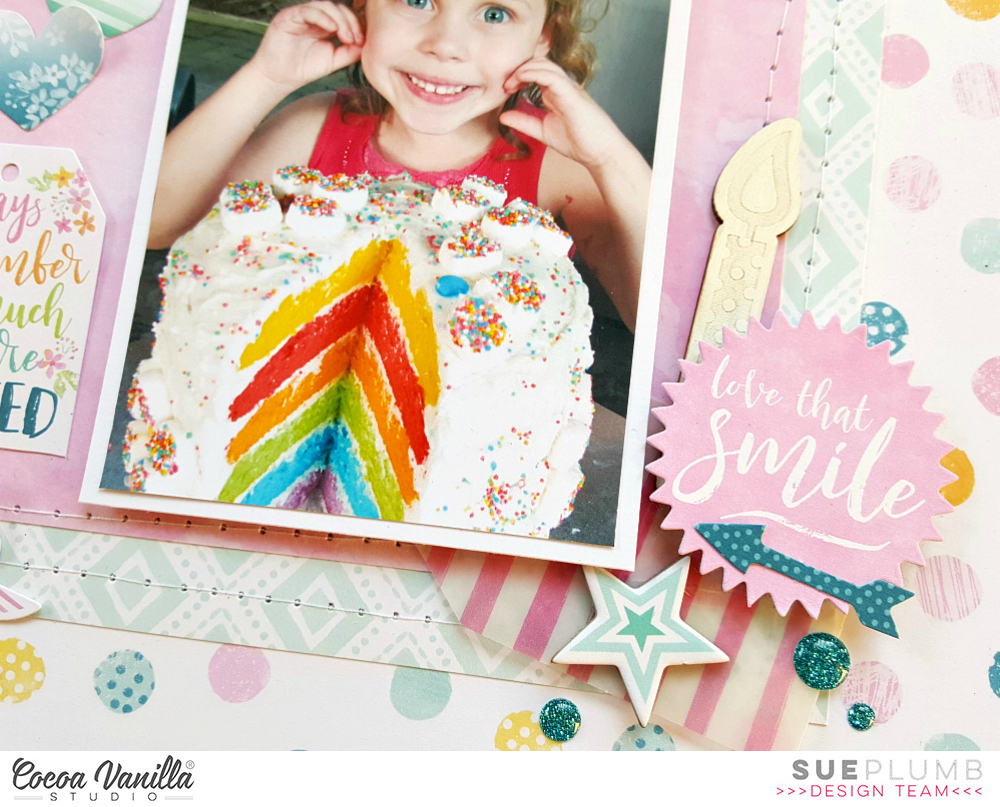
When it came to the background, I was limited with paper choices so I chose to use the sun burst style pattern on the Good Times paper from the 'Boys Rule' collection instead. I had a couple of photos from my boys 8th birthday a couple of months ago, and I thought the colours of the cake would make it a fun subject to pair with the colourful 'Totally Rad' collection.


 Based on the limited paper I had left to work with, I decided to go with a vertical design using a piece of the cute camera print Happy Snaps paper for the focal area of my page. Alongside that, I added a strip of the yellow chevron print which was the reverse side of the cameras. I also added a second strip of the chevrons along he right edge of my page. Because the photos I was working with were different orientations, I wanted to keep them contained on the vertical strip of paper and then fill around them.


The key to keeping this busy design cohesive, was to ensure that all the different elements I planned to use needed to be touching each other. This cascading arrangement meant that the viewer's eye was automatically drawn down through the design. I used a mix of die cut ephemera pieces, as well as pieces that I had fussy cut from the Mix Tape cut apart sheet. I also used a flair button and some enamel shapes.


I am not a huge fan of symmetry in my work, so to balance out how heavy my design was along the central line of the page, I added a small embellishment cluster in the bottom right corner of my page, along with my hand written journalling.


I finished off with some black ink splatters and by stamping the phrase happy birthday to you a few times around the page. I am really happy with the clean simplicity of this page, but also with the fact I got to bust some stash and re-visit a collection that I loved.

Thanks so much for stopping by today. Until next time, happy scrapping! X

Wednesday, 17 June 2020

Lucky You | Dust It Off Challenge | May Homemade Kit


Hi everyone! Today I am back to share another layout using my May homemade kit, and yes, it's another birthday layout! My wonderful hubby recently celebrated his birthday (just a quiet one at home), so I took the opportunity to snap a couple of photos of him with the kids when he sat down to open his presents.  

Here is my layout, "Lucky You"...
(Click on photos for a better view)


Besides creating a birthday page (so I could tap into some of the celebration themed embellishments in the kit), the only other idea I started this layout with was to use one of the sheets of Kraft cardstock I had included. (Yes, Tam Buckler - I used the Kraft!) I figured the best way to tackle the Kraft cardstock was by using the acrylic paints that were also in my kit. 


I used a spatula to smear some white, aqua and metallic gold paints randomly around my page, leaving some parts a little "chunky" for added texture, and then left my page to dry overnight. 
Once dry, I added some stencilled detail to the background using the Crazy Quilts Calm & Frenzy stencil from StencilGirl that I had included in my kit. I used a sponge dauber and some grey ink to add subtle depth, then I also added a little bit of stamping using black ink and my fave Doodle Dots stamp from Viva Las VegaStamps


I then began creating some papery layers, starting with a printed paper bag from my stash (it wasn't included in the kit but sometimes you have to take a little creative license, right?) It featured a gorgeous triangular pattern in shades of blue and I decided I had hoarded it for way too long! In addition to the paper bag, I decided to use tags instead of patterned paper on this page as this was also one of the items in the kit. I used a large foiled Kraft tag from Heidi Swapp, as well as some smaller printed tags from Rosie's Studio and Pretty Little Studio and tied the tops of each one using different coloured twines. 


To draw in some more gold onto the page and add extra interest to my layers under my photos, I also added a gold foiled chipboard frame from Crate Paper. Then, once my photos were in place it was simply a matter of adding my embellishments.
From the Crate Paper 'Confetti' chipboard sheet I used the large aqua balloon and the gold bow. From the Vicki Boutin 'Color Kaleidoscope' Thickers, I used the small memories tab, the circular arrow piece, the you are loved label, and the super cute teal bunting (which I cut into two pieces and placed either side of my bottom photo).


I also used a D-lish Scraps flair button; phrase stickers from a Simple Stories Carpe Diem sticker pack; a puffy heart sticker; and then finished off with the fabulous Studio Calico gold chipboard asterisks that I scattered around the page. Some quick handwritten journalling details and a stamped date and I was done!
So what do you think? Did I do the Kraft cardstock justice? 

Thanks so much for stopping by today so I could share this with you. Until next time, happy scrapping! X

Saturday, 13 June 2020

Hooray | Dust it Off challenge | May Homemade Kit


Hi friends! I am back again today with another layout using my May homemade kit. (Yes, I know it's June but May totally got away from me with the kids at home, and I am determined to use this kit I put together!) For this layout I decided to focus on the 12x12" chipboard sheet I had added into my kit, which was from the 'Confetti' collection by Crate Paper and scrap a birthday themed page. As my daughter recently celebrated her 12th birthday, I had some fresh photos and thought I would document a couple of her with her birthday cake. 


One of the other items in the kit was acrylic paints, so I thought I would put them to work and create a quick background with them. Using a sheet of white cardstock and my brayer, I simply rolled on some paint working from top to bottom and allowing the paint to fade away naturally towards the bottom of the page. The colours I used were a Mont Marte Dimensional paint in 'Naples Yellow' (these are beautiful full bodied paints); and 'Aquamarine Dream' Flutter Colour paint mixed with some Naples Yellow to get that gorgeous sage green. I then allowed my paint to dry naturally whilst I started working on my layers. 


I gathered together a variety of Crate Paper patterned paper scraps from my kit and layered them up with a small paper doily to form the matt for my photos. I also added a little frayed gauze on top then stapled the whole stack to my page. 


To embellish my layout I used some stickers from a small Webster's Pages sticker sheet that had a celebration theme, which I tucked into my layers above my photos. I also used a few pieces from the Crate Paper 'Confetti' chipboard sheet, including the candles, small heart, and the numbers for my daughter's age.


To the left of my photos I used a handmade chevron embellishment from Charms Creations, which I topped with the big smile phrase from the chipboard sheet. To the cluster on the right side I also added a flair button from Cocoa Vanilla Studio and a printed acetate heart from Heidi Swapp.


To finish off my page I used the vellum hooray title from the 'Confetti' ephemera pack; a couple of die cut butterflies from my Reject Shop ephemera pack; a fussy cut butterfly; and some small Carpe Diem tiny phrase stickers. I then stamped the date and a few tiny black ink splatters.

I love how this birthday themed layout came together and the fact I got to use up some things that I have been hoarding for FAR too long! 
Thanks for stopping by today so I could share this with you. Until next time, happy scrapping! X

Thursday, 1 August 2019

Happy Day | Cocoa Vanilla Studio


Hi everyone! Today I am sharing a mixed media layout I created recently for Cocoa Vanilla Studio to document my daughter's 11th birthday. I used the gorgeous 'Happiness' collection for this one, because when you are 11, birthdays ARE pure happiness - right?!


I started my page with the gorgeous indigo colour on the reverse side of the Botanical Bliss paper as my background. I adore this colour, as well as the random marked pattern of the paper. I wanted to create a contrasting focal area for my page, so used some pale pink acrylic paint that I applied roughly with a silicone spatula.


Once the paint was dry it was time to add some papery layers. I used a variety of pieces - the black and white heart print on the reverse of the So Fresh paper; the gorgeous tiny floral of the Meadow paper; and a little scrap of the Good Vibes paper that I had previously punched some hearts from.


Included in my layers was also a beautiful Cocoa Vanilla floral cut file - this one was from the Colour Me Happy cut file set and was cut from white cardstock. This provided a great contrast against the dark background.

I also added a section of the beautiful wreath design that I had fussy cut from the So Fresh paper, which I tucked under the bottom left corner of my photos over the top of the cut file.


Amongst my layers I tucked in a couple of tickets from the Die Cut Ephemera pack as well as some extra floral pieces; then added a heart, butterfly and some of the small word / phrase stickers from the Accessory Sticker sheet.


Finally, I added three extra tiny blooms from the ephemera pack and a title using the words happy and day from the Cardstock Titles pack and I was done!


I am so happy with how this layout came together, and am still crushing on this stunning range!
Until next time, happy scrapping! X

Saturday, 22 October 2016

Wish | Cocoa Vanilla Studio

Hi everyone!
Popping in with another design team share for Cocoa Vanilla Studio today, but this one with a bit of a twist. This month Cocoa Vanilla are sponsoring the challenge at Creative Scrappers, so our design team were invited to play along too. We were sent a fabulous sketch designed by Kristine Davidson and asked to create a layout inspired by the sketch. (You can find the sketch and challenge details on the Creative Scrappers blog HERE)
Here is my layout...

"Wish"

I used the new release Make a Wish collection for this layout. (I know I have used it quite a bit lately, but it's so fun and easy to use - I am loving it!)

I started with a sheet of the gorgeous dainty floral print Daydream paper as the base for my layout, which I topped with a piece of the pink watercolour print from Hip Hooray. I then created a mat for my photos using the pink polka dot Party Mix paper, which I complimented with some extra pieces cut from the Fresh Cut floral paper. I also added a paper doily and a tab from the accessory sticker sheet into the layers under my photos.


As I had altered the sketch and decided to work with only two photos, I used the oh yeah piece from the cut apart Party Mix paper to fill the remaining space alongside my photos. Below that, I placed a tag from the die cut ephemera pack, which I tied with some cotton twine and used for my journaling. This was layered with a wood veneer birthday cake, and a couple of stars from the ephemera pack. To add to the fun feel of this layout, I also added a party hat from the wood veneer pack above one of the photos.


To tie in with the wood elements I had already used, and to also help balance my design; I used the wish word from the wood veneer pack as my layout title and then some phrase stickers from the accessory sticker sheet to support it. I also embellished directly onto my photos - using a large star die cut and a word banner sticker.


To finish off my layout, I added a few sparkles enamel dots dotted around the page, and some stamping using a happy birthday phrase stamp.


Thanks for stopping by today. Don't forget if you would like to play along with this challenge and be in with a chance of winning yourself a Cocoa Vanilla prize, you can visit the Creative Scrappers blog HERE for all the details. (We would love to see you all joining in with some Cocoa Vanilla creations!)

Til next time, happy scrapping! X

Thursday, 8 September 2016

Smile, Make a Wish & Celebrate You | Cocoa Vanilla Studio

Hi everyone!
Just popping in today to share my latest layout using the absolutely gorgeous Make a Wish collection from Cocoa Vanilla Studio. There is just so much to love about this collection, but the stand out piece for me is the stunning 'Fresh Cut' watercolour floral paper. It's so beautiful!
Given that this is a birthday themed collection, I couldn't resist scrapping a birthday photo of my little miss, although the layout I created could have worked equally well for a non-birthday picture too.


I first wanted to create a contrasting space to place my photo and embellishments, so I cut a piece from the B-side of the 'Party Dots' paper and stitched it in place on top of my base paper, leaving a wide border so plenty of the floral print could still be seen. I also rubbed a little gesso on where I knew my embellishments were going to be.


I then created a layered mat for my photo using more of the 'Fresh Cut' paper, and also both sides of the 'Daydream' paper. The word smile came from the 'Party Mix' cut apart paper and I used it as part of my title. I indicated the start of my title using the sweet floral print arrow from the chipboard sticker sheet, and used the chipboard make a wish as the second part of my title. (I love combining different elements to create titles.)


With the use of that gorgeous paper, I decided to go "full floral" and use the coordinating die cut ephemera and vellum accent pieces from the range. I layered them together and created dimension by popping some up using foam tape. I also folded the leaves up away from the page, just as I did with the butterfly wings.


I love the dimension the chipboard stickers add to a page too. You can see how I used one of the frames under my photo to help accentuate it. I simply cut the frame in half and tucked it behind each side of my photo. I then highlighted my photo further by adding two chipboard photo corners. A few blue Sparkles enamel dots helped add some small pops of contrast to my page too.


Thanks for stopping by today so I could share this with you.
Be sure to stay connected to the Cocoa Vanilla Studio blog; Facebook page; Instagram account and the Community group to keep up with all the latest Cocoa Vanilla news, inspiration and events.
Til next time, happy scrapping! X

Tuesday, 23 August 2016

Hip Hip Hooray | Cocoa Vanilla Studio

Hi everyone!
I am so excited to pop in and share my first layout with the brand new Make a Wish collection from Cocoa Vanilla Studio!

Although this collection is birthday themed, as with most of Cocoa Vanilla's collections, it is very versatile and could be used for all sorts of projects. I couldn't resist going with a birthday layout though, featuring some photos of my daughter on her 5th birthday. At her request, I made her a layered rainbow cake and the look of joy on her face when she saw those colours made every moment I spent in the kitchen totally worthwhile.


As always when I work with any new collection, I didn't know where to start as there are just so many gorgeous things to choose from! I decided on layered design for my background so I could use multiple papers (Party Dots, Daydream and Hip Hooray). This design also allowed me to create a central area to contain my multiple photos and embellishments, leaving the surrounding space free to form a border. I also added some rough machine stitching for some subtle texture.


I mounted my photos to help them pop from the page, then set about adding my embellishments. In the top left corner I added one of the wood veneer pieces (which I coloured lightly using a Posca pen); a couple of pieces from the die cut ephemera pack and a few of the Sparkles enamel dots. I also added a Puffy Sticker and one of the small phrase stickers from the Accessory Stickers sheet directly onto my photo.


In the top right corner of my focal area, I added the "hip hip hooray" title card from the Party Mix cut apart sheet. On top of it I created a cluster containing ephemera pieces; a puffy sticker; wood veneer party hat and a chipboard sticker. (Everything is so cute I couldn't stop. I just wanted to add ALL. THE. THINGS. haha)


In the bottom right corner, yet another embellishment cluster. I used many of the same things (ephemera, wood veneer, chipboard sticker, enamel dots), but this time I layered them all on top of one of the gorgeous Vellum Accents - this one a striped tag.


More die cut ephemera here - I couldn't resist this beautiful little tag. The colours of the writing reminded me of the layers in the cake and the sentiment was perfect too!

I have to say, I am totally in LOVE with this collection! The colours, the styling, the embellishments - everything coordinates so effortlessly, it really is a joy to create with!


Don't forget that Make a Wish is not yet available, but is due to start shipping to retailers on the 9th September so keep an eye out for it at your favourite store next month!
Until next time, happy scrapping! X