Showing posts with label painting. Show all posts

Friday, 12 March 2021

Enchanted Garden painting | StencilGirl


Hi everyone!
Popping in today to share my latest project for the StencilGirl® Creative Team. For today's project I was tasked with the theme "Pastiche". If you haven't been following the team projects that have come before me, then you may not be familiar with the term? Simply put, a pastiche is a work of visual art, literature, theatre, or music that imitates the style or character of the work of one or more other artists. Unlike parody, pastiche celebrates, rather than mocks, the work it imitates.

I began by choosing the work of an artist whose work I find not only beautiful, but also incredibly inspiring. Being Australian, I couldn't go past picking a fellow Aussie, so the artist I chose was Clair Bremner. Clair creates paintings that are inspired by nature, and she uses an amazing combination of both colour and form to translate the things she sees into stunning works of art. I had long wanted to try working in Clair's style, so this provided me the perfect opportunity.

Here's a sample of Clair's work from her online gallery so you can see her style...

I chose this example of Clair's work, as I decided to use a similar colour palette and materials. I chose watercolour paper for my substrate (A3 size), and like Clair, I worked with acrylics.

Here's my piece, I entitled "Enchanted Garden"...


 I used a combination of brayer, silicone spatula, and brush to apply my base colours to the page. I worked in a random fashion, but unlike Clair's piece, I left some white space as I like the balance between busy and clean. 


With the base colours down on the page, it was then time to begin building the layers. The fist stencil I chose was Bouquet Greenery by Wendy Brightbill. This 9x12" stencil features large leafy branches, which I thought would work for trees in the scale I was working in. I used Naples Yellow paint from Monte Marte to provide a contrast to the background colours, and applied the paint using a stippling technique with a brush.


Next, I moved onto some Dusky Pink paint and the Playful Petals stencil designed by Jennifer Evans. I masked off a small section of the stencil and used the same stippling technique to add some groups of petals that I thought would make great bushes. 


At this point I felt my painting needed a little more "light", so I chose white paint for my next layer. The stencil I used was June Pfaff Daly's Inspired by Frida stencil. Once again, I masked off a small section of the stencil, this time a leafy branch, and used it to add some branches into my layers, making sure to overlap them with other portions of my design to help add depth to the piece. 


While I was using the white paint, I also added some sweet little fern branches in the foreground using the Maidenhair Fern stencil by Rae Missigman. I adore the whimsical style of the fern branches on this stencil, and thought it was perfect as part of my tribute to Clair's work. 

The final stencil I used was the super cute Daisies 6 by Terri Stegmiller. In order to be able to be very controlled with my placement, I masked off a single daisy and used Marine (a very dark blue) to add a few flowers around the page. (Because this stencil design was a little more delicate, I simply painted through the stencil with a small flat brush rather than stippled with the larger brush.)


Once all the painted layers were in place, I used a black Sharpie, white Sharpie and a Stabilo All pencil to add the finishing touches to my page. This was simply a case of adding a combination of small mark and lines over the top of the paint. (Make sure the paint is totally dry before doing this, or you will completely ruin the tip of your pens!)

I am so happy with how this piece turned out, and I really hope I did justice to Clair's amazing style. You can view more of Clair's work on her website: http://www.clairbremnerart.com/

If you would like to watch me create this painting, I have a video of my process available:


Thanks so much for stopping by today so I could share this with you. Until next time, happy creating! X

Wednesday, 5 June 2019

Embrace Your Flaws | StencilGirl®


Hi everyone!
I was thrilled to recently share my first official project created for the StencilGirl® Creative Team over on the StencilGirl® blog . I was tasked with the theme of "an abstract or summer artwork". Both of these sounded fun to me, so I was torn between the two. My answer? Combine aspects of both themes into a single project!

I began my artwork by gathering a variety of papers to create a collaged background - book paper, music paper and tissue paper; and tore them into pieces. Working on an A4 sized piece of 270 gsm cardstock, I adhered them randomly around the page using matte gel medium. The collage provides an interesting background to work over, adding extra depth and texture to the piece.


Now it was time for colour! When I think of summer I picture the tropics. Lush greenery, brightly coloured flowers, and the sun shining down. I decided to translate this imagery into my piece by using bright acrylic paints. I chose warm tones to start - pinks, orange and yellow - and applied the paint using a silicone spatula in an entirely random fashion. 


With my abstract colour layer complete, it was time to think about the composition of my piece. I wanted to introduce some of the imagery that came to my mind when I thought of summer. I started with the Dream of Palms Mask to begin building my foreground layers. I applied green acrylic paint using a sponge in the diagonally opposing corners. 


To build further on the foreground, I applied a darker shade of green paint with my spatula around some of the edges of the page.


After the paint had dried, it was time to switch to ink to further build my layers. I selected the Floral Mandala Lace stencil, as it had a section I thought would add some interesting detail to my piece. 

Using only a selected area of a stencil, rather than the image as whole, is something I often do when creating artwork like this. It also influences my choice when purchasing stencils; as I find smaller details within larger designs that I know will give me more value from my stencils.


I used a sponge to apply teal ink through the section of my stencil; layering it over the green paint to mimic the foliage of my summer-inspired lush greenery.

I then repeated the same process, this time masking off a single image from the Blades stencil to represent a flower; which I stencilled several times on my piece. 


Now it was time for a focal image for my artwork. I had a printed paper napkin that featured beautiful coloured parrots on it that I thought would be ideal for my tropical inspired piece. (I have some of these available for sale in my mixed napkin bundle on my Facebook page - just click on the "shop" button to find them.) I carefully cut around the larger parrot and a few of the leaves before separating them from the backing layer.

To ensure that the image was not lost against the background, I lightly sponged some white acrylic paint onto the page where the parrot's head would be. I also sponged some randomly over several areas in the centre of my page, just to strip back a little of the colour.


The parrot and leaves were then adhered to the page using matte gel medium.
To add further depth and variation to the foreground, I used a small paintbrush to add some teal paint amongst the foliage.


At this point the page was all quite flat and needed some dimension to help lift it. I chose the Heartfelt stencil, as it had some leaf shapes I wanted to use to finish off the foliage. 


I masked off the first leaf I wanted to use and applied Colour Blast 'Envy' Colour Paste through the stencil using a palette knife. I repeated the same leaf several times on each of the foliage areas before drying it off with a heat gun.

I then repeated the process with the other leaf design and 'Apple of My Eye' Colour Paste, layering it over the other paste before again drying it off with a heat gun.


From the same stencil, I was also drawn to the cluster of abstract style flowers and decided to use this shape to add further textured detail and some contrast in colour using Colour Blast Lovely Lilac Colour Paste. I repeated the same flowers on three separate areas of my piece. 


After the lilac paste had dried I could see the piece needed some shadowing to help bring the focal image to the front. I used a water soluble pencil to draw around the outline of the parrot, then blended it out with water. 

I also added some stamped detail using my fave Doodle Dots stamp from Viva Las VegaStamps to the background using black ink, which helped to tie in the black from the shadow outline.


At this point I wanted to add some extra stencilled detail to help lighten the piece and tie it all together. I used the Organized Chaos stencil and white acrylic paint to sponge some random spots over the top. 


To finish off, I felt it needed some text, so I added the large embrace your flaws quote and the two smaller phrase stickers from Flutterby Designs. I also added some hand drawn scribbles with black pencil.


I am so happy with the result of this piece - all the bright colours and layers just make my heart sing! 


Despite my love for this piece, I decided that keeping it for myself wasn't the best use of it. Anita from Flutterby Designs will be running a charity art auction at her annual "Create by the Lake" retreat next month to raise funds for 'United in Compassion'. This Australian organisation advocate on behalf of cancer patients for better access to medicinal cannabis as an alternative therapy to alleviate their suffering. 

Here is my finished framed piece, which has been passed onto Anita to be auctioned and will hopefully raise some funds for this very worthy cause. (If you are attending the retreat, you will have a chance to bid on it - please help my piece go to a good home!) 


The Flutterby Designs "Create by the Lake" retreat is being held from the 18th - 21st of July at Lake Keepit Sport & Rec Centre in Gunnedah, New South Wales. If you have never been before, do yourself a favour and go! It's a super fun weekend with lots of like-minded people. (And at the time of writing this, there are only 3 spots remaining!) Click on the event page HERE for all the info.

If you love the stencils I used in this piece, they are available to purchase direct from the StencilGirl® website or you can contact your favourite crafty retailer to enquire. 

Thanks for stopping by so I could share this with you. Until next time, happy creating! X

Friday, 31 May 2019

Together featuring Uniquely Creative watercolour paints


Hi everyone!
(I know, back again so soon!) Today I wanted to pop in and share a layout I created "just because". After finishing up with the Colour Blast design team recently, I have found myself with a little extra creative time and more freedom to use different products, so I decided to dig into my stash and pull out one of my neglected supplies - my watercolour paint set from Uniquely Creative.


I was lucky enough to receive this sweet little set of paints when I did guest designer spot for Uniquely Creative and since that time they have remained largely untouched. I hate having under-used supplies hanging around so I decide to take them out and put them to use. 
I started by swatching them onto some watercolour paper, which I then adhered inside the lid of the tin for easy reference.


With that out of the way, it was time to put them through their paces on a larger scale so I grabbed a piece of cardstock and sat down to play. I had no plan, so I just painted an abstract background. Once it was dry I added some stamping over the top using a cool stamp from Carabelle Studio.


I then added some small pieces of torn washi tape before adding my photo strip. (How did I forget about these photos of Fiona Paltridge and I from a couple of years ago? What a crazy pair we make when we get together - which unfortunately is not often enough!)


I kept the remainder of my supplies very simple to embellish my page - a pack of die cut ephemera purchased from Aldi (yes, Aldi and only $2!) and some messy white cotton thread. 


I finished off my page with a few black splatters and a simple line of journalling using a Sharpie. I guess you could call this one a "budget" page - it took only limited supplies AND time - winning! 

Here's my finished layout...


I was really happy how these paints performed and will definitely be using them more often now! I checked the Uniquely Creative website and although this exact set of colours is no longer available, there is a 2019 palette available HERE (and very reasonably priced too - I might be needing that one next I think!)
Until next time, happy scrapping! X

Sunday, 10 March 2019

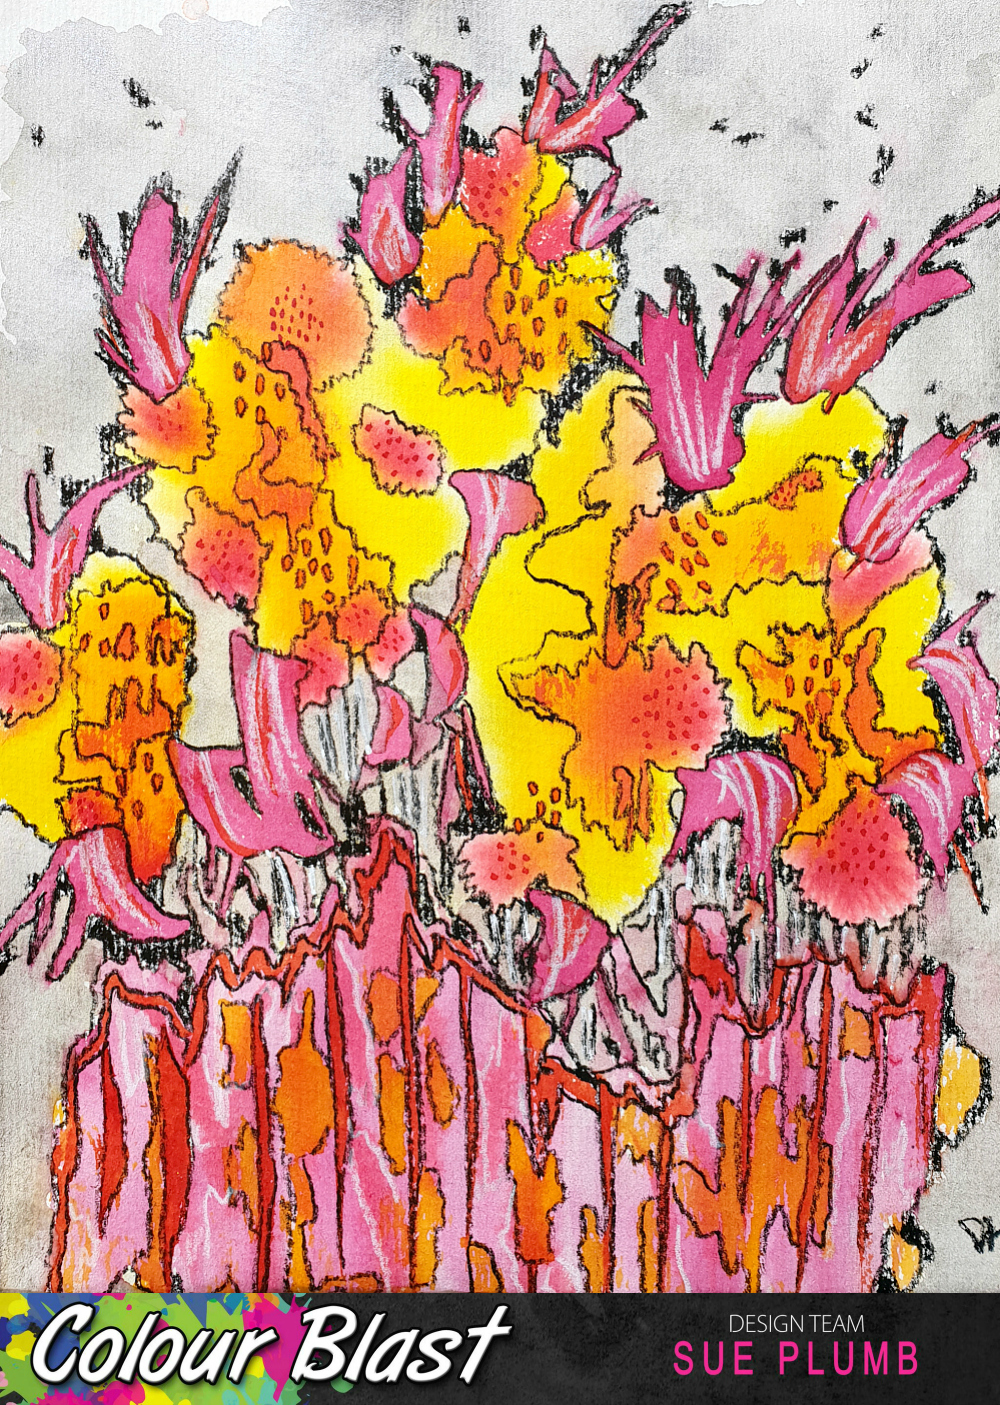
Abstract Floral painting | Colour Blast


Hi everyone!
Popping in today to share a Colour Blast design team project with you. Today I have something a bit different - an abstract floral painting I created using Colour Artist Inks. 

This painting came about one day when I was having a bad day. I felt like losing myself in something creative, but just wasn't sure what I wanted to do. As I was sitting and looking out the window, I was staring at some flowering bushes over the fence in my neighbours yard. That was enough inspiration to get me started, so I pulled out a sheet of watercolour paper to see what would come out.

The result was an abstract floral painting, inspired by the colours and shapes of my neighbours plants...


I took photos along the way to document my process so I could share it. These are the supplies I started with - a sheet of watercolour paper and a range of Colour Artist Inks in warm tones (Slipper, Cranberry, Sunburnt, Citrus, Cider, Barley, and Spice.)


I started my misting my paper lightly with a water spray bottle to make it a little wet, to help the inks to wick out as they hit the paper. 
I began with the lightest tone - Citrus as my base, and then built on it from there; adding some smaller areas of Cider over the top; then smaller again with Cranberry. I used a small round brush and a gentle dabbing motion to apply the ink to the page, allowing the paper to naturally draw the colour from the brush.


You can see in the close up below how the inks wick out with the use of the water (bleed / spread across the page) and then in the second shot below how they look once they had dried.


Once the base colours had dried, I again used my small round brush, but this time used a sweeping stroke to apply some of the pink Slipper ink to the page. As these are dye based inks, they will reactivate and blend when wet, so I added the strokes into the spaces around and between the other colours.


I then allowed the Slipper ink to dry completely before adding more detail. The next colour I used was Sunburnt - used to apply the narrower sweeping strokes over the Slipper ink and the clusters of small dots. I used Spice to apply the small, short strokes. 


Now it was time to add my "fence" to the bottom section of the page. I used Slipper for the base colour, then Sunburnt and Cider for the detail and highlights over the top.


With all the inks in place, I left the page to completely dry before colouring in the background. I wanted a soft tone so as not to draw away from the focus of the picture, so I used Stormy Weather Colour Shimmer Spray (a nice soft, shimmery grey) and simply dipped my small brush into the bottle and painted in the remaining blank area of the page. I took care not to overlap any of the inked areas so as not to muddy the colours.


Once the background was dry, it was time to add the final details. I used my Stabilo All pencils (black and white) to draw in the detail over the top.


I started with the black pencil, using it to trace the lines around and between the colours; following the naturally occurring lines formed by the inks. I also used the black pencil to colour in any remaining spots of white around the edges, between the flowers and also on the background.


To finish off, I added a few highlights with the white pencil.


(I was so happy with the result of this painting that I even framed it!)


And there you have it - a fun, simple project that you can try yourself with very few supplies. You don't need any particular artistic talent to be able to create a project like this, just play with your supplies and see what comes out.
Until next time, happy creating! X

Saturday, 22 December 2018

Stamped Bookmarks and Notebook | Viva Las VegaStamps


Hi everyone!
Popping in today share a Viva Las VegaStamps design team project with you. As we head into Christmas, I thought it would be a good time to share a couple of simple appreciation gift ideas with you. There are always people in our lives that deserve a small token of our thanks - whether that be teachers, neighbours, friends, the mailman, or even the staff at the local store. So I decided to whip up some simple bookmarks and notebooks featuring some of my fave Banksy stamps to give out.

For the notebook, I started with a plain, kraft cover notebook (purchased from Kmart). I used Dina Wakley acrylic paints, applied with a brayer and layered randomly to add some colour. I then took the recently released Victorian Flower Background and used it to stamp a border around 3 sides of the cover.


Next, I chose the fabulous Banksy Wall Singer for my feature image on the cover, before I also stamped the Banksy Life is Beautiful as the accompanying text. I love how it turned out! I paired it with a pen before wrapping it up.


After I created the notebook, I decided to re-visit a project I have created previously and shared here - bookmarks. (You can find my original watercolour bookmark post HERE) This time however, I wanted to use a more minimalist style to showcase some cool Banksy stamps. 


I started by cutting some smooth white cardstock into strips measuring 2x8.5". I then stamped a focal Banksy image onto each one, and an accompanying quote as well. 
Here is a list of all the stamps I used on the bookmarks (as shown from left to right above):


I also stamped the back of each bookmark with the Banksy stamp.

Once they were all stamped, I used Faber-Castell gelatos to add a splash of colour to each one. I wanted to keep them minimal, so I only used a single colour on each one and left the focal images uncoloured.


I then took all the bookmarks and laminated them, trimming off the excess laminate with a trimmer.

I then punched a hole into each bookmark and added a variety of twine, tassels and a metal charm to decorate them.

  
I am so happy with how these turned out and cannot wait to gift them to their new owners! Thanks so much for stopping by so I could share this with you. I hope I have inspired you to create some special handmade appreciation gifts for the people in your lives too.
Until next time, happy scrapping! X

VLVS stamps used:
Banksy