Sunday 27 October 2019

Happy Days | Scrapping Clearly


Hi everyone!
I was so excited to be invited by the lovely Kylie to be this month's guest designer for Scrapping Clearly. For anyone who doesn't already know, Kylie's fabulous bricks and mortar store is located in Gundagai, New South Wales (Australia) and for those who can't make it to the store, she also has an extensive online store filled with products for both papercrafters and mixed media artists.

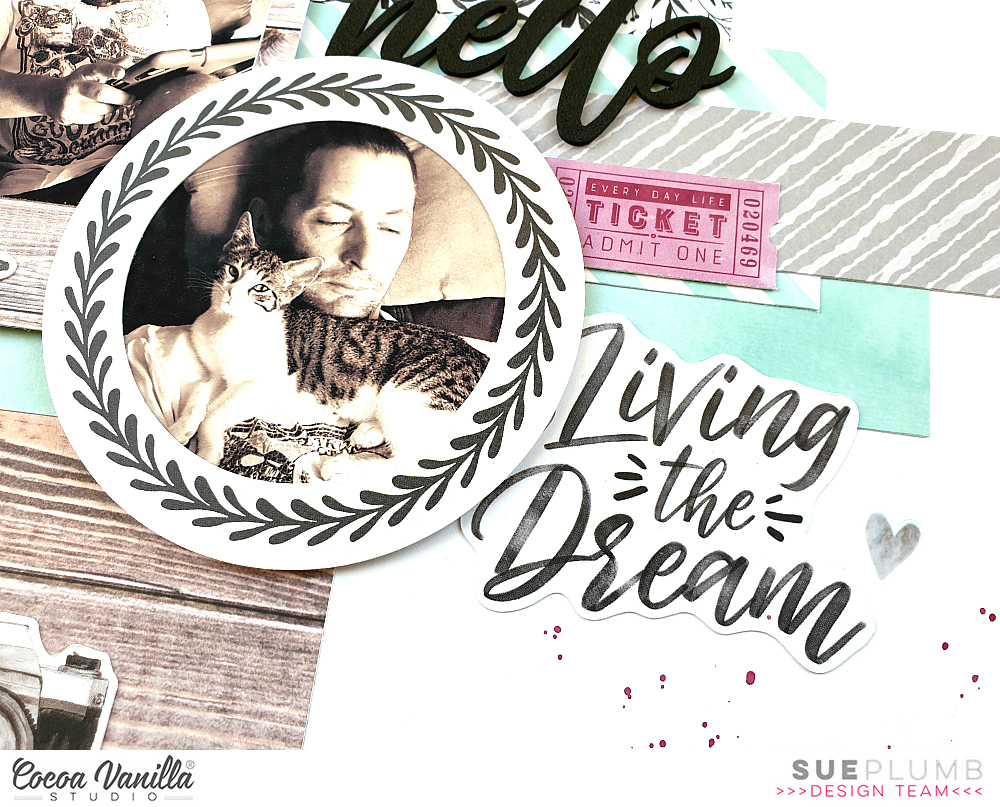
For my first project I thought I would start with what I know best - a 12x12" scrapbook layout to document some photos that were taken at the Cocoa Vanilla Studio retreat back in May.


I began my page with a sheet of Bazzill 'Marshmallow' Smooth Heavyweight cardstock; choosing the heavier weight cardstock because I was going to be applying a wet media to it to add some subtle watercolour detail to my background.

I started with Ranger 'Stormy Sky' and 'Tumbled Glass' Distress Oxide ink pads, which I swiped onto my non-stick craft then spritzed with water until large droplets had formed. I then used my fingertip to swirl the water through the inks, blending them together in a few places before laying the cardstock over the top and smoothing it down to absorb the ink.


I then set my background aside to dry whilst I turned my attention to the patterned papers. The ones I had chosen to work with were all from the gorgeous 13Arts 'Blue Magnolia' collection. I cut a large piece of the striped Evening Letters paper and added it to the right hand side of my page, leaving my watercolour work visible on the left side of the page.

Next, I added a small piece of teal paper for a mat for my photos. I used the reverse side of the Forever in My Heart paper from the Simple Stories Heart collection and then added my photos on top using some cardboard underneath to pop them up from the page. 


Now it was time for some fussy cutting! I took the Flowery Day paper (also from the 13Arts Blue Magnolia collection), which is full of gorgeous elements to cut out. I cut a few floral pieces and added them to my page with foam tape so that they formed a "visual triangle" around my photos. I also used black cotton thread in each cluster to add some soft texture to my page. 


In the bottom right corner I added a fussy cut branch with a sweet little bird perched on it; then three butterflies (also cut from the same sheet) which I placed to form a secondary visual triangle on my page.

For my title piece, I used the happy days die cut from the Pinkfresh Studio 'Boys Fort' Collection Ephemera Pack, which I also applied using foam tape for dimension.


Next, I added a simple doodled border using a black Fude Ball pen; a small strip of paper along the bottom edge to record the details about my photos; and finally, a scattering of black and white sequins from the Teresa Collins Urban Market Sequins. To finish off, I couldn't resist a few tiny black splatters of Indian Ink.

That's all from me today. If you haven't already checked out the Scrapping Clearly online store, pop over and have a look - there are LOTS of goodies to tempt you! And stay tuned, because I have a few more guest designer projects to share with you.
Until next time, happy scrapping! X

Friday 25 October 2019

Living the Dream | Cocoa Vanilla Studio


Hi everyone!
Popping in today to share a layout I created recently featuring the gorgeous 'Unforgettable' collection from Cocoa Vanilla Studio. For this page I wanted to document some sweet photos of my hubby and our cat that were taken when he was just a kitten. And with two males in the photos, I needed to put a masculine spin on it. (And yes, I think a pop of purple is perfectly acceptable for a masculine page!)


Starting with a white cardstock background, the first paper I was drawn to was the gorgeous wood grain print of the Natural Beauty paper. I am a huge fan of wood grain papers, and I have to say, I think this one is my favourite so far! The tones, the pattern of the grain - it's just perfect. I cut a large piece and placed it vertically on the left side of my page.


I overlaid the wood grain print with a piece of the minty green watercolour print paper from the 6x8" Paper Stack (in the 12x12" papers this is the reverse print of the Garland paper). I used a notebook style paper punch to punch the edge of it for extra interest. 

Then it was time to add some horizontal structure to my page. I used an extra piece of the same mint paper again; along with a piece of the black and white leafy print from the reverse side of the Natural Beauty paper; the grey stripe from the reverse of the Glorious paper; and the mint diagonal stripe from the Sprightly paper.


I decided to frame each of my photos using frames from the Die Cut Ephemera pack - one a gorgeous polaroid style wood grain and the other a black and white wreath. I positioned each of them over the patterned papers layers, using some cardboard behind them to pop them up from the page.


Now it was time to add some fun embellishments to bring all the elements of my page together.

I started with the Foam Title Stickers, choosing the word hello and adding it alongside my top photo. I then reached for the Die Cut Ephemera pack again - choosing the Living the Dream phrase piece to go alongside the lower photo. Between the two, I added the purple ticket from the ephemera pack.

I then took another frame from the ephemera pack, this time a sweet circular frame with a doodled heart border. I cut it into two pieces, tucking the larger piece around the corner of my top photo, and the second smaller piece in behind the hello sticker. I also added a label for my journalling that was fussy cut from the Story Teller paper.


After writing my journalling on the label, I added the super cute retro style camera and a small heart (both from the ephemera pack) to create a small cluster. Then, to balance it out, I added a small strip of the reverse side of the Natural Beauty paper at the top of my page, and the true story sticker from the Accessory Sticker sheet over the top.  


Almost done - time for a few finishing touches! I added two small hearts from the Clear Sticker sheet; the purple butterfly from the Die Cut Ephemera pack; and the Life is Good sticker from the Accessory Sticker sheet. 
I then stamped the oh happy life phrase using a stamp from my stash and added a few tiny splatters of berry ink. 

That's all from me today, thanks for stopping by so I could share this with you. 
Until next time, happy scrapping! X

Saturday 19 October 2019

She Was a Wildflower - Art Journal Page | Viva Las VegaStamps


Hi everyone!
Time to share another design team project with you. Today I have a simple, but fun, art journal page that I created for Viva Las VegaStamps using a variety of stamps; Distress Oxides; a Sharpie; watercolour pencils and inks.


I began my page with an A4 sized sheet of white cardstock and Distress Oxides in the colours of Twisted Citron and Cracked Pistachio. I began using a foam blender to apply the Twisted Citron to an area in the centre of my page. I then blended some of the Cracked Pistachio into it to give it some extra depth.


Once I had the colour down, I grabbed the Doodle flower/garden stamp to form the base of my focal image. I then stamped Skull stamp on top of one of the flower stems so it appeared as though it were growing in the garden.


I then used the Row of scribble circle/eyes to add "flowers" to the tops of the remaining stems.


I then added some extra detail by using a Sharpie to doodle some "petals" and also to add some grass amongst the bottom of the stems.


Next, I took the Striped pattern circle and stamped it out onto some extra white cardstock. I then fussy cut around the image before using watercolour pencils to colour it, and then blended it out with a water brush.


I then stuck the flower I had made onto the skull (like a flower in her hair). 


With the flower in place it was time to add my sentiment. I chose the She was a wildflower stamp and placed it alongside the skull.


I then added a little extra detail to my background by splattering some inks around the page using a small brush. I used 13Arts Ayeeda Ink in white and Colour Blast Colour Artist Ink in Slipper.


To finish off, I used the Sky of stars background to add some fine stamped detail.


That's all from me today, thanks for stopping by so I could share this with you. I hope I have inspired you to get inky too! X

VLVS stamps used:

Wednesday 16 October 2019

New kicks, stencilled street shoes | StencilGirl®


Hi everyone!
Dropping by today to share a recent project I created for the StencilGirl® Creative Team. For this piece I was tasked with the theme "dress it or wear it". After a bit of thought I decided to dress up a pair of shoes so I could wear them all over town! (Who doesn't ever need a pair of new shoes, right?!)


I picked up a pair of plain white canvas high top shoes from Kmart (which were only $10 - bargain!) and removed the laces. (I was actually in need of a new pair of high tops after my last pair that had served me so well were recently retired to the bin.) This type of shoe is ideal for a makeover as the canvas provides a perfect blank slate just calling for layers of paint and ink to be applied.


Before I began, I decided I wanted my shoes to be street style - urban and a bit grungy; so I started by brushing my shoes with some grey Flutter Colour paint from Flutterby Designs to tone down the stark white. I used a "dry brush" technique - whereby the brush is relatively dry but still holds paint, to give scratchy-style brush strokes. This provided a perfect background to begin building my layers on.

Now it was time to add some patterns! I chose the Crazy Quilts Calm & Frenzy stencil designed by Andrew Borloz to start with. This versatile 9x12" stencil features a variety of bold patterns arranged into a quilt style design. This is ideal for creating entire backgrounds, or like I did, for using a small section to add specific details to a piece.


I paired the stencil with a darker shade of grey acrylic paint and used the circular pattern from the top left corner to add some circles to my shoes. I used a stiff, flat brush and a stippling technique to add the paint through the stencil then dried the shoes with a heat tool so I could move onto the next layer.


For my next layer I again stuck with the circular theme; this time choosing the Collage Textures and Patterns, Circles designed by Gwen Lafleur. 


I chose the section of the stencil that features scattered circles with X's in the centres to add the next layer of detail to my shoes. This time, rather than acrylic paint, I chose to use black StazOn ink and a sponge dauber to apply it through the stencil. (Be prepared for some messy hands when you do this!) 


With layers of grey and black already in place, it was time to stray away from neutral tones and add a hint of colour to my shoes. I switched back to acrylic paint, choosing one of my favourite shades 'Night' by Dina Wakley and to add another layer over the top.

This time my stencil choice was Organized Chaos designed by Cat Kerr - which happens to be one of my absolute favourite stencils (probably not hard to guess judging by how well used it looks in my photos). I love the random, organic design of this pattern; which Cat says was inspired by Van Gogh's iconic painting, The Starry Night. 


Again, I used a stiff brush and stippled the paint through the stencil; using a small section and moving it around the surface of the shoes.

Now it was time for some fun! With my background largely complete, it was time to add some focal points and colour to bring some real personality to my shoes. The stencil I chose that I thought would fit with my own brief of urban and a bit grungy, was the Go Your Own Way Mini stencil designed by Mary C. Nasser.


I used the 4x4" size stencil for my project, but this same design is also available as a 6x6" stencil here if you prefer larger sized arrows. 

Again I reached for a Dina Wakley paint - this time in the vibrant purple shade called 'Blackberry'. (I was inspired to use this colour so I could match my shoes with my nails and the streaks of colour in my hair.) I immediately loved the way the purple arrows popped against the neutral tones of the background!


After drying the paint with a heat tool, I decided to carry the arrow theme further by stencilling arrows around the edges of the soles of the shoes. Again I used black StazOn ink and a sponge dauber to stencil an assortment of arrows right around each shoe. 


At this point my shoes I decided my shoes definitely needed an extra pop of colour to give them a bit more personality, so I grabbed my Dina Wakley 'Turquoise' paint. I squeezed out a small amount of paint and then added water to thin it down before dabbing it onto my shoes randomly using a soft, round brush. 


Once that had dried, I noticed how dirty the edge line of the soles had become due to small paint and ink smudges. My answer? Cover it up, of course! I took a large black Sharpie and coloured over the rubber edge all the way around the shoes. Not only did this do the trick covering up those dirty smudges, but it also added an extra cool detail to my shoes - winning!


I still thought my shoes needed a little extra colour; so I watered down some more Dina Wakley paint (this time I used the deeper colour 'Ocean') and took my round brush and shoes outside to add some splatters over the top. I was really happy with how the extra splatters "grunged" my shoes up even more. 


To finish off my shoes, I wanted to draw more attention to the purple arrows, as they were the focal point of my design. To do this, I used a Faber-Castell correction pen to add extra white detailing over the top of the purple paint, which I thought really made them pop!


And with that my shoes were complete! Once dry, I added the laces back in and stood back to admire my handiwork - I had one pair of super cool, unique shoes that cost me little more than $10 and some time!


And of course I HAD to put them on and show them off to my family right away...now my kids are all lining up for a pair, so I guess I will be busy stencilling some more shoes soon!


Thanks for stopping by so I could share this with you. Until next time, happy creating! X

Thursday 10 October 2019

Oh Hello You | Scrap the Girls October Challenge


Hi everyone!
Popping in today to share my take on the October challenge for Scrap the Girls. As this month is breast cancer awareness month, we have an awesome challenge called "It's All in the Bra". Find your bra according to your star sign and use it to inspire your page - fun, right?!


I am a Virgo, and I was SO happy to get the denim bra! (I am a massive denim fan and would live in jeans all year round if I could.) I even decided to document a photo of me in my favourite denim jacket (enjoying a sneaky lunchtime wine).

Here is what I created...


I began my page by creating a watercolour background on white cardstock using 'Faded Jeans' Distress Oxide. To do this I simply swipe my ink pad onto my non-stick craft mat, spray with a little water, and then lay my cardstock over the top and smooth it down with my hand before drying it off with a heat tool.


Next, I set about creating a distressed strip design that was inspired by a layout created by Anna Komenda for Cocoa Vanilla Studio whilst we were on retreat back in May. (You can see Anna's page HERE). 

I used patterned papers from the Cocoa Vanilla Studio 'Hello Sunshine' collection (including a denim fabric print); mixed with the specialty vellum sheet from the 'Wild at Heart' collection. I distressed the edges of each paper strip using a pair of scissors and layered them vertically down the page. I also interspersed the papers with a few pieces of denim fabric cut from an old pair of jeans.


Once the background paper and fabric strips were in place, I added some thick cardboard to the back of my photo and stuck it down on top. I then added a chipboard frame (also from the 'Wild at Heart' collection) on an angle over the top of my photo.

  
To embellish my page I chose a couple of floral pieces from the 'Wild at Heart' die cut ephemera pack, which I tucked in under the edges of my photo; and a butterfly from the chipboard accent stickers which I tucked in under the edge of the uppermost strip.


Alongside my photo I added a handmade denim star from Charms Creations, which I topped with a Cocoa Vanilla Studio limited edition flair button. 

My title was a mix of 'Hello Sunshine' denim print alphabet stickers and the word hello from the 'Wild at Heart' chipboard stickers. 


To finish off my page I added a couple of stickers from the 'Wild at Heart' Accessory Sticker sheet; a chipboard arrow label; and stamped the date. (If you love this range as much as I do, check it out in the Cocoa Vanilla Studio store HERE and grab a bargain!) 
I was really happy with how this page turned out, and was surprised how quickly it came together (all done under an hour).

I would love to see you play along with this month's challenge. We have a prize pack from Helmar up for grabs for our Aussie winner and as always, Scrap Accent are generously sponsoring our international winner. You can head over to the Scrap the Girls blog HERE to see what the rest of the team created for this challenge.

That's all from me today. Until next time, happy scrapping! X

Monday 7 October 2019

Captured | Cocoa Vanilla Studio


Hi everyone!
Popping in to share another design team project with you, and my very first using the brand new 'Unforgettable' collection from Cocoa Vanilla Studio. And OMG...is this one gorgeous range or what?! I was so excited to sit down and create with this one - so many beautiful pieces I hardly knew where to start! But once I did, boy was this layout easy to create; it was one of those that just "fell onto the page". (Don't you love it when that happens?)


I designed this layout to document some fun candid photos of my siblings and I that were taken recently at my sister's birthday party. You've gotta love candid shots sometimes - we were all having such a great time singing and dancing together we didn't notice the photographer snapping away at us. 


So I began my page with my three photos and a sheet of white cardstock. The first item I reached for was the 6x8" Paper Stack. You may recall that previous collections have had a paper pad, not a stack. This is a new addition to the product range, and I have to say, I MUCH prefer the stack to a pad. It made it so much easier to pull pieces out to shuffle around!

I chose three patterns from the stack that I thought would work well together - the watercolour floral print (from the Glorious paper; the monochromatic floral print from the Lacewing paper; and the hot pink pattern from the Unscripted paper.) I cut and punched a variety of circles from the papers and arranged them so they were cascading down the right side of my page.


I then placed my three photos on the page, layering the two smaller ones near the top, and the slightly larger feature photo near the bottom. I made sure I had left enough space between them for my layout title, which I had chosen from the new Foam Title Stickers. One of the best thing about these stickers? They come on a clear backing sheet! This makes it easy to move the titles around to different spots to see how they will look before you commit to placement. Once I found the right spot, I stuck it down; adding a small heart at the end of the word.


With my title in place I then set about embellishing my page. Below the title I added the sticker photo stories from the Accessory Sticker sheet; andin the smaller circle to the right, a camera sticker from the Clear Sticker sheet.

To balance out the title cluster, I then added a a large die cut flower and the little moments arrow (both from the Die Cut Ephemera pack) alongside the photo at the top of my page. I also added one of the watercolour brush marks Clear Stickers nearby.


Above my top photo, and in keeping with my circular theme, I added the snap shots flair from the Flair Buttons pack. To the right of that same photo I tucked in a small die cut flower, then added a gorgeous butterfly clear sticker.


I added another tiny die cut flower and a heart clear sticker near my feature photo; then wrote my journalling onto a tag from the ephemera pack. I added a small piece of twine to it before tucking it in behind my photo.
To finish off my page I added tiny black splatters around my page.

Thanks for stopping by so I could share this with you. Until next time, happy scrapping! X