Tuesday 28 December 2021

Oh Christmas Tree | Cocoa Vanilla Studio


Hi everyone, I hope you had a lovely Christmas with your loved ones?! I was so happy this year to just have a quiet day with my hubby and kids making memories in our new home. Today we are off to do family Christmas with relatives. (How many Christmas celebrations do you do?)

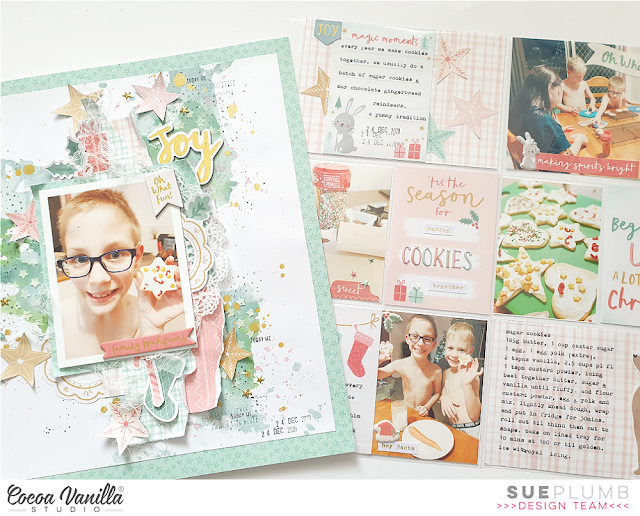
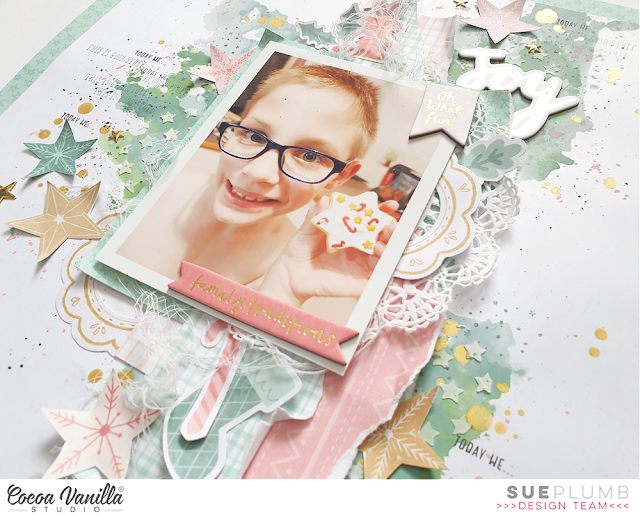
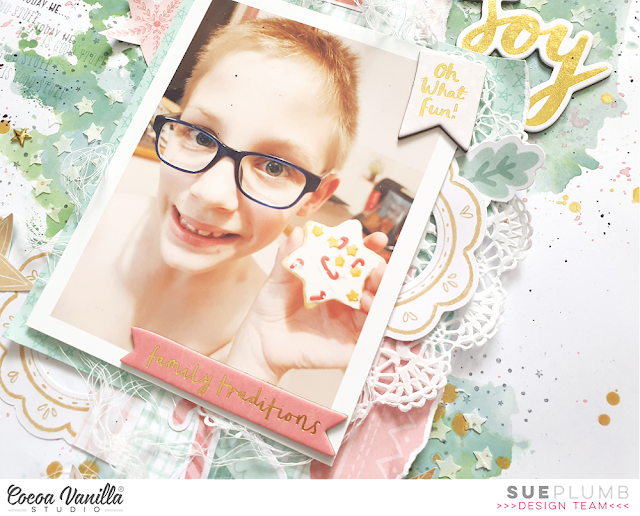
Now, following on from the mixed media layout I shared last week using the Cocoa Vanilla Studio 'Joyful' collection (which you can see in the image above), today I am sharing a companion pocket page to go with it. This page also features the 'Joyful' collection, and documents more of the details about my family's tradition of putting up our Christmas tree.


For the paper component of my pockets I used four 3x4" cards from the 'Joyful' Pocket Cards pack and a piece of the Deck the Halls 12x12" patterned paper that I cut down to fill the 6x4" pocket. (This coordinated perfectly with the border strip I used on my 12x12" layout, which helps to tie the two pages together in the album.)


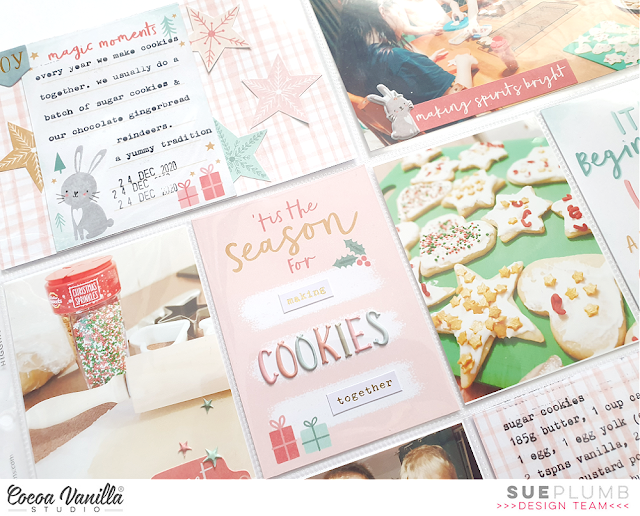
I used the paper as the background for my title card, then added the Christmas Tree from the Die Cut Ephemera pack topped with a Gold Glitter Puffy Star. For the text I used the gold foiled word Christmas from the Chipboard Sticker sheet, and some gold alphas from my stash. (I think they might have been Crate Paper ones?)


I used my typewriter again to add my journalling to the Pocket Cards, adding a tale about our cat to match with the photo of him I had included. (Yes, he is a weirdo!) On several of the photos I added some small embellishments including Accessory Stickers and Puffy Stickers


I left some of the Pocket Cards just as they were as I didn't think they needed additional embellishments. Not only did it make completing the page easier, it also helped keep it from looking cluttered.


Adding these pages to my scrapbook albums makes it so much more interesting for my kids to flip through, as the extra photos and details are what they are really interested in (not so much my pretty work! haha) If you haven't already tried incorporating pocket pages into your albums, I would highly recommend having a go. (If you already have plenty of scrapbook supplies, then the sleeves are the only thing you really need to get started!)

Here's a look at how the pages will look side-by-side in my album...


Thanks to everyone for all your lovely feedback on the previous pocket page I shared, now I know there are so many people interested in them, I will continue to share them when I can. I'm sorry that I don't make process videos for these pages. This is because there isn't actually a lot of content, and I don't tend to do them in one sitting either. Anyway, I'll keep the extra pages coming when I can.

Thanks so much for stopping by today so I could share this with you. I hope you have a happy and safe New Year! X

Monday 20 December 2021

Magical Moments | Cocoa Vanilla Studio


Hi everyone, popping in today to share my latest Cocoa Vanilla Studio design team project with you. Today I was tasked with creating something inspired by the current monthly challenge, which is this beautiful Christmas themed mood board designed by Tarrah…


This is the second layout I have created based on this mood board, and this time I was inspired by the little trees and stars to tell the story of our annual family tradition of placing the star atop our Christmas tree. The photos I was documenting were taken in 2020, and are of my son Hunter putting the star on. I was working with the ‘Joyful’ collection, and once again I decided to create a mixed media layout (because I love getting messy!)

Here is my page…

You can probably spot right away that my colour palette for this layout was dictated by my photos – with the predominant tones of green and gold at the forefront from our Christmas tree.

I began with my background – working on a sheet of white cardstock I had cut down to 11×11″, I used Rustic Wilderness Distress Oxide mixed with water to create a water wash across the page. I then added darker splatters using the same ink (just with less water added); stamped some large stars in black ink; and then finished with gold splatters. It was a fairly straightforward background.


With the background complete, it was time to work on creating some papery layers. The first paper I chose was the Kraft / gold coloured paper with the words merry & bright from the A5 Paper Stack. I tore a sheet of this and used it as my anchor piece. On top of it I added a horizontal strip of the Deck the Halls paper and also the border strip from the Very Merry cut apart paper that had the little Christmas trees on it. I used my distress tool to distress the edges of all the pieces before I stapled them together, adding a small white paper doily and some frayed gauze for texture.


I added my photos on top (which had been popped up with a little scrap cardboard), then turned to the embellishments. I already had the Die Cut Ephemera pack out open on my desk, so that was where I started. I first rifled through them and pulled out a few pieces that I thought could work with my colour scheme. (It makes it much easier than shuffling through the entire pack for every piece you want.)


Using the pieces I had pulled from the ephemera pack, I created small cluster above my photos containing a Christmas tree, the memories tab, and a small sprig of holly; and to the left I tucked in the gorgeous little deer. (Not only was it a perfect match for the colours on the page, but I just love how cute it is!) To the right of my photos I added a little flag that read joyful.


From the Chipboard Stickers sheet I chose the banner that read jingle all the way in beautiful gold foiled script, to stick along the bottom edge of my photo. I also added a few gold foiled stars around the page.


Below my photos I added one of the smaller sized Wood Epoxy Buttons, and then I used the gorgeous Puffy Gold Title Stickers to add my title. From the same sheet I also added a few extra gold scattered stars because I couldn’t resist more of that stunning gold!


I then added a stamped date, a few stamped phrases, and typed strip journalling and my layout was done! I love how it all came together with the colours, the layers and the texture, and I am so happy I have documented this story for my family.

If you would like to see exactly how I put it together, you can watch my process video here:


Thanks so much for stopping by today, don’t forget you have until the end of the month to enter this challenge via the Cocoa Vanilla Studio Community group. You could be the lucky winner of a $25 store voucher.

I’ll have a matching pocket page for this layout to share next week, until then I hope you all have a safe, happy and enjoyable time with your family and friends over the holiday period. Merry Christmas! X

Tuesday 14 December 2021

Making Cookies Together | Cocoa Vanilla Studio


Hi everyone! Do you remember the mixed media layout I shared last week featuring the Cocoa Vanilla Studio 'Joyful' collection? Today I am sharing a pocket page I created as a companion page to that layout, which also features the 'Joyful' collection. The reason I created it, is that I wanted to document more photos and record details about the story, and I often find that this is the perfect way to do it. I used the same collection for both pages as I have designed them to sit side-by-side in an album, and I like them to be cohesive. (You can see how they look together in the image above.)


For the paper component of my pockets I used four 3x4" cards from the 'Joyful' Pocket Cards and the B side of the Advent 12x12" patterned paper that I cut down to size.
(The small puffy alphabet stickers you can see in the image below were the only thing not from the 'Joyful' collection, they were from the 'These Days' collection but the soft colours were a great match!)


I used my old typewriter to add my text, as I love the imperfect, grungy look of it. As well as adding the details behind the story onto the journalling cards; I took the opportunity to type out our Sugar Cookie recipe on one of the 6x4"pieces of paper to include in the spread. The recipe looked super cute with the bear from the Die Cut Ephemera pack positioned beside it.


When it comes to pocket pages, my approach to embellishing my photos is much the same as my layouts, as I like to stick things directly onto my photos. Ephemera pieces, Accessory Stickers and Puffy Stickers are all good choices as they don't add much bulk when the photos are placed into the sleeves.


Don't feel restricted by what style or design of sleeve you have, just make it work for you! In the image below I used a 3x4" card and a 3x4" photo to fill a 6x4" pocket. (Just stick them both onto a piece of paper or cardstock cut to 6x4" to stop them sliding out of place.) Similarly, if you only have two 3x4" pockets alongside each other but a 6x4" photo, just cut it in half!


I hope you've enjoyed seeing this pocket page and reading a bit of my explanation behind it. I often create these companion pages for my albums but don't necessarily share them, so if this is something you would like to see more of, please let me know.

Until next time, happy scrapping! X

Tuesday 7 December 2021

Joy | Cocoa Vanilla Studio


Hi everyone, popping in today with a new project to share with you. This layout was created for Cocoa Vanilla Studio using the gorgeous new ‘Joyful’ collection, and was inspired by the December monthly challenge. First, here’s a look at the “Bells & Baubles” mood board designed by my fellow DT member Tarrah…


The image from the mood board that caught my eye was the one in the top right corner, with the pretty Christmas cookies. It immediately reminded me of making cookies with my kids, a tradition we do together every Christmas. I decided to document a photo of my son that I took last year with one of the cookies he made.


For my layout I wanted to create a mixed media page, so I started with 300gsm white cardstock and some Distress Oxides. I layered blue (Speckled Egg) and green (Rustic Wilderness), then used modelling paste to add some small stencilled stars over the top with a StencilGirl stencil. Next, I used another Distress Oxide (Worn Lipstick) to add small pink splatters, then stamped some tiny stars using a rubber stamp from Viva Las VegaStamps and black ink. I finished off with some big splatters of gold Heidi Swapp Color Shine, and set it aside to dry.


Once my background was dry I cut the cardstock down to measure 11×11″ so I could mount it onto some patterned paper. I chose the B side of the Deck the Halls paper, which is a soft green and features small stars on it. I cut away the centre portion of the paper so it wasn’t wasted, then mounted the cardstock on it to form a border.


I immediately used the centre piece  had just cut away to create a mat for my photo, adding a torn edge down one side for texture. I then chose a few other small pieces of patterned paper (most from the A5 Paper Stack), which I cut and tore into various shapes, then stacked together to form more layers behind my photo. I also tucked in half of a white lace doily before securing it all together with staples. (This enabled me to move the entire stack as a whole piece without dislodging any of the pieces.) On top of my stack I added some frayed gauze for soft texture, then finally, my photo on top.


For the embellishments, I started with the Chipboard Stickers, choosing the gold foiled word JOY as my page title. From the same pack I also selected the small oh what fun! flag piece, which I affixed in the top corner of my photo; and the family traditions banner, which I stuck along the bottom edge of my photo.


From the Die Cut Ephemera pack I chose the green stocking and candy cane, when I layered together below my photo. Above my photo I added a little present and a small sprig of holly. I also chose a circular frame from the ephemera pack, which I cut in half and tucked into my layers on either side of my photo.

Scattered around my page, I added some large stars, which were fussy cut from the Making Spirits Bright paper. (These tied in beautifully with my photo and the star theme I had established with the stamping and stencilling.)


I finished my page by adding yet another variety of star – the pretty puffy gold ones from the Puffy Gold Title Stickers. (These are SO gorgeous!) I then added some stamped phrases and the date, and some black ink splatters.

If you would like to see exactly how it all came together, you can watch my process video below:


I have a bonus pocket page that I created as a companion page to this layout. I’ll be sharing it over in the Cocoa Vanilla Studio Community group next week and then here some time after that, so keep your eye out for it. In the meantime, I would love to see you play along with our December challenge, entries close December 31st.

Until next time, happy scrapping! X

Sunday 28 November 2021

Ho Ho Ho | Cocoa Vanilla Studio


Hi everyone, I am here today to share my very first layout using the brand new ‘Joyful’ collection from Cocoa Vanilla Studio.

You may have noticed that I haven’t shared a project here on my blog for a while? Unfortunately I haven’t had access to my scrap stuff for quite some time while we were going through the process of moving house. I am pleased to report however, that I am now settled into my new house and after many years, I finally have a craft room again – happy days!

I was super excited to receive this new collection, and as usual, Zoe has totally hit it out of the park! I am not usually a big fan of Christmas collections because of the strong red/green colour palette they often use, but this one is so beautiful with its more muted tones and sweet little animals scattered throughout. I was also surprised to find myself drawn to use the Holly Days paper, which features a gorgeous wreath (a design I don’t often reach for first).


The photo I was working with was a photo of my three kids and my cat that I took in front of our tree on Christmas Eve, not long before they went to bed. (You can tell by the expression on their faces they were excited about what was to come the following day… except for the cat of course, who was horrified at the fact they were making him wear a turkey hat! haha)


I decided to keep the wreath paper intact and use it as my layout background. This gave me a good base to work from, with the focal area already defined for me. The first thing I did was choose some patterned papers from the A5 Paper Stack to use as a mat behind my photo and to create some layers on my page. I tore along the bottom edges of the papers, then ruffled them up a little more with my fingernail to add texture. I also added a small mint coloured doily into my layers, and some frayed gauze on top of them, then stapled the entire stack together and attached it to my page.


I then chose two different colour Distress Oxides (Rustic Wilderness and Worn Lipstick), mixed them with a little water, and used a fine brush to add tiny splatters around the entire wreath. I then repeated the process with some gold mist as well. Once dry, I adhered my photo down on top of my paper stack using a liquid adhesive and set about adding some embellishments.


In the top left corner of my photo, I tucked in a Chipboard Sticker present underneath the edge of the layers, then the sweet little season’s greetings envelope from the Die Cut Ephemera pack over the corner of the photo. (Embellishing directly onto my photos is something I love to do.) I also added the magic moments banner piece along the bottom edge of the photo (also from the ephemera pack).


To the right of my photo I added the ho ho ho Chipboard Sticker for my page title, and underneath I added the sleeps til Christmas sticker from the Accessory Sticker sheet. (For the number 1, I actually used one of the Mini Puffy Alpha Stickers from the ‘These Days’ collection.) In the bottom right corner of my photo I added that sweet little fox from the Die Cut Ephemera pack, and put a little foam tape behind him to pop him up to the same height as my photo.


To embellish around my wreath, I fussy cut some large stars from the Making Spirits Bright paper, which I mixed with a few smaller ones from the Die Cut Ephemera pack.


I finished off with a few gold foil phrase stickers from the Accessory Sticker sheet and I was done! I am so happy with how this page turned out (especially considering I thought I would be a little rusty after my time away, but this collection made it so easy!)

If you haven’t gotten your hands on this beautiful range yet, then make sure you do. There is currently a bundle deal available in the Cocoa Vanilla Studio store as part of the Black Friday sale (plus some awesome bargains too!) Shop the sale HERE

Until next time, happy scrapping! X

Saturday 28 August 2021

Finally Together | Cocoa Vanilla Studio


Hi everyone, today I am popping in to share another layout I created earlier this month for Cocoa Vanilla Studio using the gorgeous new 'These Days' collection. As this range has such a lovely home / family theme I decided to document one of my favourite ever family photos. This photo of the five of us was taken not long after we had finally brought our boys home. After being born prematurely, we spent over 10 weeks (which at the time felt like forever) in hospital and just looking at this photo reminds me of the elation I felt when we were finally able to be a family at home. 

I knew I wanted to use a patterned paper background for my page, but I started with a sheet of white cardstock as the base. I chose 3 papers - the tiny heart print Good Life; the adorable house print Neighbourhood and the spotty green Family Ties. Starting from the left edge, I added various sized vertical strips of paper, slightly distressing the overlapping edge as I went.

For my photo, I added two layers of patterned paper to mat it – the black and white floral and the wood grain print, both from the A5 Paper Stack. On top of those paper layers I also added some frayed gauze for texture before adding some cardboard and then my photo on top.

I then turned my attention to my embellishments, beginning with the Wall of Fame patterned paper with all the doodled frames on it. I fussy cut three of the frames, and then tucked them in around my photo to create the bases for my embellishment clusters.

For the cluster in the top right corner of my photo I used the home sweet home sticker from the Accessory Sticker sheet, which I placed inside the frame I had tucked there. I then chose several floral pieces from both the Die Cut Ephemera pack and the Floral Ephemera pack and tucked them in around the frame. I then added a small heart and small butterfly – both from the Puffy Stickers sheet; a small Wood Button; and a couple of leafy branches from the Foam Title Stickers pack. I also added a die cut butterfly to the corner of my photo.

To keep my design cohesive, I used the same types of embellishments in the cluster on the bottom left corner of my photo – Die Cut Ephemera, Floral Ephemera, Wood Buttons, Puffy Stickers and Foam Title Stickers. I topped this cluster with the oh happy day! sticker from the Accessory Sticker sheet. I arranged this cluster so that it trailed towards the bottom left corner of my page, which helped give my layout design a horizontal flow through the photo from top right to bottom left.

My title was the focus of my final cluster, along the bottom edge of my photo. I used the fussy cut frame I had placed there as the spot for the first word of my title, finally, which I created using the Mini Puffy Alphas. (These alphas are so gorgeous, and one of my very favourite things from this collection.) For the second word of my title, I used the word together from the Foam Title Stickers pack. These stickers are a beautiful script font, and a lovely charcoal colour. I love mixed font titles, and I think the combination of these two styles look great together. Below my title I added a brush stroke sticker and a small cluster of crosses from the Clear Stickers sheet.

Along the left edge of my layout, I added a couple of sweet phrase stickers from the Accessory Sticker sheet so that they ran vertically in line with the layered paper strips. And that was my layout done!


I am loving working with this collection so far; it’s one of those ones that is just so easy to work with, and I love how many embellishments there are to choose from! If you haven’t gotten your hands on it yet, ask your favourite scrappy retailer, or check with a stockist from the stockist list HERE
Until next time, happy scrapping! X

Friday 27 August 2021

Enjoy Together | June 2021 Hip Kit


Hi everyone, today I have a layout to share that wasn't created for anyone other than myself. (Yes, sometimes it actually happens!) If you watch my YouTube channel, you may have recently seen that I did an unboxing video of my very first kit from Hip Kit Club. Subscribing is something I have been wanting to do for a long time, so my sister Mandy and I decided to bite the bullet and just do it. (It helps that we can split the shipping costs.) So I subscribed to the Scrapbook kit, and she subscribed to the Pocket Life kit. 

The layout I am sharing today is the very first layout I created from my very first kit. I was working with the June 2021 main scrapbook kit, as well as the add-on embellishment kit that I also purchased, which gave me TONS to work with!


The photo I was documenting is of me and my family when we were out celebrating my boys' birthday with lunch at the local pub and I think it worked well with the contents of this kit. The June kit consists of a mix of Pinkfresh Studio 'Happy Blooms' collection as well as Hip Kit exclusive products and they all coordinate beautifully.

For my layout I decided to create some subtle, pretty mixed media as the basis of my design. I used Kitsch Flamingo Distress Oxide mixed with water and then brushed it across my cardstock to create a light pink wash. I also used Mowed Lawn Distress Oxide mixed with water and a fine paint brush to add splatters.


I used the purple crosshatch style patterned paper from Pinkfresh Studio to back my cardstock and create a border for my layout. I then used a mix of the Pinkfresh papers to create layers on the focal area of my page. I also added a paper doily and some frayed gauze for texture before adding my photo on top. 

Alongside my photo was a small pocket style envelope from the Pinkfresh Studio Journaling Bits pack, with a journal card tucked inside.


 I used pieces from the Pinkfresh Floral Ephemera pack to add clusters in the top right and bottom left corners of my photo, with a third floral element (the flower tucked under the edge of the pocket) coming from the Hip Kit ephemera pack. The little heart button was also a Hip Kit exclusive. Along the top edge of my photo I added the pink banner to help cover up some of the background distraction.


For my title, I used one of the large Hip Kit chipboard phrases combined with the green Pinkfresh alphas. I also used several phrases from the Hip Kit clear sticker set to add some extra text to my page.

On top of the journaling pocket I added one of the sweet little Hip Kit fabric bows. These bows come deconstructed in a pack (which I didn't mind), and only require a minute and couple of dabs of glue to put one together. I also used my typewriter to add my journaling to the journal card.

I was really happy with how this pretty page turned out, and very happy with my first Hip Kit! I am looking forward to getting stuck into it again as soon as I have a chance. 

If you would like to see how this page came together, then you can watch my process video here:

Thanks for stopping by today, happy scrapping! X