Showing posts with label pets. Show all posts

Monday, 15 February 2021

Buzz Off | Kitaholic Kits February 2021


Hi friends, today I am sharing the second of my February projects created for Kitaholic Kits. For this layout, I was drawn to use the beautiful floral print paper from Crate Paper and decided to combine it with some of the subscriber exclusive floral printables and paints from the January kit. I love being able to mix items across kits, and it certainly helps you to get the most out of them. 


As you can see, I decided to make my cat Genghis the star of the show for this page. (I knew this photo of him would make it onto a page one day when I took it! haha) I was inspired to choose this photo by one of the items from the Jen Hadfield ephemera pack  - the bee hive! When I saw the bee hive and the little bees, the phrase 'buzz off" came to mind and I thought of this picture instantly.


I began my page with a couple of the Kaisercraft acrylic paints from the January mixed media add-on kit. I wanted to try and match one of the tones of the flowers from the floral paper, so I mixed the Mango and Dusky Pink together until I had the shade I was after. I then used my wide #4 brush to dry brush some paint across my cardstock, which was cut down to 11x11" and mounted onto the floral paper. (I had already cut the centre from the patterned paper so that I could use some of it on the rest of the page.)


Once the paint was dry, I added some paper layers using a mix of papers from the kit and a paper doily from my stash. I cut a long banner shape from the floral print paper and ran it horizontally across the page where I was planning to place the photo. This would help draw the viewer's eye to the photo. I added texture to the page by distressing the paper edges using my distress tool and by using frayed gauze under my photo.


For my embellishments, I began with the bee hive from the Jen Hadfield ephemera pack as it was going to be my "hero" embellishment. I placed it down in the bottom right corner of my photo and began building my cluster from there. I added a mix of fussy cut flowers from the December subscriber exclusive printables. I used foam tape between some of my floral layers for dimension and added one of the sweet little die cut bees as well. 


I created a second embellishment cluster along the left edge of my photo, using the same elements as I had for the first. Then balanced my page my creating a smaller third cluster above my photo. This gave me the "visual triangle" I was looking for. Then it was simply a matter of my final finishing touches.

I used some of the American Crafts Thickers for the kit to create my title. (I was very excited to use up two Z's and two F's in the one title!) From the Heidi Swapp sticker book I included the this is my happy place sticker, and also a circular label that I used for my journalling. A few stamped phrases and the date,a few black splatters and I was done! 

If you would like to see exactly how this all came together (and listen to me waffling on), you can watch me create this page in my process video here: 


Thanks so much for stopping by so I could share this with you. Until next time, happy scrapping! X

Friday, 25 October 2019

Living the Dream | Cocoa Vanilla Studio


Hi everyone!
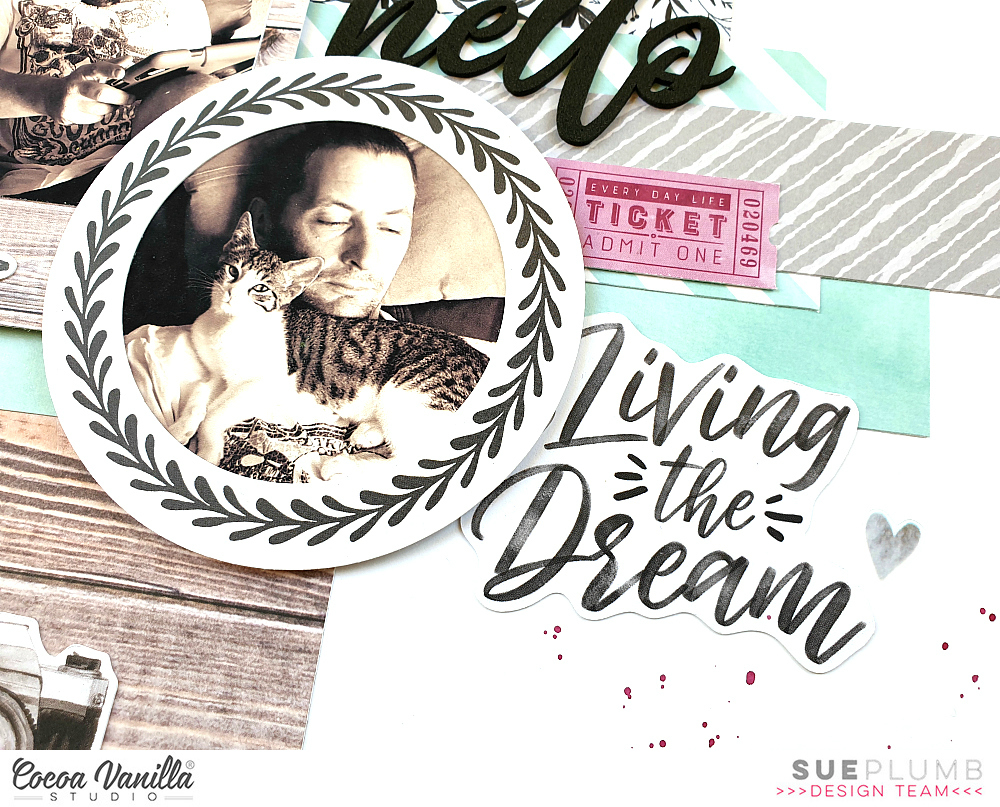
Popping in today to share a layout I created recently featuring the gorgeous 'Unforgettable' collection from Cocoa Vanilla Studio. For this page I wanted to document some sweet photos of my hubby and our cat that were taken when he was just a kitten. And with two males in the photos, I needed to put a masculine spin on it. (And yes, I think a pop of purple is perfectly acceptable for a masculine page!)


Starting with a white cardstock background, the first paper I was drawn to was the gorgeous wood grain print of the Natural Beauty paper. I am a huge fan of wood grain papers, and I have to say, I think this one is my favourite so far! The tones, the pattern of the grain - it's just perfect. I cut a large piece and placed it vertically on the left side of my page.


I overlaid the wood grain print with a piece of the minty green watercolour print paper from the 6x8" Paper Stack (in the 12x12" papers this is the reverse print of the Garland paper). I used a notebook style paper punch to punch the edge of it for extra interest. 

Then it was time to add some horizontal structure to my page. I used an extra piece of the same mint paper again; along with a piece of the black and white leafy print from the reverse side of the Natural Beauty paper; the grey stripe from the reverse of the Glorious paper; and the mint diagonal stripe from the Sprightly paper.


I decided to frame each of my photos using frames from the Die Cut Ephemera pack - one a gorgeous polaroid style wood grain and the other a black and white wreath. I positioned each of them over the patterned papers layers, using some cardboard behind them to pop them up from the page.


Now it was time to add some fun embellishments to bring all the elements of my page together.

I started with the Foam Title Stickers, choosing the word hello and adding it alongside my top photo. I then reached for the Die Cut Ephemera pack again - choosing the Living the Dream phrase piece to go alongside the lower photo. Between the two, I added the purple ticket from the ephemera pack.

I then took another frame from the ephemera pack, this time a sweet circular frame with a doodled heart border. I cut it into two pieces, tucking the larger piece around the corner of my top photo, and the second smaller piece in behind the hello sticker. I also added a label for my journalling that was fussy cut from the Story Teller paper.


After writing my journalling on the label, I added the super cute retro style camera and a small heart (both from the ephemera pack) to create a small cluster. Then, to balance it out, I added a small strip of the reverse side of the Natural Beauty paper at the top of my page, and the true story sticker from the Accessory Sticker sheet over the top.  


Almost done - time for a few finishing touches! I added two small hearts from the Clear Sticker sheet; the purple butterfly from the Die Cut Ephemera pack; and the Life is Good sticker from the Accessory Sticker sheet. 
I then stamped the oh happy life phrase using a stamp from my stash and added a few tiny splatters of berry ink. 

That's all from me today, thanks for stopping by so I could share this with you. 
Until next time, happy scrapping! X

Thursday, 27 September 2018

Purr-fect Arsehole | Flutterby Designs


Hi everyone!
Popping in with my latest Flutterby Designs design team project for you. Today I am sharing an 8.5x11" mixed media scrapbook page I created featuring some photos of my cat when he was still a kitten. I had been wanting to document this series of snaps for a while and I knew exactly which quote I was going to use!


I began my layout with white cardstock, adding some Colour Blast 'Passion' Colour Shimmer Dust (mixed with water to make a watercolour paint) along the top portion of the page and then held it vertically to let it run down. I then layered over it with some Flutter Colour paints. First 'Grape Soda', applied roughly over the top of some of the watercolour paint, and also in the bottom right corner of the page. Next, I added some 'Stormy Grey', which I spread around using a brayer.


 Next, it was time for some texture and contrast. I used the 'Macaroon 5' stencil and Colour Blast 'Singin' the Blues' Colour Paste and applied it in three small areas of my page before drying with a heat gun. At this point I decided I wanted to strip back a bit of colour so I grabbed my 'Arctic White' paint and spread a little around with my brayer in my focal area. I then rubbed off the excess paint randomly around the page.


I then created a layered mat for my photo strip, using some Everyday Etc filler cards and a page tab from the 'One of Those Days' sheet, which I secured with small staples. Once I had all the layers in place I added my photos on top, mounting them up on some cardboard to pop them up a bit. Then it was time for my feature quote, which I fussy cut from one of the 'Fur-ever Friends' Everyday Etc cards and then placed above and below my photos.


At the top of my page I added the what the fuck? Snippet Strip, and you have got to be kidding black Tiny Sticky Quote.
Next, I created my title, which I placed in the bottom right corner of my page. I started by adding the word arsehole using the 'Sentence Enhancers' stencil, a sponge dauber and ink. I then added the purr-fect die cut from the 'Fur-ever Friends' Die Cut Bits & Bobs pack. Above that, I added the one of a kind Snippet Strip, and the hey you black Tiny Sticky Quote.


Alongside my title, I added the cat is in charge sticker from the 'Fur-ever Friends' Sticky Quote sheet. Then it was time for some finishing touches. I used my favourite 'Doodle Dots' stamp from Viva Las VegaStamps to add some random dots and spots around my page. I also used my Stabilo All pencil to add some page borders and scribbled details around my page. Finally, I added some splatters of aqua mist, stamped the date and I was done. 
Thanks for stopping by today so I could share this with you.
Until next time, happy scrapping! 

Wednesday, 20 June 2018

Blanket Thief | Flutterby Designs


Hi everyone! Time again to share another of my design team projects with you. Today I have a mixed media scrapbook page that I created for Flutterby Designs using the new 'Happily Ever After' collection and some Flutter Colour paints. (And of course, my super cute kitty too!)


I started this page by creating an abstract background using Flutter Colour paints. The colours I used were Tropicana Teal; Grape Soda; Green Limousine; Stormy Grey and Yellow Zest. I didn't work with any particular result in mind when I applied the paint, I simply followed my instinct. I used a combination of methods to apply it - smeared with an old gift card; applied with a brush; and also with my fingers.


Once the paint had dried, I applied some black ink using a sponge dauber through the 'Hugs and Kisses' stencil. I then took some of the 'Happily Ever After' Everday Etc filler cards and applied some cut and torn pieces to my background, before mounting my photos on top.


I used two of the 'Happily Ever After' Everyday Etc cards and fussy cut the large LOVE word and also the blanket thief phrase. I then used 'Teal' Sticky Alphas to add the word couch to my page.


I then added the XOXO sticker from the 'Happily Ever After' Sticky Quotes sheet; along with the life is good and cheeky bugger phrases from some of the Snippet Strips.
The final embellishment I added was the good vibes only flair button directly onto my photo, from the 'Good Vibes Only' flair button set #1.


To finish my page, I splattered a few drops of pink ink, plus added a few random scribbles and crosses using a pencil.

That's all from me today, thanks for stopping by so I could share this with you. I will be back again soon with another project.
Until then, happy scrapping! X

Thursday, 2 March 2017

Welcome to our Tribe | Flutterby Designs

Hi everyone!
Here today to share my latest layout using some of the new 'Fur-ever Friends' collection from Flutterby Designs. Pets are such an important part of the family, that they deserve their own pages in our albums too. This collection is perfect for capturing those memories of all those furry, feathered (or even scaly) members of the family.
The layout I have to share today features a photo of the newest member of our family when we arrived home from picking him up. (He was so relaxed, and already showing us what a chilled out little man he is.)


I decided to mix it up a bit for this layout; and along with the elements from the 'Fur-ever Friends' collection, I also threw in some pieces from previous releases.

I started my page with a sheet of patterned paper, and drizzled some 'Tropicana Teal' Flutter Colour paint (from the new release bright set) onto the page and set it aside to dry.


I created a layered photo mat by combining Everyday Etc filler cards from the 'Fur-ever Friends' and 'Happy Together' collections. I also tucked one of the 'Fur-ever Friends' Page Tabs in amongst my layers; and used another filler card from the same collection to add two triangular pieces to the diagonally opposite corners. The "meow" word came from the 'Fur-ever Friends' Die Cut Bits & Bobs pack.


The gorgeous "a house is not a home without a pet" quote and the cute little house were both fussy cut from one of the 'Fur-ever Friends' Everyday Etc cards. You can also see where I tucked in some messy thread for texture.


I also tucked some matching thread on the other side of my photo, which I topped with a cute camera flair button (from set #195). Alongside that, I added a Photo Cut Out tab (from the Bright Directions Tabs 3 sheet); and an enamel dot (from the Bold set).


The title for my layout was fussy cut from one of the 'Happy Together' Everyday Etc cards. As a finishing touch to tie in with the hearts on the paper I had used, I added some Rainbow Heart stickers randomly around my page.

Thanks for stopping by today so I could share this with you. If you haven't already, make sure you join the Flutterby Inspiration HQ group on Facebook. You can share your Flutterby pages, chat to the team, or just be inspired by what other people share.
Til next time, happy scrapping! X

Saturday, 18 February 2017

One Spoilt Cat | Flutterby Designs

Hi everyone!
Just popping in today to share another layout featuring the brand new 'Fur-ever Friends' collection from Flutterby Designs (and my kitty!) As with all Flutterby collections, I love the bright, fun colours in this one; which makes it perfect for creating layouts about those furry or feathered members of the family.


I started this page by adding some subtle texture and colour to my newsprint patterned paper (which is from Cocoa Vanilla Studio). I used the new Flutterby Bubble O'Fun stencil to first add some texture paste to random areas of my paper, then used a few drops of Flutter Colour paint added to some water to add some light colour to the textured areas. I then drizzled white Flutter Colour paint over the top.


I created a mat for my photo by layering together several of the Fur-ever Friends Filler Cards; and then fussy cut the spoilt cat portion of my title from one of the Fur-ever Friends Everyday Etc Cards. The remainder of my title was created using some die cut pieces from the Mad About You Die Cut Bits & Bobs pack; some printed words; Cocoa Vanilla Studio alphabet stickers and a word sticker from the Fur-ever Friends Sticky Quotes sheet. (The cute little cat is from the Sticky Quotes sheet as well.) Tucked in amongst the layers under my photo was also a spoilt page tab from the Fur-ever Friends Page Tabs.


Underneath my photo I layered one of the new Fur-ever Friends wood veneer frames, along with some messy black cotton thread. I then added a flair button from the Fur-ever Friends - Cat set directly onto my photo and popped one of the black Tiny Sticky Quotes beneath my photo.


To tie in with the wood veneer frame I had used, I also added some wood veneer small hearts around my page. The small embellishment cluster at the bottom of my page included one; along with a die cut from the Fur-ever Friends Die Cut Bits & Bobs pack and another black Tiny Sticky Quote.


To finish my page, I added some stamping; black mist splatters and a quick line of journaling.

If you haven't got your hands on any of the newest products yet, make sure you head over to the Flutterby Designs store HERE and check out the new range! (Check out the Fur-ever Friends kit that includes some kit exclusives too!)
I will be back soon with another project to share with you. Until then, happy scrapping! X

Saturday, 4 February 2017

Purr-fect | Flutterby Designs

Hi everyone! Stopping by with another project share for you today, this one for Flutterby Designs. I am very excited about this layout as it features the brand new 'Fur-ever Friends' collection and new release Flutter Colour paints! (These are scheduled for release into the Flutterby Designs store tomorrow night at 8pm - you won't want to miss it!) This page also features our family's new kitten, Genghis.

Here is what I created...

"Purr-fect"

I started this layout by creating my background using the new Flutter Colour paint set (the colours are so divine!) I used a few drops of the aqua paint in some water to create a watercolour paint, which I brushed over my cardstock using a wide brush. I then used one of the new release stencils along with some purple paint, and stippled some random bubbles onto my background. Finally, I added some splats of the new green paint over the top and left it all to dry.


Once my background was dry, I fussy cut my title from one of the Fur-ever Friends Everyday Etc cards and adhered it onto my photo. I then created a layered mat for my photo to sit on from the coordinating filler card pack. (I am not normally a purple person, but am so loving the colour combination here!)


Under my photo, I also added a frame (Frame 47 'Mad About You' Photo Cut Out), which I cut in half; a Fur-ever Friends page tab; and some messy cotton thread for texture. The tab on my photo came from the Fur-ever Friends die cut bits & bobs pack.


To add some extra dimension to my layout and to tie in with the circular theme I had going on, I also added some of my favourite wood veneer circles, which I painted with the new green paint. (How perfect is the colour match between the paint and the paper?!) Inside one of the circles I popped one of the Fur-ever Friends flair buttons (from the cat set).


Finally, it was time for me to put the finishing touches on my layout. I used the cute little paw print stickers and the meow sticker from the Fur-ever Friends Sticky Quotes sheet; some blue enamel dots (from the neon set); some stamping and black mist splatters.


I also added my handwritten journaling and a couple of white Tiny Sticky Quotes - there is no project that these stickers don't belong on! haha (PS - I hope you like the tongue-in-cheek way I used the meow sticker in my journaling.) ;)

So, mark it in on your calendars or set a reminder on your phone - the new release lines will go live in the Flutterby Designs store tomorrow night (Sunday 5th Feb) at 8pm (that will be 7pm if you are here in Qld like me). If you have a pet (and not just dogs or cats), you are going to NEED this collection!

Til next time, happy scrapping! X