Friday 26 March 2021

Together | Kitaholic Kits March 2021


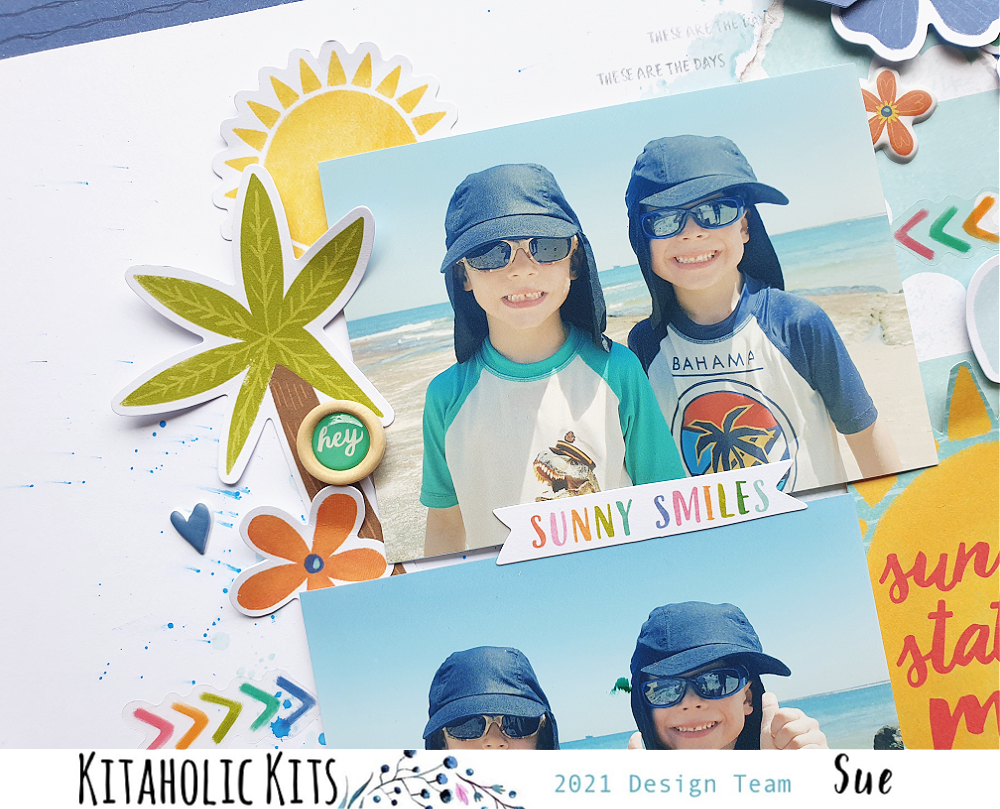
Hi friends! Yes, I am back again with another design team project to share, this time for Kitaholic Kits using the March kit. In case you didn't already know, the March kit features the new 'Sunkissed' collection from Cocoa Vanilla Studio which is totally gorgeous! I thought it would be perfect to pair with this photo of my family and I that was taken at the beach last winter (yes, winter, I am in Queensland after all!)


I started this page with a sheet of white cardstock and a couple of Distress Oxides (Shabby Shutters and Mustard Seed), along with my foam blending tools that I had decided to dust off for a change. I blended some of each colour in the central area of the page, then used a paint brush to splatter some water over the top. I then dabbed the water up with paper towel, which also drew up the colour, leaving a fabulous distressed effect.


Once the colour was down on the background, I added layers of patterned paper which included the yellow floral from Fun in the Sun; the wood grain from Just Chillin'; and the blue stripe from Bright Side. I loved the colour combination of these papers together and I used tearing and distressing to add texture to them. 


I matted my photo using the cloud print from the Just Chillin' paper, and I also added a paper doily and some frayed gauze under my photo. 

To embellish my page I used fussy cut floral pieces from the Growing Wild paper as the basis of my three clusters.


I added text to my page using a mix of Accessory Stickers and Die Cut Ephemera pieces. My title was simply the word together from the gold Glitter Foam Titles


I finished off by adding a few extra splashes of colour to my background using some of the brush strokes from the Clear Sticker sheet, then some splatters of gold and navy mists.

If you would like to watch me create this layout, you can watch my process video below. If you haven't already, I would love it if you would subscribe to my channel and give me a thumbs up if you like what you see. 


Until next time, happy scrapping! X

Wednesday 24 March 2021

Happiness Is | Cocoa Vanilla Studio for the CSI Challenge


Hi everyone, back again with another design team project to share, and this is one that I actually forgot to share here a couple of weeks ago. (Oops!) This layout was created for Cocoa Vanilla Studio as a guest designer for the CSI: Colour, Stories, Inspiration challenge. (Cocoa Vanilla Studio are one of this month's sponsors.) 

Here is the case file that I was working with...


And some more details about the challenge...


I was initially inspired by the animal element to document a photo of my cat Genghis, as he slept curled up on my daughter's book about cats. I thought the colours in the palette lent themselves very well to the Cocoa Vanilla 'Happiness' collection, so that is what I used.


My layout began with a sheet of white cardstock which I had cut down to measure 11x11" and I used a small brayer to lightly apply some pink acrylic paint, then added some stamping over the top using a ledger style stamp from Viva Las VegaStamps


After I created my mixed media background, I mounted it onto the blue watercolour style print on the reverse of the Good Vibes paper. This left me with a beautiful blue border for my page.


For the patterned paper layers in the focal area of my page, I used a mix that included Little Things; Sprinkles; and So Fresh papers. I added some torn edges and frayed gauze to bring texture to the page; and a small red paper doily from my stash for an extra pop of colour.


For my embellishments, I created three main floral clusters using a mix of Die Cut Ephemera and fussy cut flowers from the Little Things paper. I used a label fussy cut from the same paper as my journal spot; and as stipulated in the CSI challenge clues, I added some small flowers to my journal spot too.


I used the words happiness is from the Die Cut Titles pack as my page title, which flowed on directly into my journalling.

I finished off my layout by adding some Clear Stickers around the page – a butterfly, some brush strokes,a tiny heart and a group of crosses. I love adding clear stickers, especially over a mixed media background, as it allows some of your original layers to show through. I also added some small phrase stickers from the Accessory Sticker sheet, then some black ink splatters and I was done!


Visit the CSI blog HERE for all the details of the current challenges and to see what everyone else created for this case file. You have until April 4th to get your entries in to be in the running for one of the prizes on offer, so get busy!

Until next time, happy scrapping! X

Monday 22 March 2021

Totally Awesome Dudes | Cocoa Vanilla Studio


Hi everyone, popping in today to share my latest design team project for Cocoa Vanilla Studio. This one was created for the regular Throwback Thursday feature, where a member of the team creates something new using an older Cocoa Vanilla collection (or two). The purpose of this regular feature is to help inspire everyone to continue using up what they already have in their stash.

For this project I decided to create a boy-themed layout, as I get lots of requests for boy pages, so I dug into my stash of both the ‘Boys Rule’ and ‘Legendary’ collections for an epic mash-up of the two. I love the way they combined for this layout, and I hope you do too!


I started my layout with the mandala-style print of the Explorer paper from the ‘Legendary’ collection as my page base. I then added a small amount of dark grey acrylic paint using a wide brush to help define the focal area of my page. My aim for this layout was to stick with a largely monochromatic palette of black / white / grey, with a pop of one colour, and I chose yellow. I love this colour combination for boys, as it’s a great change away from the traditional blues & greens that are often used for masculine pages.


I added a large piece of the Wild One patterned paper with the gorgeous yellow print in the centre of my page, which provided me with the big pop of colour I was looking for. I used a torn edge to add texture to the page and tucked a smaller piece of the Straight & Narrow striped paper from ‘Boys Rule’ under it. I double matted my photo using the Happy Go Lucky and Messed Up papers (also from ‘Boys Rule’) and added some scrap cardboard under it to pop it up from the page.


My title was the next element I tackled, as I knew I wanted it to fill the space beside my photo. I used a combination of the ‘Boys Rule’ Clear Stickers and ‘Legendary’ Die Cut Titles – because I love a good mixed font title!


For my embellishments, I created three clusters to form a visual triangle. The main cluster was at the bottom right corner of my photo, and consisted of a handmade star embellishment from Charms Creations, which I topped with one of the ‘Boys Rule’ Flair Buttons. I also added a die cut banner along the bottom edge of my photo and some gold twisted wire which I stapled to the page.


For my remaining embellishments I used a mix of ‘Legendary’ Die Cut Ephemera pieces; a few ‘Boys Rule’ Accessory Stickers and some of the ‘Legendary’ Enamel Dots. Then I finished off my page with some black ink splatters.


If you would like to see exactly how this layout came together, you can watch my process video here:


Thanks for stopping by today so I could share this with you. Until next time, happy scrapping! X

Wednesday 17 March 2021

Sunshine State of Mind | Kitaholic Kits March 2021


Hi everyone!

Today I am sharing my second March project for Kitaholic Kits and my first one using the main kit. (You may recall the focus of my first project was the mixed media add-on kit, which I used to create a pretty layout background - you can find my video for it HERE) This month the main kit is jam-packed full of the gorgeous 'Sunkissed' collection from Cocoa Vanilla Studio (lucky me!)

As with any kit, I always find the first layout the hardest one to do. This is largely because I get overwhelmed with the huge choice of materials, but also because the hoarder in me wants to keep everything intact and hold onto it forever. Thankfully, this usually settles down by the time I get to my second layout, and I just rip into it with wild abandon. 

Here is my layout, "Sunshine State of Mind"...


I kept the mixed media relatively simple on this page, in order to allow the 'Sunkissed' collection to really shine. I used Distress Oxides (Tumbled Glass and Salty Ocean) to create a "watery" style background on my cardstock, which I had cut down to measure 11x11" so I could mount it on the Bright Side patterned paper to create a border.


Next, I chose the cloud print from the Just Chillin' patterned paper, which I tore in a way to try to create a similar shape to the one that I had on the page from the Distress Oxide. I then stuck it over the top of the background colour. This then defined the focal area of my page. 


I had two cute photos of my boys at the beach from a couple of years ago, which I added some scrap cardboard to the back of, before sticking down on the page. I chose my title piece Sunshine State of Mind from the Fun in the Sun cut apart paper, fussy cut it out and tucked it in beside my photos. Then it was time for some embellishments!


There are so many gorgeous embellishments in this kit. I used a mix of the Die Cut Ephemera; Floral Ephemera; Wood Buttons; Accessory Stickers; Clear Stickers and Puffy Stickers. I arranged them in close around my photos and followed the cascading design of my paper from top to bottom, focusing on creating three main clusters for balance.


To finish my page, I added journalling then stamped the date and a few phrases. This layout was fairly clean and simple (well for me anyway), and I love the fact that all the elements I chose get their chance to shine.

If you would like to see me put this layout together, you can watch my process video here: 

Thanks for stopping by today, I will be back again with another project share soon. Until then, happy scrapping! X

Monday 15 March 2021

You+Me | Kitaholic Kits March 2021


Hi everyone,

Popping in today to share my first March project for Kitaholic Kits. This month my kit actually arrived in two parts - the mixed media kit first, and then the main kit afterwards. I was in such a hurry to get stuck into the new mixed media kit that I decided to create something right away and combine it with some left-over items from previous kits. I also had a very special photo to document, which is of my mum and I that was taken when I was a toddler. 


My layout began with me creating a pretty mixed media background. I used the Dina Wakley Gloss Sprays and Darkroom Door butterfly stencil from the kit, which I combined with acrylic paints and some stamping. 

You can see exactly how I put the background together, and hear me talk a bit about the Gloss Sprays, in my video here: 


Once the background was done, I moved on to constructing the layout using a mixture of items from previous kits.


The patterned papers I layered under my photos were from Heidi Swapp and I used tearing and distressing, as well as a a paper doily and frayed gauze from my stash to add texture.


For my embellishments I used die cut flowers from the Jen Hadfield 'The Avenue' floral ephemera pack as well as some stickers from the Heidi Swapp 'Old School' cardstock sticker sheet and sticker book.


 To tuck in amongst my layers and add some extra dimension to my page, I also used some leafy Cut to You cut files that I had left-over from a previous project. (One of the reasons I always like to cut a few extras - you never know when you will need them!) The handmade heart embellishment is from Charms Creations, and I love the way the butterfly button ties in with the butterflies on the background.


I finished off with some white sequins,which added some subtle shine to the background. 

I really love how this page came out! If you would like to see how I constructed it after the background was done, you can watch my process video here:
 

Thanks for stopping by today so I could share this with you. Until next time, happy scrapping! X

Friday 12 March 2021

Enchanted Garden painting | StencilGirl


Hi everyone!
Popping in today to share my latest project for the StencilGirl® Creative Team. For today's project I was tasked with the theme "Pastiche". If you haven't been following the team projects that have come before me, then you may not be familiar with the term? Simply put, a pastiche is a work of visual art, literature, theatre, or music that imitates the style or character of the work of one or more other artists. Unlike parody, pastiche celebrates, rather than mocks, the work it imitates.

I began by choosing the work of an artist whose work I find not only beautiful, but also incredibly inspiring. Being Australian, I couldn't go past picking a fellow Aussie, so the artist I chose was Clair Bremner. Clair creates paintings that are inspired by nature, and she uses an amazing combination of both colour and form to translate the things she sees into stunning works of art. I had long wanted to try working in Clair's style, so this provided me the perfect opportunity.

Here's a sample of Clair's work from her online gallery so you can see her style...

I chose this example of Clair's work, as I decided to use a similar colour palette and materials. I chose watercolour paper for my substrate (A3 size), and like Clair, I worked with acrylics.

Here's my piece, I entitled "Enchanted Garden"...


 I used a combination of brayer, silicone spatula, and brush to apply my base colours to the page. I worked in a random fashion, but unlike Clair's piece, I left some white space as I like the balance between busy and clean. 


With the base colours down on the page, it was then time to begin building the layers. The fist stencil I chose was Bouquet Greenery by Wendy Brightbill. This 9x12" stencil features large leafy branches, which I thought would work for trees in the scale I was working in. I used Naples Yellow paint from Monte Marte to provide a contrast to the background colours, and applied the paint using a stippling technique with a brush.


Next, I moved onto some Dusky Pink paint and the Playful Petals stencil designed by Jennifer Evans. I masked off a small section of the stencil and used the same stippling technique to add some groups of petals that I thought would make great bushes. 


At this point I felt my painting needed a little more "light", so I chose white paint for my next layer. The stencil I used was June Pfaff Daly's Inspired by Frida stencil. Once again, I masked off a small section of the stencil, this time a leafy branch, and used it to add some branches into my layers, making sure to overlap them with other portions of my design to help add depth to the piece. 


While I was using the white paint, I also added some sweet little fern branches in the foreground using the Maidenhair Fern stencil by Rae Missigman. I adore the whimsical style of the fern branches on this stencil, and thought it was perfect as part of my tribute to Clair's work. 

The final stencil I used was the super cute Daisies 6 by Terri Stegmiller. In order to be able to be very controlled with my placement, I masked off a single daisy and used Marine (a very dark blue) to add a few flowers around the page. (Because this stencil design was a little more delicate, I simply painted through the stencil with a small flat brush rather than stippled with the larger brush.)


Once all the painted layers were in place, I used a black Sharpie, white Sharpie and a Stabilo All pencil to add the finishing touches to my page. This was simply a case of adding a combination of small mark and lines over the top of the paint. (Make sure the paint is totally dry before doing this, or you will completely ruin the tip of your pens!)

I am so happy with how this piece turned out, and I really hope I did justice to Clair's amazing style. You can view more of Clair's work on her website: http://www.clairbremnerart.com/

If you would like to watch me create this painting, I have a video of my process available:


Thanks so much for stopping by today so I could share this with you. Until next time, happy creating! X