Showing posts with label Legendary collection. Show all posts

Tuesday, 6 July 2021

Super Stars | Danni Vee's 4K Hooray YouTube Hop


Hi everyone, I hope this finds you well. It's been super busy around my house lately with the kids on school holidays and I haven't had much time to sit at my desk and create. *insert sad face* I did however, have a chance recently to play along with Danni Vee's 4K Hooray YouTube hop. This hop was put together to celebrate my dear friend Danni's recent milestone of reaching four thousand subscribers on YouTube. Such a fabulous achievement!

For the hop, Danni invited us to create a layout using four of her favourite items from the grid below...


In a further nod to Danni, several participants (myself included), also decided to scraplift one of Danni's layouts. I knew immediately which one I wanted to do, because it was one of my favourite Danni layouts of all time...


This was one that Danni created for the Cocoa Vanilla Studio design team, and given that I am fortunate enough to be on this team with her, I thought it was the perfect choice. Danni used the 'Legendary' collection for her page, so of course I did the same. 

Here's my take on it...


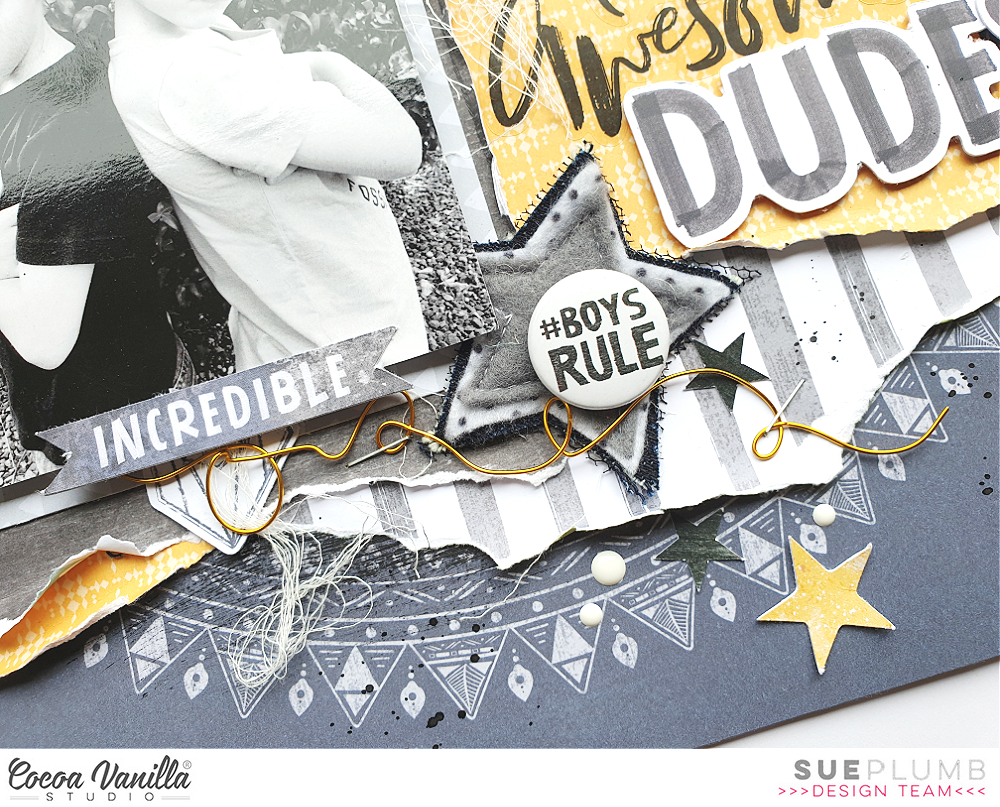
The photo I chose to document was of my boys at their cross country at school. They placed second and fifth for their age group, which was an awesome performance from them both. 

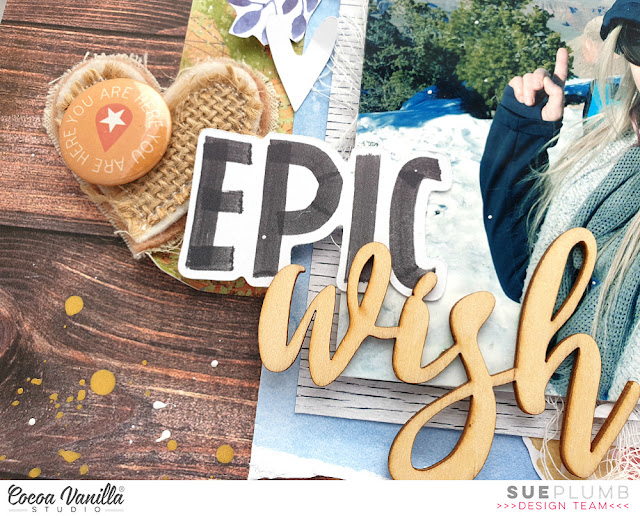
I started my layout with the same wood grain paper that Danni did, which is just about my favourite paper from this whole range. I added some subtle mixed media to my page using texture paste and a stencil from Dusty Attic. I also added some white and teal splatters and then set it aside to dry.


For the focal area of my page, I matted my photo using blue star print paper then added the layer of the teal chevron print paper (which was actually from the 'Sunkissed' collection) underneath it. Amongst the layers I also tucked in a grey paper doily, and some frayed gauze for texture before sticking my photo on top.


I knew I wanted to use the title "Super Stars" for my page using the Die Cut Titles from the collection. (I did have to improvise and add an extra "s" to the end of star, which I simply cut from another word.) I stuck my title down along the bottom edge of the photo, just as Danni had placed hers. 


When it came to embellishing my page, I wanted to use stars to tie in with the title. I gathered together a selection from the Die Cut Ephemera pack and tucked them in around my photo. On the right edge of my photo I also added the certified legend ribbon, because it worked perfectly with the theme of the page. 


Like Danni's page, I finished off with some tiny phrase stickers and a scattering of enamel dots (both of which were on Danni's list of materials). In the end, I ticked off:
- patterned paper background
- ink splatters
- tiny word stickers
- enamel dots
AND, I added in a scraplift to boot!

If you would like to see how this layout came together and see the videos from the other participants in Danni's hop, check out my process video here (there is a inked listed of participants in my video description):


Until next time, happy scrapping! X

Friday, 9 April 2021

Brothers Love | Scrappy YouTubers Lift-a-thon


Hi friends! I've got an extra project to share with you today - a layout that was created for the Scrappy YouTubers Lift-a-thon. (I know, it sounds kind of strenuous doesn't it? I promise it's not!) 


This huge YouTube hop has a long list of very talented participants and I was so happy to be able to take part. For the hop, each participant scraplifts a project from the next person on the list, which means there is a new video going up every day for well over a month. (You can find the full list of participants and a link to each of their channels in my video description on YouTube.)

I was tasked to scraplift a project by the lovely Joanne Bartell, and below is a shot of the pretty layout I chose to lift.


I decided to put my own spin on Joanne's page by creating a boy page for my layout, and I used the 'Legendary' collection from Cocoa Vanilla Studio.


I documented a sweet photo of my boys that I took one day when one of them wasn't feeling well.


Besides the 'Legendary' collection, I also added some mixed media to my page using a Distress Oxide with a cool stencil from StencilGirl, and some stamping using one of my favourite background stamps from Viva Las VegaStamps
 

I added texture to my page with the use of frayed gauze, and included metallic elements of wire and staples to help give it a masculine feel.


I also included a handmade star embellishment from Charms Creations, which I layered with the Cocoa Vanilla flair button. 

I was so happy with how this layout turned out - I do love a good boy page!
If you would like to see exactly how this all came together, make sure you pop over and watch my process video. (And don't forget to visit all the participants as the hop progresses too.)


Until next time, happy scrapping! X

Monday, 22 March 2021

Totally Awesome Dudes | Cocoa Vanilla Studio


Hi everyone, popping in today to share my latest design team project for Cocoa Vanilla Studio. This one was created for the regular Throwback Thursday feature, where a member of the team creates something new using an older Cocoa Vanilla collection (or two). The purpose of this regular feature is to help inspire everyone to continue using up what they already have in their stash.

For this project I decided to create a boy-themed layout, as I get lots of requests for boy pages, so I dug into my stash of both the ‘Boys Rule’ and ‘Legendary’ collections for an epic mash-up of the two. I love the way they combined for this layout, and I hope you do too!


I started my layout with the mandala-style print of the Explorer paper from the ‘Legendary’ collection as my page base. I then added a small amount of dark grey acrylic paint using a wide brush to help define the focal area of my page. My aim for this layout was to stick with a largely monochromatic palette of black / white / grey, with a pop of one colour, and I chose yellow. I love this colour combination for boys, as it’s a great change away from the traditional blues & greens that are often used for masculine pages.


I added a large piece of the Wild One patterned paper with the gorgeous yellow print in the centre of my page, which provided me with the big pop of colour I was looking for. I used a torn edge to add texture to the page and tucked a smaller piece of the Straight & Narrow striped paper from ‘Boys Rule’ under it. I double matted my photo using the Happy Go Lucky and Messed Up papers (also from ‘Boys Rule’) and added some scrap cardboard under it to pop it up from the page.


My title was the next element I tackled, as I knew I wanted it to fill the space beside my photo. I used a combination of the ‘Boys Rule’ Clear Stickers and ‘Legendary’ Die Cut Titles – because I love a good mixed font title!


For my embellishments, I created three clusters to form a visual triangle. The main cluster was at the bottom right corner of my photo, and consisted of a handmade star embellishment from Charms Creations, which I topped with one of the ‘Boys Rule’ Flair Buttons. I also added a die cut banner along the bottom edge of my photo and some gold twisted wire which I stapled to the page.


For my remaining embellishments I used a mix of ‘Legendary’ Die Cut Ephemera pieces; a few ‘Boys Rule’ Accessory Stickers and some of the ‘Legendary’ Enamel Dots. Then I finished off my page with some black ink splatters.


If you would like to see exactly how this layout came together, you can watch my process video here:


Thanks for stopping by today so I could share this with you. Until next time, happy scrapping! X

Thursday, 11 June 2020

You Are My Sun | Cocoa Vanilla Studio


Hi everyone! Today I am sharing a mixed media layout I created recently for Cocoa Vanilla Studio using the 'Legendary' collection. I had these two cute photos of my equally cute boys dressed and ready for their end of year party day at school. 

Here is my layout "You Are My Sun"...
(Click on photos for a better view)


I began my page using a sheet of white cardstock and some 'Mowed Lawn' Distress Oxide. I used my go-to method of applying the ink to my messy mat, adding a little water, and then laying the cardstock over the top to absorb the ink. I then allowed it to dry before I repeated the process with some blue ink, then added some stamping with black ink using a stamp from Viva Las VegaStamps that featured tiny stars.

Once the inks were dry, I added a small tear along the top edge of the cardstock, then folded the edges of the tear back and fastened with tiny staples. I then backed the tear using some of the green print from the cut apart Total Legend paper. To balance it out, I then added a torn piece of the green striped print from the Explorer paper, adding a little torn marble print washi tape from my stash over the top.


 I then turned my attention to the main focal area of my page, adding pieces of layered papers to create a photo mat. The papers I used included the blue star print from the Offbeat paper; more of the green stripe; the bold orange from the One Way paper; and the multi coloured stars of the All Star paper. I also added some more of the torn washi tape, frayed gauze, and a charcoal coloured paper doily from my stash.


After fastening all my layers in place and then adding my photos on top, it was time to get busy embellishing! The first piece I added was my title piece, which I fussy cut from the Epic Tales cut apart paper. I don’t tend to add my titles before other embellishments, but because this was a large piece and it had to be placed to the left of my photos (to hide the straight edge along the right side of it), I needed to place it first.


Now it was time to add “the sprinkles” – because that’s what embellishments are, right?! The sweet little morsels we add to finish things off. First and foremost, my layout needed STARS! (What else was I going to use with a title like that?) I fussy cut a handful of various sized stars from the All Star paper and scattered them around my page, bending the points up for extra dimension.


To balance my title, I needed a cluster to the right of my photos so I added a moon, the incredible label and an arrow from the Die Cut Ephemera pack (using foam tape to pop them up a little from the background). Above my photos I added a little star banner (also from the ephemera pack) and the little hey there phrase from the Accessory Sticker sheet. I then finished off my page with a splattering of navy mist.

Thanks so much for stopping by today so I could share this with you, I hope you are feeling inspired to pull out your supplies and get creative to. Until next time, happy scrapping! X

Monday, 1 June 2020

Epic Wish | Cocoa Vanilla Studio June Challenge


Hi friends!
I am super excited to be sharing this with you today - Cocoa Vanilla Studio now has a new monthly challenge that will be held in our Cocoa Vanilla Studio Community group on Facebook. (Yay!) Each month the design team will take turns to collate a mood board to be used as inspiration and I am so happy to say the June mood board was put together by me!

Here's a look at my "Rustic Trails" board...


And here is the layout I created that was inspired by the board...


I decided to draw on the travel theme that was represented in the board by documenting a selfie I took at the Grand Canyon. This was taken at the moment I first walked up to the edge, and was a moment I had dreamt of for most of my life. The Grand Canyon had long been #1 on my travel wish list, so to finally be standing there was almost beyond belief (and may have even caused me to shed a few tears). 


I began my layout with the wood grain paper from the 'Legendary' collection, which was inspired by the image of the gorgeous timber table on the board. (I love this paper so much!) I then set about adding some paper layers. First, a piece of the map print, which is the reverse side of the wood grain on the Outdoors Type paper. I trimmed down a rectangle shape so that there was only a little green showing and it was largely the warm, earthy orange tone I was looking for.


Continuing on with the wood theme, I used the white wood grain paper from the 'Wild at Heart' collection to mat my photo. I added a second layer, again using a paper from 'Wild at Heart', that featured a pretty blue watercolour to tie in with the blue sky in my photo. I also tucked a grey doily into my layers before stapling the stack together and sticking it onto the page. To add some texture, I added frayed gauze, then stuck my photo down on top. 


Now it was time to draw in those beautiful rustic flowers from the board by adding some fussy cut floral pieces. I used a floral paper (again from 'Wild at Heart'), and tucked them in under the edges of my photo to frame it. 

At this point, I really wanted to add an extra floral element, and I also wanted to draw in the white from the board, so I used the beautiful 'Bouquet' cut file from Cut to You. This is a fairly large piece, so I actually cut it into sections so I could tuck it into my layers and add to the diagonal flow of the page. I topped the cut file with a couple of vellum flowers from the 'Love Always' collection.


Now it was time for some smaller embellishments. First my page needed a title, so I used the word EPIC from the 'Legendary' die cut tile words combined with the wood veneer word wish from the 'Make a Wish' collection. I really wanted to draw in the hearts from the board, so I also added a few wood veneer hearts from the same pack, a Charms Creations handmade heart and a few white cardstock hearts I had left over from previous cut files. 


I found the perfect flair button in my stash to pop on top of the Charms heart, which came from the 'Made of Awesome' collection. (This boy collection is no longer available in physical form, but you can purchase it as a digital bundle to print and cut yourself at home HERE)

I finished off with some splatters of gold Heidi Swapp Color Shine and some splatters of 13Arts white acrylic ink. (And yes, some of them got on the photo but I don't care - I was standing in the snow anyway!)

If you would like to watch this page come together you can check out my process video on my YouTube channel here:


That's all from me today. If you love the look of my "Rustic Trails" mood board and would like to join our challenge, make sure you are a member of the Cocoa Vanilla Studio Community group. Simply upload your entry into the challenge album there to go in the running for a $25 store voucher.
Happy scrapping! X

Tuesday, 19 May 2020

Super Silly Fun | Cocoa Vanilla Studio


Hi everyone! Just wanted to pop in and share a recent layout I created for Cocoa Vanilla Studio. For this layout I was tasked with incorporating the theme of “sewing”, which gave me a great excuse to dust off my sewing machine and put it to good use. I decided to use the ‘Legendary’ collection for my page and pair it with a series of photos of my boys and hubby having some fun with a swing at the park.


I started with a sheet of white cardstock that I cut down to measure 11×11″, and then mounted it against the fabulous rainbow stripe of the Wild One paper. I chose this paper as my base as I really wanted to coordinate with all the colours that were present in my photos. It also opened up a broad colour scheme for the papers I was going to use on my page.


For my design I knew I wanted something fun with lots of colour and a feeling of movement to echo the action in the photos, so I decided to create a large banner. Once I had decided where my photos were going to sit on the page, it was simply a matter of cutting an assortment of different sized paper pieces for the sections of the banner. (The papers I used included All Star; Total Legend; Wild One; Offbeat; and Explorer.) I then used a small amount of glue to tack the pieces lightly in place before I used my sewing machine to stitch down the middle of a few of them.


I then tacked the photos lightly in place before adding several lines of stitching back and forth across the top to represent the string of the banner and hold them firmly in place. (I deliberately left all the loose threads hanging intact, as they added to the texture of the page.) I then went back and bent up the tails of the banner pieces, as well as the bottom edges of my photos so they would look as though they were blowing in the breeze. Now it was time for some embellishments!


I started by tucking the large circular frame / mandala piece from the Die Cut Ephemera pack in underneath the middle photo, then added a large star over the top (which I also bent up from the page). I chose the words super and silly from the Die Cut Titles pack and tacked them along the top of my photos. I then took to it with my sewing machine again, and added some lines of stitching over the top, before I added the word fun from the Clear Stickers pack underneath.


In amongst the banner pieces, I tucked in a couple of tickets and a small flag from the Die Cut Ephemera pack; then I added a couple of phrases stickers from the Accessory Sticker sheet along the bottom of the left photo. From the Clear Sticker set, I added two chevrons on either side of my photos to indicate a “swinging” motion and to help draw the viewer’s eye through.


At the top of my page I added some crazy, silly stitching in each of the top corners, then added a date label from the Accessory Sticker sheet to the right hand side. I finished off by adding a few paint splat Clear Stickers, and then a few splatters of black ink and I was done!

This was a really fun page to put together, (especially doing all that random wild sewing!) and I am really happy with the result. If you have a sewing machine but you aren’t confident sewing on a layout, then this type of project might be right for you because perfection is not necessary.

Thanks so much for stopping by today so I could share this with you. Until next time, happy scrapping! X

Monday, 11 May 2020

You Shine and Best Buddies | Scrapbook Class for the ScrappingClearly Cyber Crop


Hi everyone!
A bit of a catch up post from me today, as I didn't realise I hadn't shared this pair of layouts on my blog yet. In case you didn't see via my Facebook page last month, I was thrilled to be asked by the lovely Kylie Tout from ScrappingClearly to be part of her April Cyber Crop. It was such a sensational event, filled with inspiration from a multitude of mixed media and papercraft artists. Just take a look at this stellar line up and see how many faces you recognise...


And yes, that's little ole me in there included in the mix!

So for my contribution to the crop, I decided to design a free online scrapbook class that people could follow along at home and create their own version of my layout using whatever materials they had on hand. I created two versions of my layout for my class - both feminine and masculine, using the Cocoa Vanilla Studio 'Unforgettable' and 'Legendary' collections respectively. This was to demonstrate that the class instructions could be applied to either one. I also included some basic mixed media techniques to ensure that people of any skill level could achieve.

Here is the feminine style layout "You Shine" first, using 'Unforgettable'...
(Click on photos for a better view)


I won't go into all the details of how I created it here, as you can watch my process video to see how I did it below, or follow along with my printable instructions which are available to download HERE

Here's a few close-ups...


You can see below how I layered the flair button with a handmade star embellishment from Charms Creations


And just to show how versatile this class can be, I created a second layout "Best Buddies" in a masculine style using the 'Legendary' collection...


As I mentioned earlier, you can adapt this class to use whatever materials you have on hand, and if you aren't fussed on using mixed media you can simply leave it off.

Here's a few close-ups...


Again, I used a star from Charms Creations to layer under my flair button.


If you would like to see exactly how I put my "Shine Bright" page together, you can watch the process video here:


That's all from me today, thanks for stopping by. If you use my class to create a layout of your own please make sure you share it with me! You can post to, or message my Facebook page, or tag me on Instagram @sue.plumb
Until next time, happy scrapping! X