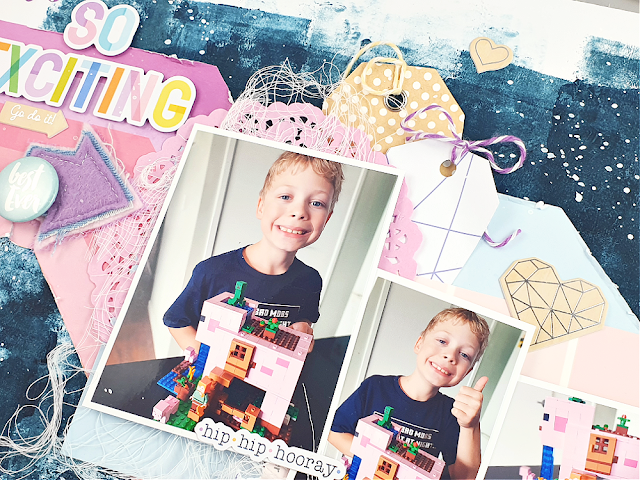
Hi everyone, today I have another project using the awesome new 'No Limits' collection from Cocoa Vanilla Studio. (Loving this collection SO much!) This layout features a photo of my hubby and one of my sons that I took while they were busy doing work in our garden recently. (This boy loves to help his Dad with projects in the yard!) I decided to use the wood grain print from the Big Bang patterned paper as my background for this page, as I thought it would work well for the outdoor theme.
You can see I have added some light mixed media layers to my background paper. I used a combination of acrylic paint, a stencil with ink, stamping, and splatters.
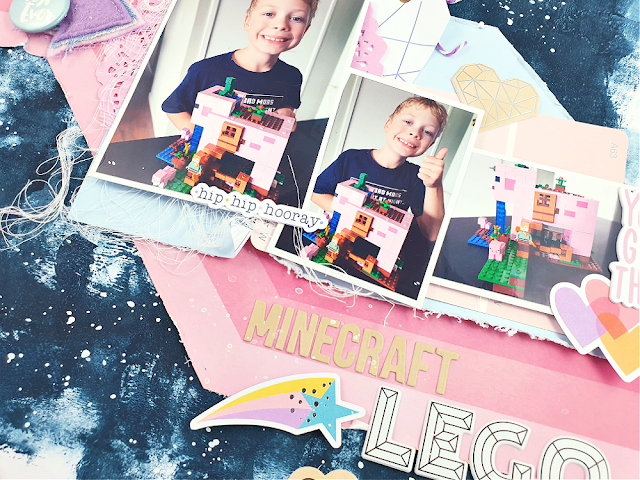
I used a mix of layered patterned papers for the focal area of my page that included Stardust, Orbit and Latitude and I used distressing, tearing and some frayed gauze to add texture. I also tucked in a paint sample card from my stash to help draw in the green on my sons hat, which I thought also worked well with the DIY that was happening on the day.
I used Die Cut Title words for my page title, but then used the always be your awesome self quote card from the Universal cut apart paper below it as a subtitle. Both of these were popped up from the page like my photo to create dimension and help them stand out from the background.
To embellish my layout I used lots of fussy cut stars from the gorgeous Nebula paper, which I combined with pieces from the Die Cut Ephemera pack and Accessory Sticker sheet.
I also added a few pieces from the Chipboard Sticker sheet which also provided some extra dimension.
Of course I couldn't help but include some of my favourite embellishment from this collection - those stunning Puffy Stickers. (Seriously, I wish I had a million of these things!)
If you would like to see how this layout came together, you can watch my process video here:
Thanks for stopping by today, I hope you are feeling inspired to use up those scraps on your desk! Until next time, happy scrapping. X
Today I am popping by with some images of a layout I created recently for the "Mix It Up Monday" creative hop. The premise of this hop was to take a traditional scrapbook sketch and "mix it up" using mixed media / stitching / texture, etc.
This is the sketch by Rochelle Spears that we were all working with...
And here is my take on it, which I did in my "girly grunge" style...
I have a process video for this layout available which you can view here:
There is a linked list to all the videos from the hop participants in my video description on YouTube, so please click over to my channel if you'd like to follow along.
Here are a few close-up photos of my layout...
If you missed my previous post containing the announcement about my blog, please click HERE
That's all from me today, thanks for stopping by. Until next time, happy scrapping! X
Hi everyone! So excited to be sharing another new layout with you today, and this one is using the January 2022 Hip Kit. This kit features a Hip Kit Club exclusive collection called 'Kaleidoscope' and it is really pretty! (If you want to see exactly what is in the kit, you can watch my unboxing video HERE)
Here is my layout...
For this page, I was documenting some photos of one of my boys with his Minecraft Lego. He was so excited to get this as it combines two of his favourite things. One of his other favourite things at the moment is the colour pink, so I wanted to make sure I got plenty of pink on this page for him.
My mixed media background was created using acrylic paint applied with a brayer over plain white cardstock. The white dots are splatters of Dylusions ink spray.
I challenged myself to use only one patterned paper from the kit and chose this one with a bold striped pattern. I fussy cut part of the pattern and that formed the base for the design of this page.
I used a mix of the exclusive Hip Kit 'Kaleidoscope' embellishments from the kit including faux wood veneer chipboard stickers; die cut ephemera and chipboard stickers. I also added a few items from my stash, as I had gathered together a selection of coordinating pieces prior to starting my page. These included a Charms Creations arrow, paint sample card and enamel dots, amongst others.
I love mixed font titles, so I chose some small Pinkfresh Studio alpha stickers to mix with the larger puffy geo print alphas from the kit.
If you would like to watch me create this layout and hear me talk more about it, you can watch my process video below:
That's all from me today, thanks for stopping by. Until next time, happy scrapping! X
Hi everyone, popping in today to share my very first project using the brand new 'No Limits' collection from Cocoa Vanilla Studio. You know I am a passionate boy scrapper, so I can't tell you how excited I was to receive this new collection! There is no arguing that Zoe does THE BEST boy collections and this one is no exception. Besides the awesome colour palette which includes blues, greens, orange, and even a pop of red; it also features some fabulous bold patterns and a bit of space themed imagery. (Not enough that I would necessarily consider this an entirely "themed" collection though, as it could be used for all sorts of creations.)
For my first project I decided to create a 12x12" mixed media layout, combining the collection with Distress Oxide, acrylic paint, modelling paste with a stencil and also some stamping.
You can see that this layout contains many layers - from the mediums on the background, right through to multiple paper layers, texture from frayed gauze and an assortment of embellishments.
The B side of the Orbit paper (which just might be my favourite pattern from this collection) was what I chose for my page border, and I also used the same print from the A5 Paper Stack to mat my photo with.
Torn pieces of the Stardustand Spark papers were used to define the focal area of my page and add texture. A banner piece from the Chipboard Sticker sheet added the sentiment to the bottom of my photo.
Die Cut Ephemera and Accessory Stickers always make it easy to embellish a layout. The 'No Limits' ephemera pack contains 64 pieces, providing plenty of choices; and the sticker sheet contains a great mix of phrases, icons, labels, etc.
The Puffy Stickers (definitely my most favourite item from this collection - I need 1000 of these!) and Wood Buttons are both great embellishments for adding extra small details and subtle texture to the page.
You can see exactly how I put this layout together and hear me talk about it in more detail in my process video:
Thanks so much for stopping by today. If you have any questions, feel free to leave them here in the comments or over on my video.
I've got a fun mixed media layout to share today that was created just for ME! If you have been around for a while you would already know that mid last year I took the plunge and subscribed to Hip Kit Club's monthly scrapbook kit. Unfortunately, not long after that I had to pack all my craft supplies away and move house, and I haven't really had a chance to play with my kits since. So it was high time that I crack one open and get some creating done! I chose the August kit, which was a bright, fun kit full of a mix of different brands. I chose to document a series of photos of myself after a visit to the hairdresser last year.
I started my layout with a sheet of 300gsm cardstock and Mont Marte Dimension paint in Paynes Grey. I used my favourite Number 4 brush and the dry brush technique to add some background colour to the page. I then used floral stencil from StencilGirl (Rose Bouquet) and BeeArtySnow White Colour Paste to add some subtle detail over the top of the paint.
Next, I cut a large piece of one of the Hip Kit exclusive papers, choosing the B side for the beautiful orange colour and subtle pattern. (I always love a B side!) I distressed the edges of the paper using scissors (I was scrapping away from home and didn't have my distress tool with me) and then used my fingernail to ruffle it up a bit more. I used another of the Hip Kit papers featuring a black and white sketchy style floral pattern to add a piece above and below the orange paper. I tore along the edges of each strip to add texture. On top of the papers I added a dark grey paper doily and some frayed gauze and before placing my photos on top.
When it came to the embellishments I actually found myself a little challenged. Most of the embellishments were either the wrong colour for the palette I had chosen (I didn't really think it through before I started), or didn't fit with the theme of my page. In the end I chose the Floral Study paper by Vicki Boutin, and fussy cut several flowers from it to use as my main embellishments and tucked them in around my photos.
I chose the word smile from the Amy Tan Thickers in the kit which matched well with the pops of red from the roses on my jacket. I also found a few small pieces in the Simple Stories ephemera pack that matched with the warm tones I was using and added them to the page.
Luckily, the Simple Stories foam alphas in the kit were the perfect match for the main paper I had chosen, so I used them in my title. I finished off my layout with some of the Prima crystals; handwritten journalling; some stamped phrases; and tiny red splatters using Barn DoorDistress Oxide.
Overall I was happy with how the layout turned out, but I would probably think more carefully about how my choice of colours / photos will work with the kit before I dive in next time. Oh well.
If you would like to watch how I put this layout together, I have a video available on my YouTube channel here:
If you have any questions, feel free to leave them in the comments section of my video, here on my blog post, or connect with me via my Facebook page.
Hi everyone, popping in today to share my latest Cocoa Vanilla Studio design team project with you. For this one I decided to pull out my supplies of the beautiful 'These Days' collection as I still have plenty in my stash left to play with and was dying to use it again. I also had a sweet photo of my boys together that I took last year when they were heading off to their first school disco. Although they might be twins, you can see that they are very different and both have their own individual styles, which I thought was summed up quite well in this shot.
Despite the fact this range has quite a broad palette of soft colours, I decided to focus on predominantly the blue and green tones combined with the wood grain for my background. Before I moved onto my papery layers however, I really wanted to add some depth to the background by adding some paint and stamping. I used a white Mont Marte paint applied with a brayer, which also helped me to define the focal area of my page. Over the top of the paint, I used a brick pattern stamp from Viva Las VegaStamps with a grey ink.
For the papery layers over my background, I used a few papers from the A5 Paper Stack which I cut and tore to size. I also added a grey paper doily from my stash, a strip from the cut apart paper, and some frayed gauze for texture. My photo also had some scrap cardboard adhered to the back of it to help pop it up from the page.
For my embellishments, I started with the Die Cut Ephemera pack. I chose a doodled frame first, which I cut in half and tucked half in under the right edge of my photo. I often use frames in this way (cut into pieces and tucked into layers) as opposed to the way they were designed to be used. I also chose the stack of books from the ephemera pack as I thought this worked well with the fact it was a school disco the boys attended.
I used the gorgeous Mini Puffy Alpha stickers for my title, as I didn't want to detract from all the delicate elements I had on the page. I love these alphas sooo much, they are a perfect size and such a pretty mix of colours. Along with the puffy alphas, I also added some of the Puffy Stickers to my page - a heart, a flower and a butterfly (because you can never have too many butterflies!)
There were plenty of regular Accessory Stickers on this page too - you can see how I used the tab and flag amongst the cascade of embellishments alongside my photo, and there were several phrase stickers used as well. From the Clear Stickers sheet I used three small clusters of crosses and a green brush stroke. This coordinated beautifully with the green Epoxy Wood Button that I also included.
I finished off my layout with handwritten journalling; stamped phrases and date; and some black stamped doodled circles and dots (stamp from Viva Las VegaStamps).
I have a process video available for this layout. If you would like to see how it came together you can watch it here:
Thanks so much for stopping by today so I could share this with you. Until next time, happy scrapping! X
Today I am here to share my latest design team project created for Cocoa Vanilla Studio. This layout was created specifically for the Throwback Thursday feature, where a design team member is tasked with creating something new from an older collection. I chose the beautiful 'Sunkissed' collection that was released approximately a year ago, and features lots of vibrant colours - right up my alley!
For this layout, I wanted to create a mixed media page and decided to use some of my stash of acrylic paint. I love using paint because it is quick, easy, economical, and available in a great range of colours. And even those of you who are not “mixed media people” will usually have access to paint if you want try a technique like this yourself. (I didn’t use any fancy paints – cheap student grade acrylics will do the job!)
The photos I documented on this page are of my two boys taken on the day of their colour run at school. This was not long after they had crossed the finish line and they were both so proud of how wet and coloured they were. (And no, I didn’t bother trying to wash the clothes, they were destined for the bin anyway.) It was the colours of the paint on their clothes that inspired my colour choices for this layout.
As I mentioned above, I used acrylic paint for my mixed media background on this page. I used three different colours which I applied with a small brayer. (This method is great if you are short on time as the thin application means it dries super fast!) I then mounted my painted cardstock on top of the beautiful Good Vibrations striped paper, which created a fun page border.
Next, I added my rainbow arches, which had been fussy cut from a piece of the Bright Side paper left over from a previous project. I cut only the pink, orange and yellow arches (or what I had of them anyway) and stuck them onto my background.
I then created a layered mat for my photos to sit on using a piece of the heart print Feelin’ Fine paper, topped with a piece of the smaller scale cloud print paper from the A5 Paper Stack and finally a scrap of the Summer Lights paper. I also added a small yellow paper doily and some frayed gauze for texture before adding my photos on top.
The next step was to add my title, which I ran along the horizontal strip in my paper stack. To the left of my photos I used some alphabet stickers I had left over from the 'Love Always' collection for the word colour and then to the right, I used the word fun from the Glitter Foam Title Stickers. Look at that gorgeous golden sparkle!
With all the main components in place, it was time to add a few fun embellishments. I chose a number of pieces from the Die Cut Ephemera pack including a flag, umbrella, and a watermelon slice. These were chosen purely based on their colour, but I love that they add a touch of whimsy to the page. I also added several stickers from the Puffy Stickers pack.
I finished off with some phrases from the Accessory Sticker sheet and some tiny black ink splatters. I love how fun and colourful this layout turned out!
If you would like to see exactly how it came together, you can watch my process video here:
Thanks for stopping by so I could share this with you, I hope you are feeling inspired to bust out some of your older Cocoa Vanilla stash now too! Until next time, happy scrapping! X
Hi everyone, today I am sharing a layout I created for the "Favourite Escape" YouTube hop that I am currently taking part in alongside a bunch of talented creators. The theme of favourite escape could be interpreted any way we wanted, so I chose to document one of my very favourite escapes - scrap retreat! These photos were from my retreat on the Sunshine Coast back in November 2018, but really they are representative of any and all the retreats I've been on. So. Much. Fun.
I decided to use the 'Let's Wander' collection from Vicki Boutin as the basis for my page. (I have so much of it hoarded and I really need to let go and start getting stuck into it!) The travel theme and colours of this range were perfect for these photos that were taken on our dress up night (our theme was "Trouble in Paradise").
I decided to use patterned paper for my background, choosing the black paper with the white script words say cheese. (I thought this paper was appropriate give that these photos were taken in our photo booth corner.) I decided to add some acrylic paint to the focal area of my page. I used a Dina Wakley sky blue paint (which was conveniently still on my desk from a previous project), plus some white paint, both of which I applied with a brayer.
Next, I added some extra papery layers to go in behind my photos (all Vicki Boutin papers). I chose the bright green leafy print paper first, as it was totally made to go with the shirts Mandy and I were wearing. I also added a splash of orange to tie in with the colour of Fiona's dress. I also added some frayed gauze under my photos and a few pieces of torn washi tape to the page.
When it came to embellishing the layout I didn't stray far from the 'Let's Wander' collection. I used a few pieces from the chipboard Thickers pack including the labels I attached to each of my smaller photos and the orange phrase label that formed part of my title. The remainder of my title was some of my favourite black foam Thickers.
I chose three large die cuts from the ephemera pack (sunglasses, camera and a leafy branch), and used them to create my "visual triangle" around my main photo. I chose the large size die cuts because anything smaller would have been overwhelmed on this bold, busy page. I also added a couple of stickers from the sticker sheet.
I finished off with my handwritten journalling and a scattering of small orange star buttons.
Check out my process video for this page, and please make sure you visit the other creators who are taking part in the hop - you might just find some new scrappers to follow. (You can find a full list of the participants in my video description over on YouTube.)
Thanks so much for stopping by today, I'll see you again soon. Until then, happy scrapping! X