Showing posts with label art journal. Show all posts

Friday, 12 March 2021

Enchanted Garden painting | StencilGirl


Hi everyone!
Popping in today to share my latest project for the StencilGirl® Creative Team. For today's project I was tasked with the theme "Pastiche". If you haven't been following the team projects that have come before me, then you may not be familiar with the term? Simply put, a pastiche is a work of visual art, literature, theatre, or music that imitates the style or character of the work of one or more other artists. Unlike parody, pastiche celebrates, rather than mocks, the work it imitates.

I began by choosing the work of an artist whose work I find not only beautiful, but also incredibly inspiring. Being Australian, I couldn't go past picking a fellow Aussie, so the artist I chose was Clair Bremner. Clair creates paintings that are inspired by nature, and she uses an amazing combination of both colour and form to translate the things she sees into stunning works of art. I had long wanted to try working in Clair's style, so this provided me the perfect opportunity.

Here's a sample of Clair's work from her online gallery so you can see her style...

I chose this example of Clair's work, as I decided to use a similar colour palette and materials. I chose watercolour paper for my substrate (A3 size), and like Clair, I worked with acrylics.

Here's my piece, I entitled "Enchanted Garden"...


 I used a combination of brayer, silicone spatula, and brush to apply my base colours to the page. I worked in a random fashion, but unlike Clair's piece, I left some white space as I like the balance between busy and clean. 


With the base colours down on the page, it was then time to begin building the layers. The fist stencil I chose was Bouquet Greenery by Wendy Brightbill. This 9x12" stencil features large leafy branches, which I thought would work for trees in the scale I was working in. I used Naples Yellow paint from Monte Marte to provide a contrast to the background colours, and applied the paint using a stippling technique with a brush.


Next, I moved onto some Dusky Pink paint and the Playful Petals stencil designed by Jennifer Evans. I masked off a small section of the stencil and used the same stippling technique to add some groups of petals that I thought would make great bushes. 


At this point I felt my painting needed a little more "light", so I chose white paint for my next layer. The stencil I used was June Pfaff Daly's Inspired by Frida stencil. Once again, I masked off a small section of the stencil, this time a leafy branch, and used it to add some branches into my layers, making sure to overlap them with other portions of my design to help add depth to the piece. 


While I was using the white paint, I also added some sweet little fern branches in the foreground using the Maidenhair Fern stencil by Rae Missigman. I adore the whimsical style of the fern branches on this stencil, and thought it was perfect as part of my tribute to Clair's work. 

The final stencil I used was the super cute Daisies 6 by Terri Stegmiller. In order to be able to be very controlled with my placement, I masked off a single daisy and used Marine (a very dark blue) to add a few flowers around the page. (Because this stencil design was a little more delicate, I simply painted through the stencil with a small flat brush rather than stippled with the larger brush.)


Once all the painted layers were in place, I used a black Sharpie, white Sharpie and a Stabilo All pencil to add the finishing touches to my page. This was simply a case of adding a combination of small mark and lines over the top of the paint. (Make sure the paint is totally dry before doing this, or you will completely ruin the tip of your pens!)

I am so happy with how this piece turned out, and I really hope I did justice to Clair's amazing style. You can view more of Clair's work on her website: http://www.clairbremnerart.com/

If you would like to watch me create this painting, I have a video of my process available:


Thanks so much for stopping by today so I could share this with you. Until next time, happy creating! X

Saturday, 9 November 2019

Scribble That Shit Out - Art Journal Page | Viva Las VegaStamps


Hi everyone!
Today I am popping in to share an art journal page that I created for Viva Las VegaStamps to showcase one of the stamps from the recently released plate #1517, which features some fabulous arty scribble-style faces. I wanted my page to represent the creative thought process, and how therapeutic art can be.

To create my page, I started with some loose white cardstock that I had cut down to an A5 size, with the intention of punching it and putting into my art journal binder once it was complete.


I began by applying Mustard Seed Distress Oxide using a foam blending tool to the cardstock. I then took an Aboriginal inspired stencil from StencilGirl that featured a rippling wave style pattern, and applied Carved Pumpkin Distress Oxide using a sponge dauber through the stencil over the top.


For the focal image on my page, I first stamped out the Large Lightbulb using black StazOn ink onto another piece of cardstock. I then used a water brush and the Mustard Seed and Carved Pumpkin Distress Oxides to colour the light bulb image before cutting it out. 

I then repeated the process with the Tina Walker Scribble Girl with Curlers and Earrings stamp; using Barn Door; Spun Sugar; and Mowed Lawn Oxides to colour it in before cutting it out.


In keeping with the style of my chosen feature lady, I used the Scribble Circle stamp and stamped it directly onto my page background. I then took the light bulb I had already prepared and positioned it in the circle so that it was surrounded by what appeared it to be energy flowing from it.


Next, I stamped the Scribble That Shit Out phrase stamp (also from new plate #1517) along the bottom edge of my journal page. I then took my scribble lady and added some cardboard to the back of her before sticking it down slightly overlapping the light bulb in the background. (This represented her "ideas".)


I was so happy with how this page came out and I am crushing on those new scribble ladies from Tina - I expect I will be using them again very soon!
Thanks for stopping by so I could share this with you, I hope I have inspired you to get inky too! X

VLVS stamps used:

Saturday, 19 October 2019

She Was a Wildflower - Art Journal Page | Viva Las VegaStamps


Hi everyone!
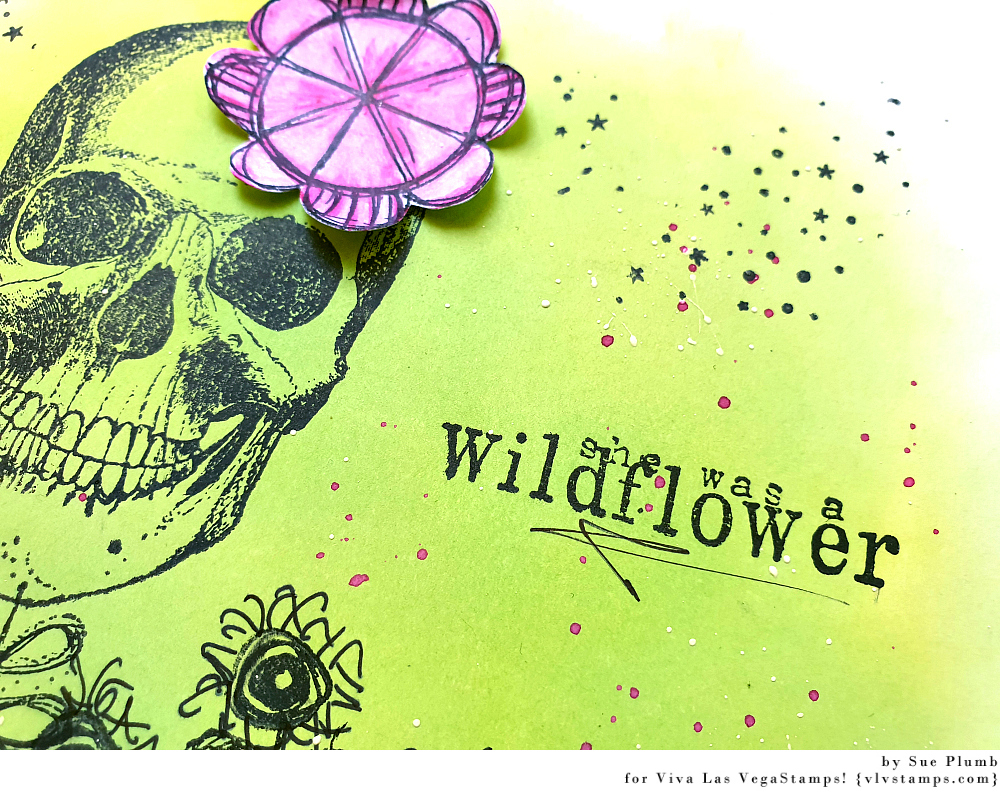
Time to share another design team project with you. Today I have a simple, but fun, art journal page that I created for Viva Las VegaStamps using a variety of stamps; Distress Oxides; a Sharpie; watercolour pencils and inks.


I began my page with an A4 sized sheet of white cardstock and Distress Oxides in the colours of Twisted Citron and Cracked Pistachio. I began using a foam blender to apply the Twisted Citron to an area in the centre of my page. I then blended some of the Cracked Pistachio into it to give it some extra depth.


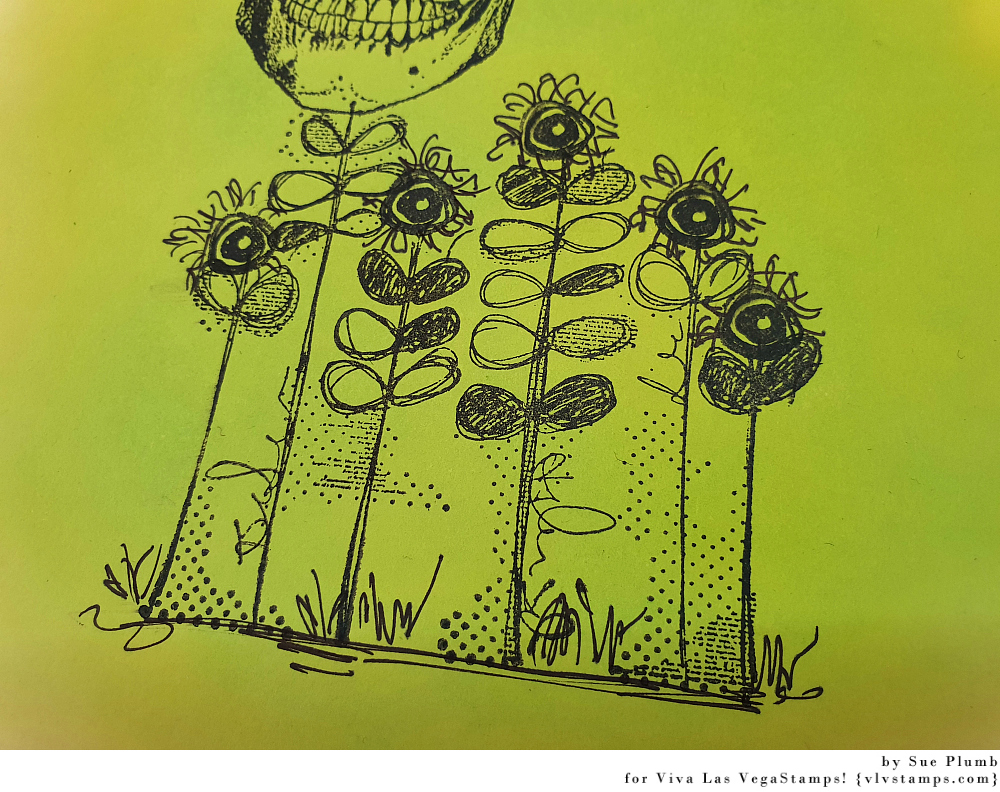
Once I had the colour down, I grabbed the Doodle flower/garden stamp to form the base of my focal image. I then stamped Skull stamp on top of one of the flower stems so it appeared as though it were growing in the garden.


I then used the Row of scribble circle/eyes to add "flowers" to the tops of the remaining stems.


I then added some extra detail by using a Sharpie to doodle some "petals" and also to add some grass amongst the bottom of the stems.


Next, I took the Striped pattern circle and stamped it out onto some extra white cardstock. I then fussy cut around the image before using watercolour pencils to colour it, and then blended it out with a water brush.


I then stuck the flower I had made onto the skull (like a flower in her hair). 


With the flower in place it was time to add my sentiment. I chose the She was a wildflower stamp and placed it alongside the skull.


I then added a little extra detail to my background by splattering some inks around the page using a small brush. I used 13Arts Ayeeda Ink in white and Colour Blast Colour Artist Ink in Slipper.


To finish off, I used the Sky of stars background to add some fine stamped detail.


That's all from me today, thanks for stopping by so I could share this with you. I hope I have inspired you to get inky too! X

VLVS stamps used:

Saturday, 7 September 2019

Like a Queen - Art Journal Page | Viva Las VegaStamps


Hi everyone! Popping in today with my latest Viva Las VegaStamps design team project with you. Today I am sharing a whimsical style art journal page that I created on some loose leaf black A4 cardstock. I don't often create on dark backgrounds, but I felt like a change of pace.


I started by creating my background using Dylusions acrylic paints and the Crazy Quilts Calm and Frenzy stencil from StencilGirl using a technique inspired by my friend Lisa Oxley. I stamped over the top of the paint using black ink with the Wildflowers Silhouette stamp; and then around my page using the Sky of Stars Background with a Distress Oxide. 


I created my "whimsical being" using a variety of stamped pieces put together - Striped LeggingsDressformSet of WingsCat Mermaid. I simply stamped, cut, coloured and pieced.

The border was stamped also using a Distress Oxide with the Doodle Frame stamp and I used the Treat Me Exactly Queen phrase stamp to add text to my page.


I used Distress Oxides again with the Beautiful Lily and Leaves and 3 Extra Leaves stamps to add extra detail over my background (love how these look over a black background!); and added gold splatters using a Heidi Swapp Color Shine spray. 


You can see how I put this page together in my process video on my YouTube channel:


Thanks for stopping by so I could share this with you, I hope I have inspired you to get inky too! X

VLVS stamps used:

Sunday, 12 May 2019

Love.Repeat - Art Journal Page | Viva Las VegaStamps


Hi everyone!
Today I have a mixed media art journal page to share that I created recently for Viva Las VegaStamps. This piece was inspired by a gorgeous art journal page shared last month by Jenn Engle. (You can see Jenn's page on the VLVS blog HERE) I really loved the balance between colour and white space on her page and wanted to create something similar - but with my own twist, of course.


I was working in my 9x6" Jane Davenport journal for this one (it has watercolour paper pages and takes wet media fairly well with no bleed through). I started by putting down multiple layers of Colour Blast Colour Artist Ink; drying between each one with a heat gun to get the "hard" water lines.


Once I had the colour down, I began adding some structure. I started with the Punchinella/Sequin Waste Border; which I stamped vertically using black Staz On ink.


Next, I used the Double Coffee Rings stamp with 'Mowed Lawn' Distress Oxide; stamping it several times over the top.


I then used the Cross Marks Background with black Staz On to add some marks around the edges of the colour.


Now it was time to add some texture to my page. I used small torn pieces of washi tape and some snippets of punchinella.


I also added a piece of paper doily, some plasterer's tape, and some frayed gauze - all layered in the central focal point of the page.


I then stamped out the focal image for my page using the Squiggle Heart stamp and Staz On ink onto some white cardstock and fussy cut around it. I used a shimmery watercolour paint to colour the heart before sticking it down onto the page.


To finish off, I stamped the sentiment Love.Repeat a few times and then splattered a little bit of blue ink around the edges.


I was really happy with how this page came out - thank you Jenn for the inspiration!


That's all from me today, thanks for stopping by. I hope I have inspired you to get inky too! X

VLVS stamps used:
Punchinella/Sequin Waste Border
Double Coffee Rings
Cross Marks Background
Squiggle Heart
Love.Repeat

Wednesday, 3 April 2019

"Dream Big" Art Journal Page | Viva Las VegaStamps


Hi everyone!
Popping in to share my latest Viva Las VegaStamps design team project with you. Today I am sharing a whimsical style art journal page that I created called "Dream Big" in my Jane Davenport art journal. This is the first time I have used this journal, so I wanted to create something pretty and inspirational for the first page.


I used a range of stamps to create this page, with the feature being (of course) that gorgeous Unicorn. The majority of the stamps I used come from plate #918 and plate #1437.
(For a full linked list of stamps, please see end of post.)


In addition to the VLVS stamps, this page used fairly limited supplies - Ranger Distress Oxides; a Colour Blast Colour Shimmer Brush Marker; and a Stabilo All pencil.


I love the "painted" look that stamping with Distress Oxides gives, especially when layered over the soft, blended background.


If you would like to see exactly how I created this page, there is a process video available on my YouTube channel:


VLVS stamps used:

Other materials:
- Jane Davenport art journal
- Ranger Distress Oxides
- Colour Blast Colour Shimmer Brush Marker (clear)
- Stabilo All pencil (black)

Thanks for stopping by today so I could share this, I hope I have inspired you to get inky too! X

Wednesday, 26 December 2018

Too Glam - art journal page | Colour Blast


Hi everyone!
Today I am here to share my latest Colour Blast design team project with you. This fun, colourful art journal spread that I created in my altered book journal was inspired by summer; and features Colour Artist Inks, Colour Pastes and a Colour Shimmer Brush Marker.

Here's a look at the entire spread...


And now for my process...

I began by priming my page using White Heavy Gesso. I used an old gift card to spread it to ensure a thin, even coat. I didn't want it too thick, as I still wanted some of the text to be visible.


Next, I began adding colour to my pages using Colour Artist Inks. I chose Berry, Bordeaux, and Slipper as my colour palette - all shades of pink / purple. I used a small, round brush to apply the ink, starting with Berry around the outer edge, then moving to the lighter Bordeaux inside it.


I then dried the two colours off with a heat gun before going in with the Slipper ink to add some extra colour along the very outer edge and in a few spots over the top of the Berry ink. 


Once all the inks were dry, it was time to add some features and dimension to my page. I used the 'Dream of Palms' stencil from StencilGirl; which I paired with Deep Water Colour Paste. I applied a thin layer of paste through the stencil in the top right corner of my page, before flipping the stencil over and applying more paste on the left side. 


I then moved onto adding the focal point for my page. I cut out a flamingo from a printed paper napkin and adhered it onto the page using a gel matte medium. I also tore up some other pieces featuring flowers and leaves and collaged them onto the page as well. The quote was cut from an Everyday Etc card from Flutterby Designs, and I thought it was a perfect sentiment to use for a flamingo! 


To add a little extra texture and colour I then swiped some Lovely Lilac Colour Paste over a few random areas of my page with a narrow palette knife.


Next, I wanted to add some contrast and a little extra sparkle, so I used a Gold Colour Shimmer Brush Marker to add some highlights through the branches of the palm trees and on top of some of the collaged pieces. Sometimes it's hard to capture just how gorgeous the sparkle is in photos (especially when you are taking shots and the sun won't come out to help you!)


I decided my focal image needed a little something extra to help it pop and stand out from the page, so I used my Stabilo All pencil to add some shadowing to the outline. Once I had drawn it in, I blended it out with a water brush.


To finish off my page I decided to add some splatter using Cider Colour Artist Ink. I simply dipped a small, stiff bristle brush into the bottle and then tapped the ink off around the page.


You can see how the Cider ink brought extra warmth to the page and helped to tie in the gold from the Colour Shimmer Brush Brush Marker...


Here's a closer look at the finished page, so you can better see the colours and texture...


I love all the layers at play here...


That's all from me today. I hope I have inspired you to pull out some supplies and do some post-Christmas crafting.
Until next time, happy creating!