Showing posts with label stamping. Show all posts

Saturday, 2 April 2022

Best Day | Pinkfresh Fridays YouTube Hop


Hi everyone, 
I'm back with another new mixed media layout to share today. This one was created recent for the Pinkfresh Fridays monthly YouTube hop that is organised by my sweet friend Joanne Bartell. Each month, a group of scrappers create and share videos using Pinkfresh Studio products and I was delighted to be able to join in this time. 

I don't have a huge amount of Pinkfresh products in my stash, but luckily for me they often appear in the Hip Kit Club scrapbook kits, so I do have some. The products I used for this layout all came from my June 2021 kit, and were from the 'Happy Blooms' collection - a perfect choice to document this series of photos of my daughter with her Valentine's Day flowers from her boyfriend. 


I went quite product heavy on this page (why not - no use hoarding it, right?) and added lots of luscious layers, including a bunch tags that I cut from patterned paper.


My mixed media background was created using Distress Oxides - first applied with an ink blending tool, then stamped, then splattered. 


I added a couple of my signature elements (I guess they could be called that now?) with a paper doily and then frayed gauze for texture.


I was happy with how this one turned out and it was certainly fun to put together. You can watch my process video for this page via the link below. If you would like to see what everyone else created for this hop, be sure to open my video in YouTube and you will find a linked list of the other participants in my video description. 


While you are there, I would love it if you would subscribe to my channel so you don't miss any of my upcoming videos. (Or check out my back catalogue of videos - there are lots there to choose from!)

Until next time, happy scrapping! X

Sunday, 20 March 2022

We Are Awesome | Mix It Up Monday hop


Hi everyone,
Today I am popping by with some images of a layout I created recently for the "Mix It Up Monday" creative hop. The premise of this hop was to take a traditional scrapbook sketch and "mix it up" using mixed media / stitching / texture, etc. 

This is the sketch by Rochelle Spears that we were all working with...


And here is my take on it, which I did in my "girly grunge" style...


I have a process video for this layout available which you can view here:


There is a linked list to all the videos from the hop participants in my video description on YouTube, so please click over to my channel if you'd like to follow along.

Here are a few close-up photos of my layout...


If you missed my previous post containing the announcement about my blog, please click HERE

That's all from me today, thanks for stopping by. Until next time, happy scrapping! X


Thursday, 10 March 2022

Good Things Ahead | January 2022 Hip Kit


Hi everyone! So excited to be sharing another new layout with you today using the January 2022 Hip Kit. This kit features a pretty Hip Kit Club exclusive collection called 'Kaleidoscope' and I have loved working with it so far. (And yes, I am a subscriber and I buy my kits.)

Today's layout was created for the Hip Kit Club weekly challenge which is hosted each week in the Hip Kit Club group on Facebook. You don't need to be a subscriber to join the group, nor do you need to use one of their kits to enter the challenge. This week the challenge is a sketch that looks like this...


And this is my take on it...


I couldn't resist scrapping these recent photos of my daughter. I don't seem to get many of her these days, so I grab them whenever I can. I printed them in black and white as it gave me the freedom to use anything from the kit without any colours clashing. 


I used a mix of three different Distress Oxides to add subtle blended colour to my cardstock, then I stamped over the top with a fourth colour.
I used a mix of papers to add torn pieces along the top and bottom edges of my layout, then another piece from the same paper to define the focal area of my page. I also cut some tags from patterned  paper that were tucked into my layers under the photos.


I used a variety of pieces from the ephemera pack and the chipboard stickers to embellish my page. I also mixed in a number of items from my stash including a Charms Creations handmade heart, a small resin heart / rainbow; a flair from Cocoa Vanilla Studio; and some really pretty washi tape. 


I actually impressed myself with how accurately I was able to represent the sketch. (Usually when I do sketch challenges they end up looking nothing like the sketch!)


If you love this layout and would like to see how it came together (or even if you are just curious about how I did it), then make sure you watch my process video:


If you like what you see over on my YouTube channel, I would appreciate it if you gave my video a thumbs up and subscribed to my channel. 
Hopefully I'll be back soon with another project to share. Until then, happy scrapping! X

Monday, 7 March 2022

So Epic | Cocoa Vanilla Studio


Hi everyone,

Today I am popping in to share my latest design team layout for Cocoa Vanilla Studio which was inspired by this month's mood board challenge. The mood board is called "Explore and Discover" and it looks like this...


My initial inspiration came from the painted image in the top left, which made me decide to create a mixed media layout. And of course I chose to use the new 'No Limits' collection, because it is freakin' amazing!


I chose to mainly focus on the yellow, blue and black tones from the mood board for my layout. I used a bright yellow Distress Oxide for my painted background to tie in with the photos of my son and his cube that I was documenting. I also added navy blue stencilling, black stamping and some torn washi tape too.


I added layers of patterned paper behind my photos, as well as a yellow paper doily and some frayed gauze.


I used a mix of Die Cut Ephemera and Accessory Stickers as the basis of my embellishment clusters. I also used a mix of stars that were fussy cut from the Nebula paper. These pieces all tied in with the stars from the mood board. I added foam tape under some of the pieces for dimension.


I used words from the Die Cut Titles pack for my page title. These were also raised up from the background using foam tape.


I added three small buttons from the Wood Buttons pack and then scattered some of the amazing (my fave!) Puffy Stickers around the page to finish off.

If you would like to see how this layout came together, or want more details, you can watch my process video below:


That's all from me today, I hope I have inspired you to play along with this month's Cocoa Vanilla Studio challenge. There is a $25 store voucher up for grabs for one randomly chosen winner, and you can enter via the Cocoa Vanilla Studio Community group HERE

Until next time, happy scrapping! X

Monday, 21 February 2022

You're the Best | Cocoa Vanilla Studio


Hi everyone, popping in today to share my very first project using the brand new 'No Limits' collection from Cocoa Vanilla Studio. You know I am a passionate boy scrapper, so I can't tell you how excited I was to receive this new collection! There is no arguing that Zoe does THE BEST boy collections and this one is no exception. Besides the awesome colour palette which includes blues, greens, orange, and even a pop of red; it also features some fabulous bold patterns and a bit of space themed imagery. (Not enough that I would necessarily consider this an entirely "themed" collection though, as it could be used for all sorts of creations.)

For my first project I decided to create a 12x12" mixed media layout, combining the collection with Distress Oxide, acrylic paint, modelling paste with a stencil and also some stamping.


You can see that this layout contains many layers - from the mediums on the background, right through to multiple paper layers, texture from frayed gauze and an assortment of embellishments.


The B side of the Orbit paper (which just might be my favourite pattern from this collection) was what I chose for my page border, and I also used the same print from the A5 Paper Stack to mat my photo with.


Torn pieces of the Stardust and Spark papers were used to define the focal area of my page and add texture. A banner piece from the Chipboard Sticker sheet added the sentiment to the bottom of my photo.


Die Cut Ephemera and Accessory Stickers always make it easy to embellish a layout. The 'No Limits' ephemera pack contains 64 pieces, providing plenty of choices; and the sticker sheet contains a great mix of phrases, icons, labels, etc.


The Puffy Stickers (definitely my most favourite item from this collection - I need 1000 of these!) and Wood Buttons are both great embellishments for adding extra small details and subtle texture to the page.

You can see exactly how I put this layout together and hear me talk about it in more detail in my process video:


Thanks so much for stopping by today. If you have any questions, feel free to leave them here in the comments or over on my video.
Until next time, happy scrapping! X

Friday, 21 January 2022

Disco Day | Cocoa Vanilla Studio


Hi everyone, popping in today to share my latest Cocoa Vanilla Studio design team project with you. For this one I decided to pull out my supplies of the beautiful 'These Days' collection as I still have plenty in my stash left to play with and was dying to use it again. I also had a sweet photo of my boys together that I took last year when they were heading off to their first school disco. Although they might be twins, you can see that they are very different and both have their own individual styles, which I thought was summed up quite well in this shot.


Despite the fact this range has quite a broad palette of soft colours, I decided to focus on predominantly the blue and green tones combined with the wood grain for my background. Before I moved onto my papery layers however, I really wanted to add some depth to the background by adding some paint and stamping. I used a white Mont Marte paint applied with a brayer, which also helped me to define the focal area of my page. Over the top of the paint, I used a brick pattern stamp from Viva Las VegaStamps with a grey ink.


For the papery layers over my background, I used a few papers from the A5 Paper Stack which I cut and tore to size. I also added a grey paper doily from my stash, a strip from the cut apart paper, and some frayed gauze for texture. My photo also had some scrap cardboard adhered to the back of it to help pop it up from the page.


For my embellishments, I started with the Die Cut Ephemera pack. I chose a doodled frame first, which I cut in half and tucked half in under the right edge of my photo. I often use frames in this way (cut into pieces and tucked into layers) as opposed to the way they were designed to be used. I also chose the stack of books from the ephemera pack as I thought this worked well with the fact it was a school disco the boys attended.


I used the gorgeous Mini Puffy Alpha stickers for my title, as I didn't want to detract from all the delicate elements I had on the page. I love these alphas sooo much, they are a perfect size and such a pretty mix of colours. Along with the puffy alphas, I also added some of the Puffy Stickers to my page - a heart, a flower and a butterfly (because you can never have too many butterflies!)


There were plenty of regular Accessory Stickers on this page too - you can see how I used the tab and flag amongst the cascade of embellishments alongside my photo, and there were several phrase stickers used as well. From the Clear Stickers sheet I used three small clusters of crosses and a green brush stroke. This coordinated beautifully with the green Epoxy Wood Button that I also included.


I finished off my layout with handwritten journalling; stamped phrases and date; and some black stamped doodled circles and dots (stamp from Viva Las VegaStamps).

I have a process video available for this layout. If you would like to see how it came together you can watch it here:


Thanks so much for stopping by today so I could share this with you. Until next time, happy scrapping! X

Monday, 20 December 2021

Magical Moments | Cocoa Vanilla Studio


Hi everyone, popping in today to share my latest Cocoa Vanilla Studio design team project with you. Today I was tasked with creating something inspired by the current monthly challenge, which is this beautiful Christmas themed mood board designed by Tarrah…


This is the second layout I have created based on this mood board, and this time I was inspired by the little trees and stars to tell the story of our annual family tradition of placing the star atop our Christmas tree. The photos I was documenting were taken in 2020, and are of my son Hunter putting the star on. I was working with the ‘Joyful’ collection, and once again I decided to create a mixed media layout (because I love getting messy!)

Here is my page…

You can probably spot right away that my colour palette for this layout was dictated by my photos – with the predominant tones of green and gold at the forefront from our Christmas tree.

I began with my background – working on a sheet of white cardstock I had cut down to 11×11″, I used Rustic Wilderness Distress Oxide mixed with water to create a water wash across the page. I then added darker splatters using the same ink (just with less water added); stamped some large stars in black ink; and then finished with gold splatters. It was a fairly straightforward background.


With the background complete, it was time to work on creating some papery layers. The first paper I chose was the Kraft / gold coloured paper with the words merry & bright from the A5 Paper Stack. I tore a sheet of this and used it as my anchor piece. On top of it I added a horizontal strip of the Deck the Halls paper and also the border strip from the Very Merry cut apart paper that had the little Christmas trees on it. I used my distress tool to distress the edges of all the pieces before I stapled them together, adding a small white paper doily and some frayed gauze for texture.


I added my photos on top (which had been popped up with a little scrap cardboard), then turned to the embellishments. I already had the Die Cut Ephemera pack out open on my desk, so that was where I started. I first rifled through them and pulled out a few pieces that I thought could work with my colour scheme. (It makes it much easier than shuffling through the entire pack for every piece you want.)


Using the pieces I had pulled from the ephemera pack, I created small cluster above my photos containing a Christmas tree, the memories tab, and a small sprig of holly; and to the left I tucked in the gorgeous little deer. (Not only was it a perfect match for the colours on the page, but I just love how cute it is!) To the right of my photos I added a little flag that read joyful.


From the Chipboard Stickers sheet I chose the banner that read jingle all the way in beautiful gold foiled script, to stick along the bottom edge of my photo. I also added a few gold foiled stars around the page.


Below my photos I added one of the smaller sized Wood Epoxy Buttons, and then I used the gorgeous Puffy Gold Title Stickers to add my title. From the same sheet I also added a few extra gold scattered stars because I couldn’t resist more of that stunning gold!


I then added a stamped date, a few stamped phrases, and typed strip journalling and my layout was done! I love how it all came together with the colours, the layers and the texture, and I am so happy I have documented this story for my family.

If you would like to see exactly how I put it together, you can watch my process video here:


Thanks so much for stopping by today, don’t forget you have until the end of the month to enter this challenge via the Cocoa Vanilla Studio Community group. You could be the lucky winner of a $25 store voucher.

I’ll have a matching pocket page for this layout to share next week, until then I hope you all have a safe, happy and enjoyable time with your family and friends over the holiday period. Merry Christmas! X

Tuesday, 7 December 2021

Joy | Cocoa Vanilla Studio


Hi everyone, popping in today with a new project to share with you. This layout was created for Cocoa Vanilla Studio using the gorgeous new ‘Joyful’ collection, and was inspired by the December monthly challenge. First, here’s a look at the “Bells & Baubles” mood board designed by my fellow DT member Tarrah…


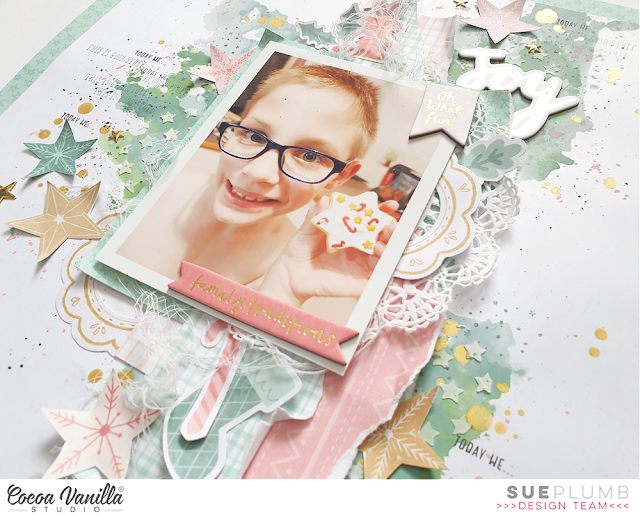
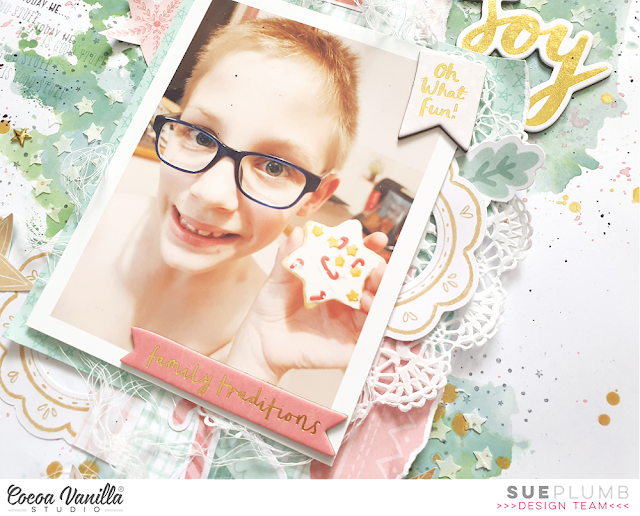
The image from the mood board that caught my eye was the one in the top right corner, with the pretty Christmas cookies. It immediately reminded me of making cookies with my kids, a tradition we do together every Christmas. I decided to document a photo of my son that I took last year with one of the cookies he made.


For my layout I wanted to create a mixed media page, so I started with 300gsm white cardstock and some Distress Oxides. I layered blue (Speckled Egg) and green (Rustic Wilderness), then used modelling paste to add some small stencilled stars over the top with a StencilGirl stencil. Next, I used another Distress Oxide (Worn Lipstick) to add small pink splatters, then stamped some tiny stars using a rubber stamp from Viva Las VegaStamps and black ink. I finished off with some big splatters of gold Heidi Swapp Color Shine, and set it aside to dry.


Once my background was dry I cut the cardstock down to measure 11×11″ so I could mount it onto some patterned paper. I chose the B side of the Deck the Halls paper, which is a soft green and features small stars on it. I cut away the centre portion of the paper so it wasn’t wasted, then mounted the cardstock on it to form a border.


I immediately used the centre piece  had just cut away to create a mat for my photo, adding a torn edge down one side for texture. I then chose a few other small pieces of patterned paper (most from the A5 Paper Stack), which I cut and tore into various shapes, then stacked together to form more layers behind my photo. I also tucked in half of a white lace doily before securing it all together with staples. (This enabled me to move the entire stack as a whole piece without dislodging any of the pieces.) On top of my stack I added some frayed gauze for soft texture, then finally, my photo on top.


For the embellishments, I started with the Chipboard Stickers, choosing the gold foiled word JOY as my page title. From the same pack I also selected the small oh what fun! flag piece, which I affixed in the top corner of my photo; and the family traditions banner, which I stuck along the bottom edge of my photo.


From the Die Cut Ephemera pack I chose the green stocking and candy cane, when I layered together below my photo. Above my photo I added a little present and a small sprig of holly. I also chose a circular frame from the ephemera pack, which I cut in half and tucked into my layers on either side of my photo.

Scattered around my page, I added some large stars, which were fussy cut from the Making Spirits Bright paper. (These tied in beautifully with my photo and the star theme I had established with the stamping and stencilling.)


I finished my page by adding yet another variety of star – the pretty puffy gold ones from the Puffy Gold Title Stickers. (These are SO gorgeous!) I then added some stamped phrases and the date, and some black ink splatters.

If you would like to see exactly how it all came together, you can watch my process video below:


I have a bonus pocket page that I created as a companion page to this layout. I’ll be sharing it over in the Cocoa Vanilla Studio Community group next week and then here some time after that, so keep your eye out for it. In the meantime, I would love to see you play along with our December challenge, entries close December 31st.

Until next time, happy scrapping! X