Hi everyone, today I am here to share a layout that was created for a very special celebration. My dear friend Gwen Wruck's YouTube channel, "Created by Gwen" is one year old today. (Congrats Gwen!) To mark the occasion, a group of us have joined forces to put together a YouTube hop. The theme of this hop is to be inspired by Gwen's crafty style, and to try and include Gwen's top five signature scrappy elements. These are a square photo (4x4" preferred); cut files; patterned paper; layered clusters and stitching. If you aren't already familiar with Gwen's work, you can find her YouTube channel here: https://www.youtube.com/c/CreatedByGwen
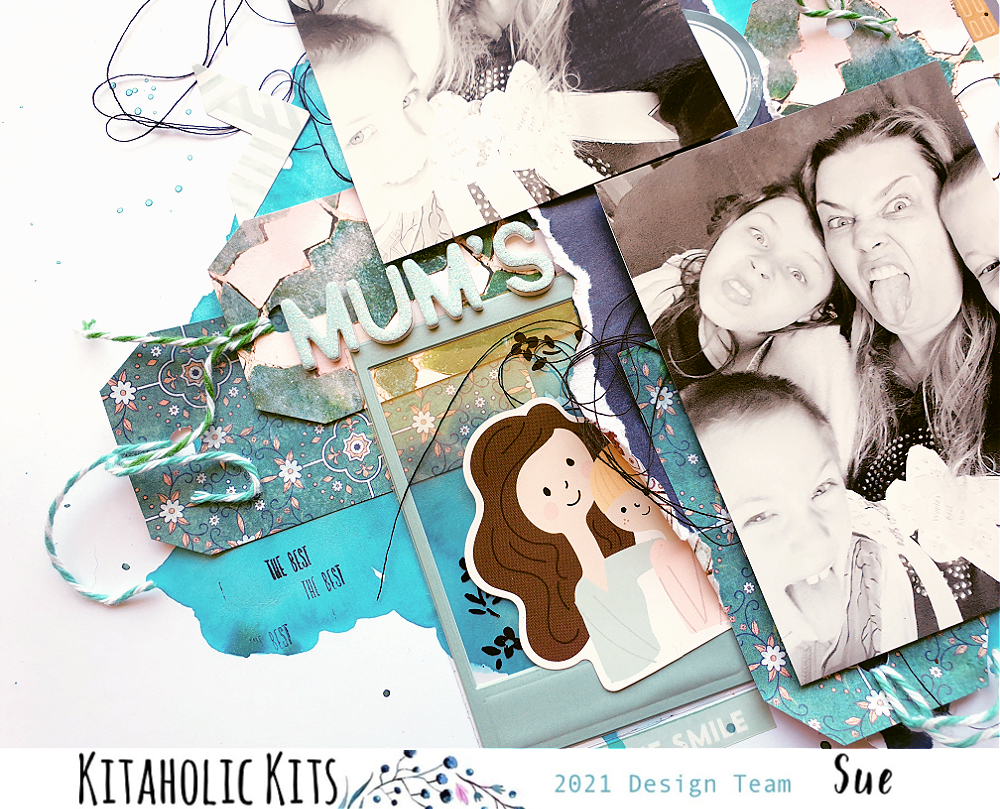
Here's a look at the layout I created...
The photo I chose to document for this page is of my hubby and I last month as we were popping out for a lunch date to celebrate 20 years together.
So for my layout, I started with a sheet of my favourite 300gsm white cardstock. I decided to add some mixed media to my page, but as Gwen isn't a huge mixed media fan, I kept it relatively subtle. I used Tattered RoseDistress Oxide applied with the packaging technique, then Rustic WildernessDistress Oxide to add some splatters.
I used a sheet of patterned paper from the Amy TanLate Afternoon collection to back my cardstock, giving me a green border for my page. My intention had been to stitch around the cardstock edge to tick off the stitching element, but unfortunately when I pulled my machine out to use I found I had an empty bobbin, and being late at night it was all too hard and I just went without it.
Now it was onto the main portion of my layout. In another move that was inspired by Gwen and her "Maggie Holmes Monday" series she runs on her channel, I decided to pull out some of my own Maggie goodies and use them too.
I had a couple of partly used sheets of paper from the Crate Paper Marigold collection that I had left-over from previous projects, which I combined with a sheet from the Crate PaperBloom collection. I created a double layered mat for my photo, and I also added a white paper lace doily and some frayed gauze into my stack. (I know the gauze isn't Gwen's style, but I still wanted to make it my own.)
Whilst digging in my Crate Paper stash for materials for this page, I stumbled upon a pack of chipboard frames from waaay back. (The Open Book collection to be exact - remember that one?) I knew this would be the perfect opportunity to use a few up, as Gwen often includes chipboard pieces on her pages. I chose 3 frames and layered them under my photo, following my natural instinct to create a "visual triangle"...and then I had to make a left turn.
If you know anything about Gwen's style, you will know that she doesn't create her clusters in the same way I do. Instead of the visual triangle method that I usually use, she uses a technique that can best be described as "flowing clusters". That is, she creates clusters that are designed to lead the eye around the page to different points of interest. These clusters are rarely out on their own on the page, as Gwen usually keeps all her elements touching another one. So I set about adding some extra bits and pieces to my page that would be more in keeping with Gwen's method.
I used pieces from both the Open Book ephemera and floral ephemera packs, along with several small cut files that I also tucked into my layers. All of the cut files I used were from CutToYou (of course), as that is Gwen's very own cut file store. I used the Open Leaf Stem file (one of my faves), as well as two other floral pieces from the Caite Floral Set, all of which I coloured using Stormy SkyDistress Oxide.
I finished off my layout with a few stickers from the Crate PaperGarden Party sticker book; some Doodlebug Design gold puffy hearts; gold number Thickers for my title; and two beautiful CutToYou cut file butterflies from the Mixed Butterflies set, which I left white to add a little pop of freshness back into my layers. A little handwritten journalling and I was done!
I love how this layout finished up, and I think I did a pretty well at honouring Gwen's style whilst still making it my own.
If you would like to see how it all came together, you can watch my process video here:
You will find links to all the other hop participants in my video description on YouTube.
Thanks for stopping by today so I could share this with you. Until next time, happy scrapping! X
Hi again everyone! It's time to share another project created for Kitaholic Kits using the fabulous April kit. For this layout, I was challenged to dust off some under-used tools from my stash so I pulled out a couple of border punches and an old stencil and combined them with my kit to create something new.
For this page I decided to document my huge love of coffee with a selfie that I took one morning with my favourite coffee cup. Because of the bold black tones in my photo, I started with the black and white checked paper from Doodlebug Design as the base for my page. I cut out a large piece from the corner that I knew wouldn't be seen and set it aside to use for another part of my page.
Over the top of the black and white check, I added a large piece of the yellow spotted paper, which is from the Obed Marshall 'Buenos Dias' collection. I used an old Martha Stewart punch to punch the heart detail along one edge.
For my sunburst pattern, I used the grey wood grain print from the reverse side of the black & white check. I used an old Studio Calico stencil as a template and traced the rays by hand. I then layered them over the yellow paper and positioned them so they would radiate out from the right side of my photo. Over the top of those, I used a scrap of the yellow paper and a Fiskars scallop punch to punch out some scalloped lines. These provided the lines for my gold title words, which were from the Maggie Holmes 'Garden Party' Thickers pack in the kit.
My photo was matted with a pale pink Obed Marshall paper to draw some pink into my colour palette and help soften it a bit. Behind it I added a charcoal coloured doily, and some frayed gauze for texture. Along the bottom edge I added the gold scallop to tie into the punched scallop pieces.
For my embellishments, I used a mix of the puffy icons from the 'Garden Party' Thickers pack, which included florals and the sweet little tea cup (which I figured was close enough to a coffee cup).
I finished off with a few small stickers from the 'Garden Party' sticker book; some wood veneer hearts which I coloured black using a Sharpie; and some black splatters of Liquitex acrylic ink.
A bit of a different style for me, but I enjoyed the challenge of pulling out some punches, which is something I haven't done in a while.
If you would like to watch my process video for this page, you can see it here:
Thanks for stopping by today. Until next time, happy scrapping! X
Hi friends, today I am sharing the second of my February projects created for Kitaholic Kits. For this layout, I was drawn to use the beautiful floral print paper from Crate Paper and decided to combine it with some of the subscriber exclusive floral printables and paints from the January kit. I love being able to mix items across kits, and it certainly helps you to get the most out of them.
As you can see, I decided to make my cat Genghis the star of the show for this page. (I knew this photo of him would make it onto a page one day when I took it! haha) I was inspired to choose this photo by one of the items from the Jen Hadfield ephemera pack - the bee hive! When I saw the bee hive and the little bees, the phrase 'buzz off" came to mind and I thought of this picture instantly.
I began my page with a couple of the Kaisercraft acrylic paints from the January mixed media add-on kit. I wanted to try and match one of the tones of the flowers from the floral paper, so I mixed the Mango and Dusky Pink together until I had the shade I was after. I then used my wide #4 brush to dry brush some paint across my cardstock, which was cut down to 11x11" and mounted onto the floral paper. (I had already cut the centre from the patterned paper so that I could use some of it on the rest of the page.)
Once the paint was dry, I added some paper layers using a mix of papers from the kit and a paper doily from my stash. I cut a long banner shape from the floral print paper and ran it horizontally across the page where I was planning to place the photo. This would help draw the viewer's eye to the photo. I added texture to the page by distressing the paper edges using my distress tool and by using frayed gauze under my photo.
For my embellishments, I began with the bee hive from the Jen Hadfield ephemera pack as it was going to be my "hero" embellishment. I placed it down in the bottom right corner of my photo and began building my cluster from there. I added a mix of fussy cut flowers from the December subscriber exclusive printables. I used foam tape between some of my floral layers for dimension and added one of the sweet little die cut bees as well.
I created a second embellishment cluster along the left edge of my photo, using the same elements as I had for the first. Then balanced my page my creating a smaller third cluster above my photo. This gave me the "visual triangle" I was looking for. Then it was simply a matter of my final finishing touches.
I used some of the American Crafts Thickers for the kit to create my title. (I was very excited to use up two Z's and two F's in the one title!) From the Heidi Swapp sticker book I included the this is my happy place sticker, and also a circular label that I used for my journalling. A few stamped phrases and the date,a few black splatters and I was done!
If you would like to see exactly how this all came together (and listen to me waffling on), you can watch me create this page in my process video here:
Thanks so much for stopping by so I could share this with you. Until next time, happy scrapping! X
Hi everyone! Popping in today to share the first of my projects using the fabulous February kit from Kitaholic Kits. This month's kit features a range of papers from Vicki Boutin, Heidi Swapp and Amy Tan; as well as a mix of embellishments; and the mixed media kit includes FOUR Dylusions Shimmer Sprays and a stencil! Jam. Packed.
I decided to document a couple of fun selfies of my kids and I that were taken on Mother's Day in 2019, right after they had showered me with handmade gifts, chocolate, kisses and cuddles.
For my first layout, I couldn't wait to crack out one of the Shimmer Sprays, and was immediately drawn to the Vibrant Turquoise (given it is from my favourite blue / green colour family). Instead of using as it as a spray though, I grabbed a soft round brush, dipped it into the bottle and painted it onto my cardstock instead. The colour is gorgeous and it has such a beautiful shimmer.
If you know my work, you will already know how much I love using tags. So for this layout I decided to create a bunch of tags from a couple of the Vicki Boutin 'Storyteller' papers, which I tied off with twine. I added a large torn strip of another of the Vicki Boutin papers running vertically down my page, then used the tags I had made to start building layers where my photos were going to go.
Tucked in amongst the tags I also included three of the Maggie Holmes 'Sweet Story' puffy frames, which are a beautiful duck egg blue colour. Before adding my photos, I also added some messy black cotton thread for texture.
To embellish my layout I used a mix of Jen Hadfield ephemera pieces, Heidi Swapp stickers and the American Crafts Thickers from the kit for my title. I finished it off with my handwritten journalling and some simple stamping.
If you would like to watch how this one came together, I have a process video available on my YouTube channel:
There are still a few of these kits left in the Kitaholic Kits store, but you will have to be quick! You can find them in store here: https://www.kitaholickits.com/shop-now
I am looking forward to sharing the rest of my projects using this kit, I loved working with it.
Happy new year. After 2020 finished on such a sad note for me personally, I hope that 2021 is kinder to us all. Today I am popping in to share the last of my Kitaholic Kits projects using the gorgeous December kit.
For this layout I decided to create a paper-based layout so I could focus on some of the beautiful Crate Paper patterned papers in the kit. I paired these with some photos of my three kids that I took one day when I took them to a local cafe for "fancy" milkshakes. (They really are pretty easy to please!)
As I mentioned above, my plan was to keep the design relatively simple for this one to allow the paper (and my photos) to shine. I started with the beautiful pink paper for the background and then added a strip of the navy floral print vertically down the page. I used torn edges, and distressed the further with my fingers to add extra texture.
Because the photos had a neural background and I already had a busy print with the floral paper, I chose not to mat my photos. I did back them with some scrap cardboard though, to help pop them up from the page. I kept the photos positioned along the vertical paper to keep my focal area in tight on the page.
To embellish my layout I started with a couple of journal spots from the Crate Paper cut apart, which I tucked in around the right side of my photos. One was to be used for journalling, whilst the other was going to be for my page title. On the journal block I also added the word yum using some of the Rosie's Studio small puffy alphas. My main page title life is lovely, was one of the die cuts from the Pebbles 'The Avenue' phrase ephemera pack.
I complimented my title with a few other gold foiled pieces from the same pack; as well as some Pebbles gold puffy dots. (I really love these dots!) A fussy cut flower and a sweet little bird (both cut from Crate Paper patterned papers); a couple of the November subscriber exclusive floral printables; and a splattering of navy mist to finish it off.
If you would like to see how it all came together, check out my process video on YouTube here:
Thanks so much for stopping by today so I could share this with you. If you haven't already checked out the details on how to become a subscriber to Kitaholic Kits, you can find all the info HERE
And be sure to join the Kitaholic Kits Comunity group on Facebook HERE for lots more inspiration!
Hi everyone! In case you missed my announcement on one of my other social media channels, I am so happy to announce that I have officially joined the Kitaholic Kits team as a permanent design team member. Today I am sharing my very first layout using the new December kit and mixed media add-on kit. This month's gorgeous kit is filled with products from Crate Paper; Amy Tan; Pebbles; Simple Stories and more. (If you would like to see exactly what is in the kit, I have an unboxing video on my YouTube channel HERE)
For my first project I wanted to focus on the row of tags from the Crate Paper cut apart sheet in the kit, because - tags! I love tags, they are great for creating layers and tucking in amongst other elements. This time I really wanted the tags to be the hero of the page though, so I mixed a few different ones from the sheet, with some that I fussy cut myself and a few Kraft tags from my stash.
For my background I used a couple of Distress Oxides from my stash, as well as one of the Vicki Boutin stencils from the mixed media add-on kit. My photos were a series of pictures that I took of my hubby and daughter dancing together at her primary school graduation.
For my embellishments, I used a combination of the Pebbles die cuts from the Jen Hadfield collection 'The Avenue'; some of the wood veneer hearts; and a fussy cut floral piece from another of the Crate Paper patterned papers.
My title was a mix of the Simple Stories foam alphas and the Rosie's Studio small puffy alphas. I finished off with some tiny splatters of navy mist, a stamped date and handwritten journalling.
You can watch my process video for this layout, on my YouTube channel here:
I would love it if you would pop over and watch my video, and please leave me a thumbs up and subscribe to my channel if you haven't already.
Hi friends! Sadly, this is the last of my Kitaholic Kits guest designer layouts for the month using the November kit and mixed media add-on. This is the fourth layout I have created from this kit, along with some extra pocket pages, and I still have some left to create with!
For this layout, I decided to document some photos of my daughter that were taken almost 10 years apart - to the day! The focus of my page was the remaining pieces I had of the cut apart sheet from the Crate Paper 'Marigold' collection and one of the subscriber exclusive cut files designed by Anita Bownds.
I used white cardstock as the base for my page, and added the Pebbles Jen Hadfield black and white checkered paper from 'The Avenue' collection over the top.
For my embellishments I used a mix of the Pinkfresh Studio floral ephemera, puffy alpha stickers and one of the subscriber exclusive cut files,which I coloured using watercolour paint.
I also used some stickers from the Heidi Swapp 'Old School' collection and added some sparkle with Ranger Stickles Glitter Gel.
I have a process video available for this layout on my YouTube channel if you would like to see how I put this one together. And if you haven't already, I would love it if you subscribed to my channel while you are there.
Hi everyone! I am super excited to share the third of my Kitaholic Kits guest designer projects with you today. For this one, I decided to create another masculine layout, but use a bit more mixed media than my previous two projects.
As I was documenting a photo of my boys at the beach that was taken on their birthday, I wanted to give my page a "watery" vibe, so I used Distress Oxides to create a watercolour style background on my cardstock using my messy mat.
Over the top of the ink I added some stencilling using one of the Vicki Boutin stencils and the Ranger Stickles Glitter Gel - both from the mixed media add-on kit, and (of course) there was some ink splatters too.
The papers I used were a mix of Crate Paper and Heidi Swapp from the kit, along with some of this month's subscriber only exclusive printables thrown in.
For my embellishments I used a mix of Heidi Swapp stickers; Pinkfresh Studio floral ephemera; and a Charms Creations handmade heart from my stash.
I have a process video available for this layout on my YouTube channel if you would like to see how it came together:
For current Kitaholic Kits subscribers I also have some companion pocket pages that I created to match this layout, which are available exclusively in the Subscribers Facebook group. (Additional content is only one of the benefits of becoming a kit subscriber. You can check out all the other benefits HERE)
I've got one more guest designer project to share using this kit, so make sure you keep an eye out for it.
Hi everyone! I am here today to share the second of my guest designer projects for Kitaholic Kits using the November scrapbook kit and mixed media add-on kit. If you recall my first project, I documented some photos of my son dressed up as a character from a story he wrote, so for this page I decided I had better create a layout of his twin dressed as his story character too.
I used white cardstock for my page base, then layered it with the Crate Paper wood grain paper and the Jen Hadfield (for Pebbles) text print paper, which I punched with a notebook style punch. (I thought this would work well with the "story" theme.)
I also added a row of stencilled lines across the top and bottom of the page using one of the new Vicki Boutin 'Storyteller' stencils from the mixed media add-on kit.
As with my previous project, the story was an important part of the page, so I used another of the Pinkfresh Studio pockets and a journal tag to be a prominent feature of my design. I also added almost identical journalling, just changing the relevant details to personalise it for him. I also added a QR code to the back of my tag that linked to a video of him reading his "Frank the Zombie" story.
For the embellishments, I used a mix of the Heidi Swapp cardstock and phrase stickers; a few of the subscriber exclusive printables; and some of the Pinkfresh Studio floral ephemera pieces. I also used the Pinkfresh puffy alphas for my title.
I have a process video available if you would like to watch how this layout came together. (If you like what you see, I would love it if you would become a subscriber of my YouTube channel too.)
That's all from me today. If you would like to check out the Kitaholic Kits shop, or investigate about becoming a kit subscriber so you can receive your own box of happiness each month, visit the Kitaholic Kits website HERE
Today I am happy to be sharing the first of my guest designer projects for Kitaholic Kits using the November kit and mixed media add on kit. This month's kit is filled with products from Heidi Swapp, Pinkfresh Studio, Crate Paper and Pebbles; and the mixed media kit with products from Vicki Boutin and Ranger. (If you would like to see exactly what is in the kit, I have an unboxing video on my YouTube channel HERE)
For my first project, I found myself drawn to the Jen Hadfield leaf print paper, which I thought would work well with some outdoor photos. I was also drawn to the Pinkfresh Studio journalling bits, so I knew I wanted to create a page that had a good story behind it. I came up with the idea of documenting a series of photos of one of my boys that were taken during our remote learning period. On this day, my boys had both written Dr Suess style stories, and then we did a dress up photo shoot of the main character from each of their stories. This is Hunter dressed as "Fred the Dragon".
I chose to keep the leaf print paper to use as a border for my page (because I thought it gave it that "story book" vibe), and used a sheet of white cardstock with brushed acrylic paint for my background.
Layers of torn and distressed patterned papers mixed with a paper doily, frayed gauze and Heidi Swapp stickers formed the basis of the focal point of my design.
I used the Pinkfresh 'Days of Splendour' floral ephemera to create clusters for my page, which I brushed with the Ranger Stickles 'Moon Dust' Glitter Gel for a touch of sparkle.
I then added more stickers, a few rhinestones, and a punny title by altering the title printed on the Pinkfresh envelope with puffy alpha stickers.
To finish off, I printed my journalling and stuck it onto the tag.
Below you can see where I have added a QR code on the back of the journal tag that links to the private video on my YouTube channel of Hunter reading his story. This is a great interactive element to add to layouts and helps share more of the story than you can fit on the page.
So there you have it! If you would like to watch me put this page together, I've got a process video on my YouTube channel:
Thanks so much for stopping by today so I could share this with you. I have plenty more to come from this kit, so stay tuned!