Hi everyone, today I am here to share a layout that was created for a very special celebration. My dear friend Gwen Wruck's YouTube channel, "Created by Gwen" is one year old today. (Congrats Gwen!) To mark the occasion, a group of us have joined forces to put together a YouTube hop. The theme of this hop is to be inspired by Gwen's crafty style, and to try and include Gwen's top five signature scrappy elements. These are a square photo (4x4" preferred); cut files; patterned paper; layered clusters and stitching. If you aren't already familiar with Gwen's work, you can find her YouTube channel here: https://www.youtube.com/c/CreatedByGwen
Here's a look at the layout I created...
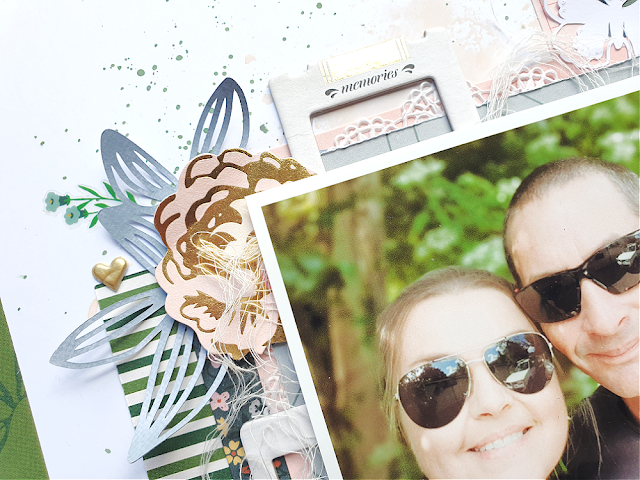
The photo I chose to document for this page is of my hubby and I last month as we were popping out for a lunch date to celebrate 20 years together.
So for my layout, I started with a sheet of my favourite 300gsm white cardstock. I decided to add some mixed media to my page, but as Gwen isn't a huge mixed media fan, I kept it relatively subtle. I used Tattered Rose Distress Oxide applied with the packaging technique, then Rustic Wilderness Distress Oxide to add some splatters.
I used a sheet of patterned paper from the Amy Tan Late Afternoon collection to back my cardstock, giving me a green border for my page. My intention had been to stitch around the cardstock edge to tick off the stitching element, but unfortunately when I pulled my machine out to use I found I had an empty bobbin, and being late at night it was all too hard and I just went without it.
Now it was onto the main portion of my layout. In another move that was inspired by Gwen and her "Maggie Holmes Monday" series she runs on her channel, I decided to pull out some of my own Maggie goodies and use them too.
I had a couple of partly used sheets of paper from the Crate Paper Marigold collection that I had left-over from previous projects, which I combined with a sheet from the Crate Paper Bloom collection. I created a double layered mat for my photo, and I also added a white paper lace doily and some frayed gauze into my stack. (I know the gauze isn't Gwen's style, but I still wanted to make it my own.)
Whilst digging in my Crate Paper stash for materials for this page, I stumbled upon a pack of chipboard frames from waaay back. (The Open Book collection to be exact - remember that one?) I knew this would be the perfect opportunity to use a few up, as Gwen often includes chipboard pieces on her pages. I chose 3 frames and layered them under my photo, following my natural instinct to create a "visual triangle"...and then I had to make a left turn.
If you know anything about Gwen's style, you will know that she doesn't create her clusters in the same way I do. Instead of the visual triangle method that I usually use, she uses a technique that can best be described as "flowing clusters". That is, she creates clusters that are designed to lead the eye around the page to different points of interest. These clusters are rarely out on their own on the page, as Gwen usually keeps all her elements touching another one. So I set about adding some extra bits and pieces to my page that would be more in keeping with Gwen's method.
I used pieces from both the Open Book ephemera and floral ephemera packs, along with several small cut files that I also tucked into my layers. All of the cut files I used were from CutToYou (of course), as that is Gwen's very own cut file store. I used the Open Leaf Stem file (one of my faves), as well as two other floral pieces from the Caite Floral Set, all of which I coloured using Stormy Sky Distress Oxide.
I finished off my layout with a few stickers from the Crate Paper Garden Party sticker book; some Doodlebug Design gold puffy hearts; gold number Thickers for my title; and two beautiful CutToYou cut file butterflies from the Mixed Butterflies set, which I left white to add a little pop of freshness back into my layers. A little handwritten journalling and I was done!
I love how this layout finished up, and I think I did a pretty well at honouring Gwen's style whilst still making it my own.
If you would like to see how it all came together, you can watch my process video here:
You will find links to all the other hop participants in my video description on YouTube.
Thanks for stopping by today so I could share this with you. Until next time, happy scrapping! X


