Back again to share another recent project that I forgot to share here (I told you managing all these different platforms is a lot of work, LOL) This was another layout I created using my January 2022 scrapbook kit from Hip Kit Club. The kit was packed full of the Hip Kit exclusive collection called 'Kaleidoscope' which features lots of gorgeous colours and geometric shapes.
I actually dug into the photo archives for the photo I used on this layout - a picture of my gorgeous boys back when they were in Kindergarten. I can't believe I hadn't scrapped this one yet!
I added a very subtle mixed media background to this page using Distress Oxides (yes, again - they are my favourite medium after all!)
Besides the Hip Kit contents, I also added a few other items from the extra add-on kit I had curated from my stash. This included a handmade star embellishment from Charms Creations, a flair button from Cocoa Vanilla Studio, wood veneer stars, enamel dots and some butterflies.
You can see how this layout came together in my process video here:
Thanks so much for stopping by today. Until next time, happy scrapping! X
Hi everyone! So excited to be sharing another new layout with you today using the January 2022 Hip Kit. This kit features a pretty Hip Kit Club exclusive collection called 'Kaleidoscope' and I have loved working with it so far. (And yes, I am a subscriber and I buy my kits.)
Today's layout was created for the Hip Kit Club weekly challenge which is hosted each week in the Hip Kit Club group on Facebook. You don't need to be a subscriber to join the group, nor do you need to use one of their kits to enter the challenge. This week the challenge is a sketch that looks like this...
And this is my take on it...
I couldn't resist scrapping these recent photos of my daughter. I don't seem to get many of her these days, so I grab them whenever I can. I printed them in black and white as it gave me the freedom to use anything from the kit without any colours clashing.
I used a mix of three different Distress Oxides to add subtle blended colour to my cardstock, then I stamped over the top with a fourth colour.
I used a mix of papers to add torn pieces along the top and bottom edges of my layout, then another piece from the same paper to define the focal area of my page. I also cut some tags from patterned paper that were tucked into my layers under the photos.
I used a variety of pieces from the ephemera pack and the chipboard stickers to embellish my page. I also mixed in a number of items from my stash including a Charms Creations handmade heart, a small resin heart / rainbow; a flair from Cocoa Vanilla Studio; and some really pretty washi tape.
I actually impressed myself with how accurately I was able to represent the sketch. (Usually when I do sketch challenges they end up looking nothing like the sketch!)
If you love this layout and would like to see how it came together (or even if you are just curious about how I did it), then make sure you watch my process video:
If you like what you see over on my YouTube channel, I would appreciate it if you gave my video a thumbs up and subscribed to my channel.
Hopefully I'll be back soon with another project to share. Until then, happy scrapping! X
Hi everyone! So excited to be sharing another new layout with you today, and this one is using the January 2022 Hip Kit. This kit features a Hip Kit Club exclusive collection called 'Kaleidoscope' and it is really pretty! (If you want to see exactly what is in the kit, you can watch my unboxing video HERE)
Here is my layout...
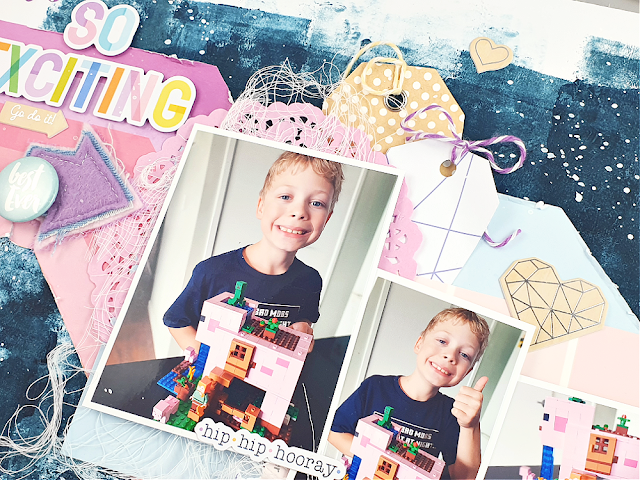
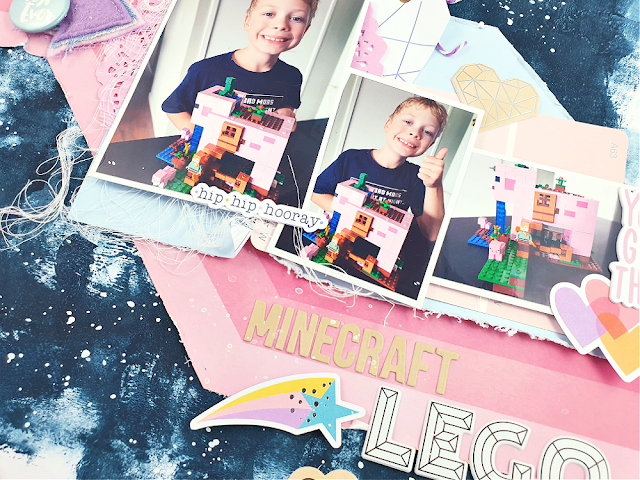
For this page, I was documenting some photos of one of my boys with his Minecraft Lego. He was so excited to get this as it combines two of his favourite things. One of his other favourite things at the moment is the colour pink, so I wanted to make sure I got plenty of pink on this page for him.
My mixed media background was created using acrylic paint applied with a brayer over plain white cardstock. The white dots are splatters of Dylusions ink spray.
I challenged myself to use only one patterned paper from the kit and chose this one with a bold striped pattern. I fussy cut part of the pattern and that formed the base for the design of this page.
I used a mix of the exclusive Hip Kit 'Kaleidoscope' embellishments from the kit including faux wood veneer chipboard stickers; die cut ephemera and chipboard stickers. I also added a few items from my stash, as I had gathered together a selection of coordinating pieces prior to starting my page. These included a Charms Creations arrow, paint sample card and enamel dots, amongst others.
I love mixed font titles, so I chose some small Pinkfresh Studio alpha stickers to mix with the larger puffy geo print alphas from the kit.
If you would like to watch me create this layout and hear me talk more about it, you can watch my process video below:
That's all from me today, thanks for stopping by. Until next time, happy scrapping! X
Hi everyone! Today I am here to share a new layout I created using my August 2021 Hip Kit from Hip Kit Club. This mixed media page features the main scrapbook kit combined with acrylic paint, a Distress Oxide, modelling paste and some stamping too. I also added a few small items from my stash - tissue paper, sequins, gauze, some phrase stickers, a flair button and a Charms Creations heart. (Yay for a bit of stash-busting!)
My inspiration for this layout was the Simple Stories 'Sunkissed' ephemera pack from the kit which is summer themed, and full of vibrant colours. I chose the photo of my daughter in the pool to go with it and also one of the subscriber exclusive Hip Kit Club cut files too. The cut file is called Target and was released alongside this kit in August 2021. For something different, I decided to cut it from a dark blue coloured cardstock (yay for more stash-busting!)
My background was created using a mix of Salvaged Patina and Salty Ocean Distress Oxides and a piece of kitchen sponge. This technique was inspired by fellow Cocoa Vanilla Studio DT member Josefine van der Hoeven.
I used papers from the kit to create layers under my photo, and I also fussy cut a few flowers from one of the Vicki Boutin papers. I included quite a few pieces from the ephemera pack, including the title piece.
The sequins provided a nice shimmery touch and went well with the water theme of the page. I attached them using tacky glue in my fineline bottle. I also added handwritten journalling with a felt pen.
If you would like more details about this page, or to see how I put it together, you can watch my process video here:
That's all from me today, I'll be back with another project soon. Until then, happy scrapping! X
I've got a fun mixed media layout to share today that was created just for ME! If you have been around for a while you would already know that mid last year I took the plunge and subscribed to Hip Kit Club's monthly scrapbook kit. Unfortunately, not long after that I had to pack all my craft supplies away and move house, and I haven't really had a chance to play with my kits since. So it was high time that I crack one open and get some creating done! I chose the August kit, which was a bright, fun kit full of a mix of different brands. I chose to document a series of photos of myself after a visit to the hairdresser last year.
I started my layout with a sheet of 300gsm cardstock and Mont Marte Dimension paint in Paynes Grey. I used my favourite Number 4 brush and the dry brush technique to add some background colour to the page. I then used floral stencil from StencilGirl (Rose Bouquet) and BeeArtySnow White Colour Paste to add some subtle detail over the top of the paint.
Next, I cut a large piece of one of the Hip Kit exclusive papers, choosing the B side for the beautiful orange colour and subtle pattern. (I always love a B side!) I distressed the edges of the paper using scissors (I was scrapping away from home and didn't have my distress tool with me) and then used my fingernail to ruffle it up a bit more. I used another of the Hip Kit papers featuring a black and white sketchy style floral pattern to add a piece above and below the orange paper. I tore along the edges of each strip to add texture. On top of the papers I added a dark grey paper doily and some frayed gauze and before placing my photos on top.
When it came to the embellishments I actually found myself a little challenged. Most of the embellishments were either the wrong colour for the palette I had chosen (I didn't really think it through before I started), or didn't fit with the theme of my page. In the end I chose the Floral Study paper by Vicki Boutin, and fussy cut several flowers from it to use as my main embellishments and tucked them in around my photos.
I chose the word smile from the Amy Tan Thickers in the kit which matched well with the pops of red from the roses on my jacket. I also found a few small pieces in the Simple Stories ephemera pack that matched with the warm tones I was using and added them to the page.
Luckily, the Simple Stories foam alphas in the kit were the perfect match for the main paper I had chosen, so I used them in my title. I finished off my layout with some of the Prima crystals; handwritten journalling; some stamped phrases; and tiny red splatters using Barn DoorDistress Oxide.
Overall I was happy with how the layout turned out, but I would probably think more carefully about how my choice of colours / photos will work with the kit before I dive in next time. Oh well.
If you would like to watch how I put this layout together, I have a video available on my YouTube channel here:
If you have any questions, feel free to leave them in the comments section of my video, here on my blog post, or connect with me via my Facebook page.
Hi everyone, today I have a layout to share that wasn't created for anyone other than myself. (Yes, sometimes it actually happens!) If you watch my YouTube channel, you may have recently seen that I did an unboxing video of my very first kit from Hip Kit Club. Subscribing is something I have been wanting to do for a long time, so my sister Mandy and I decided to bite the bullet and just do it. (It helps that we can split the shipping costs.) So I subscribed to the Scrapbook kit, and she subscribed to the Pocket Life kit.
The layout I am sharing today is the very first layout I created from my very first kit. I was working with the June 2021 main scrapbook kit, as well as the add-on embellishment kit that I also purchased, which gave me TONS to work with!
The photo I was documenting is of me and my family when we were out celebrating my boys' birthday with lunch at the local pub and I think it worked well with the contents of this kit. The June kit consists of a mix of Pinkfresh Studio 'Happy Blooms' collection as well as Hip Kit exclusive products and they all coordinate beautifully.
For my layout I decided to create some subtle, pretty mixed media as the basis of my design. I used Kitsch Flamingo Distress Oxide mixed with water and then brushed it across my cardstock to create a light pink wash. I also used Mowed Lawn Distress Oxide mixed with water and a fine paint brush to add splatters.
I used the purple crosshatch style patterned paper from Pinkfresh Studio to back my cardstock and create a border for my layout. I then used a mix of the Pinkfresh papers to create layers on the focal area of my page. I also added a paper doily and some frayed gauze for texture before adding my photo on top.
Alongside my photo was a small pocket style envelope from the Pinkfresh Studio Journaling Bits pack, with a journal card tucked inside.
I used pieces from the Pinkfresh Floral Ephemera pack to add clusters in the top right and bottom left corners of my photo, with a third floral element (the flower tucked under the edge of the pocket) coming from the Hip Kit ephemera pack. The little heart button was also a Hip Kit exclusive. Along the top edge of my photo I added the pink banner to help cover up some of the background distraction.
For my title, I used one of the large Hip Kit chipboard phrases combined with the green Pinkfresh alphas. I also used several phrases from the Hip Kit clear sticker set to add some extra text to my page.
On top of the journaling pocket I added one of the sweet little Hip Kit fabric bows. These bows come deconstructed in a pack (which I didn't mind), and only require a minute and couple of dabs of glue to put one together. I also used my typewriter to add my journaling to the journal card.
I was really happy with how this pretty page turned out, and very happy with my first Hip Kit! I am looking forward to getting stuck into it again as soon as I have a chance.
If you would like to see how this page came together, then you can watch my process video here:
Today I am sharing my fourth and final project created with the Kitaholic Kits May kit, and it is also my final project as a member of the design team. For this layout I wanted to focus on the Heidi Swapp goodies and play on the earthy tones of the kit, so I decided to document a photo I took at the Grand Canyon a couple of years ago.
I started my page with a sheet of patterned paper from the Heidi Swapp 'Carefree' collection, which featured a soft, sketchy floral print. I wanted to add some extra warmth to the background, and also tone down the print in the centre of my page, so I applied some yellow and white acrylic paints using my brayer.
For my papery layers under my photo, I also used pieces of the Heidi Swapp 'Carefree' papers, as well as one of the white paper doilies from the kit. I also added some frayed gauze for texture, then popped my photo up on some cardboard to help separate it from the background. I added a phrase sticker along the bottom edge of my photo, which is something I often do.
I used papers from the kit to trace and cut my own tags, which I tied off with bakers twine and tucked into the layers behind my photo. My journal card came from the 'Carefree' ephemera pack and I tucked that into my layers as well. I added the wander far & wide vellum piece to my journal tag using a Kmart tape runner (which is my preferred adhesive for vellum pieces as it's virtually invisible).
To the right of my photo I created a cluster using more of the ephemera pieces and a wood veneer heart from a previous kit. Below my photo was where my title was placed and I used a combination of one of the die cut words from the ephemera pack as well as some of the raw chipboard Thickers from the kit.
I finished off my page with some of the Bo Bunny enamel dots, a few stamped butterflies using the Pink Paislee stamp set, and a little bit of inky splatter.
If you would like to watch how I put this page together, you can watch my process video here:
I have really enjoyed the challenge of working with these kits, and am happy with the projects I made with them. I have no idea what is in store for me next on the creative front, but I'll be sure to keep you posted here.
Thanks for stopping by today, I'll see you again soon. Until then, happy scrapping! X
Today I am sharing another design team project I created for Kitaholic Kits using the May kit and mixed media add-on kit. The May kit is full of the beautiful Heidi Swapp 'Carefree' collection, which features a soft, muted colour palette. Whilst the mixed media add-on kit features a set of Vicki Boutin stencils and some of the new VB gel crayons, which are quite bright and vibrant. My challenge to myself was how to marry the two together on a layout whilst still achieving a cohesive design.
The first thing I did was to do some experimenting with the crayons to see how different methods of using them would achieve different looks. This is something I try to do anytime I receive a new medium to work with, because the best way to learn is to play! I tried a mix of wet & dry applications and different blending techniques until I finally settled on the method I wanted to use for this layout.
I finally settled on a dry application, and used a mix of the pink and orange crayons to achieve the colour I wanted. To apply them to my page, I first scribbled them onto my non-stick craft mat, then used a foam blending tool to pick up the pigment and then gently blend it onto my page to give me a subtle result.
For the next layer on my background, I used one of the new Vicki Boutin 'Color Study' stencils and some plain texture paste and just added some subtle stencilling over the top. I then used the gel crayons again, but this time with a wet application, by mixing some of the pigment with a little water and then using a paintbrush to add splatters on my page.
For the paper layers I used a mix of the Heidi Swapp papers, starting with a piece I had left-over from my previous project using the kit. I also used labels from the HS 'Carefree' cardstock sticker sheet to add extra interest to my layers. I had matted the main photo of the three that I had chosen for my layout, and used soft, messy cotton thread to add texture to the page.
My title came from the 'Carefree' ephemera pack, and I popped it up with some foam tape to help raise it up to the same height as my photos. I used a few other pieces from the same pack, including the cactus plant embellishment which I chose to use simply because the colours and shape worked on the page.
A few extra stickers, a scattering of Bo Bunny Candy Dots, some stamped phrases and a final splatter and my page was complete.
You can see how it all came together in my process video here:
Thanks so much for stopping by today, I'll be back soon with another project to share.
Hi everyone, today I have another Kitaholic Kits design team project to share using the May kit and mixed media add-on kit. My inspiration for this project came from one of the Vicki Boutin stencils in the mixed media kit - the floral pattern. As soon as I saw this stencil it had a real "retro" vibe to me, and I knew I wanted to pair it with an old childhood photo. I found a photo of my sister and I and thought that the painted style paper from the Heidi Swapp 'Carefree' collection in the kit would work well as my page background.
I used a sponge applicator and my Tattered RoseDistress Oxide to add some of the floral pattern through the Vicki Boutin stencil in three areas of my page. I love the way it added extra depth to the background paper and I was impressed with how the Distress Oxide looked on top of the colour variations on the paper.
Next, I moved onto creating some paper layers for the focal area of my page. I added some torn pieces from some of the other Heidi Swapp papers in the kit, and added a mat to my photo as well. I layered them together, adding a paper doily from the kit and some frayed gauze from my stash, before placing my photo on top.
To the left of my photo, I used a gold foil edged journal card from the 'Carefree' Ephemera pack with my typed journalling on it; along with a circular gold foil phrase piece and leafy branch from the same pack. Along the bottom edge of the photo I added the gold foil happy with you phrase sticker.
To the right of my photo I added more ephemera pieces including a tag (which I tied with twine), gold foiled flower and small gold heart. I used the word together from the Cardstock Sticker sheet as my page title, adding some foam tape under it to pop it up from the page. The wood veneer heart was from a previous kit and I think the small splash of natural texture it brought to the page worked really well.
I finished off my layout with some stamped butterflies from the Pink Paislee stamp set in the kit. I used Bundled Sage and Stormy SkyDistress Oxides for them. The final touch was splatters of Heidi Swapp Color Shine in Navy and Dina Wakley Gloss Spray in Mineral, plus a few stamped phrase using a roller stamp from my stash.
If you would like to see it come together, you can watch my process video here:
Thanks for stopping by, I'll be back soon with another project to share. Until then, happy scrapping! X