Showing posts with label Color Kaleidoscope collection. Show all posts

Friday, 2 October 2020

You Are Kind | Kitaholic Kits Cyber Crop challenge


Hi everyone! 
Just thought I would pop in quickly to share a mixed media layout I created over the weekend for one of the challenges for the Kitaholic Kits 'Spring Fling' cyber crop. The criteria for this challenge was a gorgeous mood board...


My initial inspiration came from the included quote "every day is a gift", which made me think of this cute photo of one of my boys handing over a flower he picked for me. The photo was taken at the beach, which gave it a summery vibe (even though it was actually winter at the time). 

Here's what I came up with...


So my page began with a sheet of white cardstock and some "Picked Raspberry" Distress Oxide, which I simply mixed with some water on my craft mat, then laid the cardstock over the top to pick up the colour. Once dry, I added some subtle detail using grey ink and a crosshatch pattern acrylic stamp to add some random stamping around the page.
 

For my next layer I used a Simple Stories heart pattern stencil with my Vicki Boutin "Prism" glaze so that I could draw in the hearts from the board. I then added some splatters to my page using blue and grey mists.

Now it was time to move onto some paper layers, so I decided to pull out my Vicki Boutin stash, as I thought it would work well with the bright colours of the board.


I layered some papers from the 'Color Kaleidoscope' collection, adding a pink paper doily and some pieces of torn washi to my page as well. I also added some frayed gauze for soft texture, before adding my photo on top.

I then added some of the coordinating ephemera pieces and chipboard Thickers, and my journalling on a small journal spot.


I finished off by using a roller stamp to stamp hello, I love you repeatedly around the page.

Thanks so much for stopping by today so I could share this with you. I will be back with another project (and maybe even a process video?!) soon. Until then, happy scrapping! X

Friday, 18 September 2020

Big Fun


Hi everyone! I've got another "just because" layout to share with you today. This mixed media page was created to document another one of my kids awesome dress-up photos using some of my favourite products from my stash.


 I started my page by adding some Distress Oxides to my cardstock (Chipped Sapphire and Mowed Lawn), which I applied by mixing it with water on my messy mat and then laying my cardstock over the top to soak it up. I love the randomness of using this method, as it's always a surprise how the colour will come out and it gives me a jumping off point for the rest of my page.


Next, it was time to start building some layers. First, I used black ink and one of my fave star stamps (Squiggly Star Collage) from Viva Las VegaStamps, which I stamped three times to create a "visual triangle" around where my photo was going to go. I then took some Vicki Boutin Prism glaze, and swiped a little around the page using my palette knife. This broke up the strong navy of the ink, and added texture and shine. 


For my next layer I used a stencil from StencilGirl Products called 'Military Style Stars' along with my TCW 'Light & Fluffy' Modelling Paste. I chose a basic white modelling paste as I wanted something with a matte, white finish to pull back some of the colour. I then used another of my fave VLVS stamps 'Sky of Stars Background' to add yet another layer to my background. 


Next, I added some papery layers using patterned papers from Vicki Boutin (a mix from both the 'Let's Wander' and 'Color Kaleidoscope' collections). I cut and tore the papers into various size pieces, which I stacked with a paper doily and some frayed gauze before topping with my photo. 

For my embellishments I again used Vicki Boutin products - a mix of ephemera, stickers and Thickers. I used these pieces to continue building up the layers on the page. To the right of my photo I added a handmade star embellishment from Charms Creations, which I topped with a flair button (from my sister's stash - thanks Mandy!)


I finished off with some Vicki Boutin puffy word Thickers for my title and then I was done! I had so much fun creating this page and it all came together so easily. (Don't you love it when that happens?)
Thanks so much for stopping by so I could share this with you. Until next time, happy scrapping! X 

Sunday, 9 August 2020

Celebrate Today | Scrap the Girls August Challenge


Hi everyone,
Today I am here to share my take on the August challenge for Scrap the Girls. This month the challenge is called "Open Your Heart" and is based on this sweet inspiration image...


I started by drawing on the heart / love theme from the image and decided to document some photos of my daughter that I took on Valentine's Day. She had come home from school with a beaming smile because she had received a red rose from a "secret admirer". 


I used the colours of the image as a guide to my palette, choosing the blue that was dominant in the picture as the primary colour for my background, with a little green thrown in. I used Distress Oxides to first create a watercolour style background. I then used a gorgeous StencilGirl floral stencil called 'Rose Bouquet' along with Vicki Boutin Iridescent Glaze to add subtle texture to the page and tie in the nature aspect of the inspiration image. 


Once the background layers were dry, it was time to add some paper layers. I wanted something bright and fun to go with the strong colours of my daughter's uniform so I reached for the Vicki Boutin 'Color Kaleidoscope' collection. I cut and tore a variety of pieces and stacked them together to form my photo mat.


I loved the pop of red of the heart in the image, so I added a small red paper doily on top of the paper stack before placing my photos on top. I also tore some small pieces pieces of navy washi tape that featured small gold hearts, and added them for a bit of contrast. 


Next, it was time to add some embellishments. In the interests of keeping things simple, I decided to use a couple of Vicki Boutin ephemera pieces and stickers so that they would coordinate effortlessly. I also used some matching hearts that I fussy cut from one of the VB papers.


To finish off my page I added some small black ink splatters and a simple stamped word look using one of the roller stamps from my stash. I then added my handwritten journalling and I was done. 


I would love for you to join in on our challenge at Scrap the Girls this month. We have Flutterby Designs on board as our Aussie sponsor this month, and our regular international sponsor of Tanya Leigh Designz. Pop over to the blog post HERE for more details or to see what the rest of the team created. 
Until next time, happy scrapping! X

Thursday, 2 April 2020

You Are Amazing ~ a mixed media layout


Hi all!
Popping in today to share a layout I created recently featuring the Vicki Boutin 'Color Kaleidoscope' collection and a fabulous background technique that was inspired by Vicki as well. I recently watched a video that Vicki hosted on the Scrapbook and Cards Today Facebook page where she used a fabulous, fun (and easy!) acrylic paint bubble technique. I fell in love with the effect immediately so I had to give it a try. (If you would like to see it in action, you can watch Vicki's video HERE)

I tested the technique out on a few different substrates, then used one of the backgrounds I created to put this page together...
(Click on photos for a better view)


I decided to document a photo of my hubby and daughter that was taken just before we went off to her primary school graduation back in December. I chose this photo because the colours of the background reminded me of the colour of her dress. 


Isn't that background effect stunning? I am very keen to explore this technique further using different types of paints, containers and substrates.

Over my background I layered some patterned paper pieces from the 'Color Kaleidoscope' collection along with a paper doily, then topped it with my photo.


I used a combination of die cuts and stickers from the same collection to embellish around my photo and then finished off by stamping a few phrases and splattering some navy and gold mists.


That's all from me today - short and sweet! Until next time, happy scrapping! X

Saturday, 14 March 2020

Remember ~ a mixed media layout


Hi all!
You probably already know of my love for all things Vicki Boutin (and if you don't, you must have been hiding out somewhere), so today I am here to share another layout featuring some VB goodness. This layout was created after I played along with Vicki's Facebook Friday night live last week (which is Saturday morning for me here in Australia and usually means I am still sitting around in my PJS! haha) I actually did the background for this page in real time, creating along with Vicki. (If you would like to see her video you can watch it HERE)

So this is the background that I finished up with after the video...


To create it, I used a combination of Faber-Castell Gelatos (as I don't have any of Vicki's art crayons), Dina Wakley 'Night' acrylic paint (one of my fave colours!), a stencil from StencilGirl, and Vicki's brand new 'Prism' glaze. I love how it turned out! (I adore those hard water lines in watercolour work.) You can see in the photo that I had already stuck a VB sticker on there as well before I thought to take a background shot. 

And here is what I did with it...
(Click on photos for a better view)


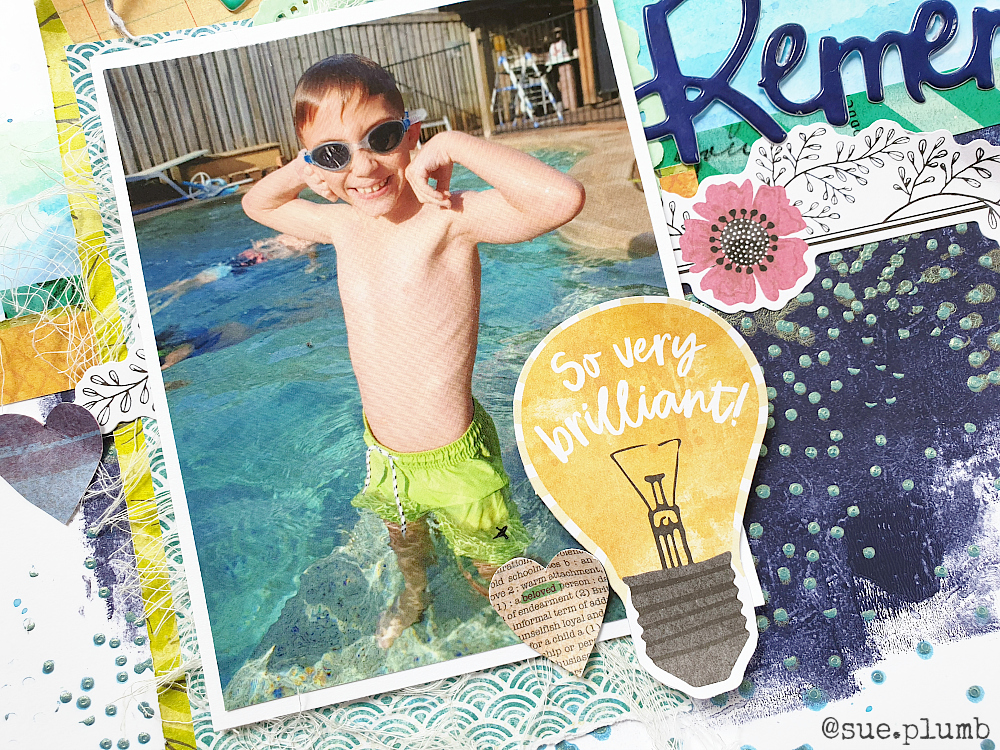
You will see that I kept the remainder of my page relatively simple, so as not to cover up too much of that beautiful background. The photo I used is one of my boys in my sister's pool during the Christmas holidays - we were celebrating the fact that after working very hard at swimming lessons that he had finally reached the stage he was competent (and confident) enough to swim in the deep pool without his swim vest on. A great achievement!


After adding the sticker horizontally across my page, I added some layers behind my photo using papers from the 'Color Kaleidoscope' collection, a small paper doily and some frayed gauze. I also tucked in a tag from the coordinating ephemera pack that I tied with a small piece of twine and used to write my journalling on.


I used the large lightbulb die cut with so very brilliant printed on it as I thought it was the perfect piece to go with the theme of my page. To the right of my photo I added another die cut, this time a black and white floral piece, along the horizontal line I had already created with the sticker.


I then used the sticker as the anchor point for my title word, which was the word remember from the VB Puffy Thickers pack, and I also popped a small heart from the same pack onto my journal tag. Below my title I added the attitude is everything phrase sticker from the 'Color Kaleidoscope' sticker book. Then I finished off my page with a few hearts that were fussy cut from one of the papers.

This was a super simple page to throw together after all the background work was already done and I love how it turned out. I am so excited that I now have the new VB 'Let's Wander' collection in the house - I think that will be getting a run on my table VERY soon!

Until next time, happy scrapping! X 

Friday, 6 March 2020

Bloom | Scrap the Girls March Challenge


Hi everyone! Today I am sharing my layout for the March challenge at Scrap the Girls, which is called "Bloom From Within". It's a super cool inspiration board that looks like this...


Isn't it awesome? I love all those beautiful images! I knew immediately that I had the perfect photo for this challenge - a shot of my daughter that I took a little while ago while she was dressed up in a Cosplay costume. 

There were several elements from the board I wanted to include - a white background; the colour palette of green / pink / red; lots of florals; typed text; and hearts to represent the human heart.

Here's what I came up with...
(Click on photos for a better view)


How perfect is that photo with all the blooms growing out of her skin? I love it! In hindsight, I am so glad I took these photos of her in this costume.

Now onto my layout. I began my page with a sheet of white cardstock, 'Worn Lipstick' Distress Oxide and the 'Distressed Grid' stencil from Dusty Attic. I added some subtle stencilling using a sponge to begin building my layers from. I then used my 'Grass' Colour Artist Ink from Bee Arty to add some large splats, and 'Soot' to add some tiny splatters. 

Next, I added stamping using black ink and some fabulous floral stamps by Vicki Boutin from her 'Wildflower and Honey' release (which I was able to borrow from my friend Amanda Hartmann during a scrappy girls weekend away). At this point I was pretty happy with the mixed media layers on my background so I moved onto adding some papery ones.


I chose to use the Vicki Boutin 'Color Kaleidoscope' collection again (are you getting sick of it yet? I'm not! haha), as I knew the rich tones and florals would be perfect for this page. I chose a couple of patterned papers - one teal and one kraft (which featured typed text) and cut some pieces to add as my layered photo mat. 


Now it was time to embellish my page! I gathered up a variety of pieces from the 'Color Kaleidoscope' die cut ephemera packs and set to work tucking them in around my photo. I also added lots of small green leaves that I fussy cut from one of the patterned papers from the range. 


For my page title, I used a clear sticker that said bloom from one of my MAMBI sticker pads. The hot pink on the sticker really stood out from the page, as it was a slightly different pink to everything else I had already used, so I added a couple of small coordinating watercolour flower stickers from the same pad to help tie in. I also added some small pink and green heart stickers and I was done! 

I am SO happy with how this page came out; it's fun, quirky, multi-layered and a little bit messy - much like my daughter is. (And yes, she loves it too and has already asked me if she can put it up in her room.)


I hope you will play along with us this month at Scrap the Girls, we have Cocoa Vanilla Studio on board as our sponsor (and who wouldn't want to win themselves a CVS prize?) For all the details, and to see what the rest of the design team created for this challenge, head over to the STG blog HERE
Until next time, happy scrapping! X

Saturday, 22 February 2020

Escape the Ordinary | Dust it Off Challenge


Hi everyone!
Today I am back to share another layout for my #dustitoff challenge. (If you missed my previous post explaining what this is all about, you can read it HERE) For this layout, I began by assessing my stash to find something to "dust off" and work with.

Here is what I chose...


 My (very neglected) Big Shot, and some metal dies. At this point I had no idea what I was going to create, so I just pulled out a few that appealed to me. I also decided to use the Vicki Boutin 'Color Kaleidoscope' collection (again) because I still hadn't packed it away and I was enjoying using it.  So I pulled out my photo box, found a photo of my sister and I, and set to work.

I started with my page background. I decided to go with a patterned paper background for this one, rather than mixed media as I was keen to get to my challenge items. I chose the beautiful "Look Up" paper, which featured pretty blue / pink / purple tones and clouds that worked well with my photo. (I immediately thought that it would be perfect to use with the sun die as well.) 

Here's a look at the entire page...
(Click on photos for a better view)


Now if you are anything like me, another item you probably have in abundance in your stash (but don't use much) is cardstock. Specifically, coloured cardstock. As this was my Dust it Off challenge, I thought what better time than to put some of it to use. I grabbed a sheet of pale yellow and cut three of the Stitched Suns using the die from Uniquely Creative.


I used a navy sheet from the 'Color Kaleidoscope' 6x8" paper pad as the anchor point for my design, then sat my photo on top (not stuck down) and began building my layers from there. I used the tag dies to cut a couple of tags from different patterned papers, which I tied with twine and tucked in alongside my photo. I decided to run the suns vertically down my page on the other side of my photo, so I added a couple of narrow paper strips first to help ground them to the page. I mirrored this element by adding some strips below my photo as well, including the row of birds that was fussy cut from another of the 6x8" papers.


At this point I decided to make a little change to my background, and add some cardstock behind the paper. I trimmed off a small amount along the top and right side of the patterned paper and mounted a sheet of Kraft behind it. This created a border on the left edge and along the bottom of the layout and helped tie in the kraft coloured elements on the page. (It also meant I was getting stuff USED!)


To balance out the row of suns on the right side of my page, I created an embellishment cluster to the left of my photo using a die cut and stickers. I adore that holographic foil heart on the today sticker, which I popped up from the background using foam tape. 

I also used a couple of small round stickers with foam tape under them on top of my suns; and a round die cut for my journalling over the centre one. My title came from the escape the ordinary sticker I placed above my photo.


I was really happy with how this one came out, and even happier that I managed to dust off my Big Shot; some dies; and use up some coloured cardstock!

Don't forget if you have any suggestions for anything you would like to see me use, leave me a comment and I will add it to my list. If you would like to play along with me, please use the #dustitoffchallenge hashtag on Instagram to share your own creations so I can see yours too!
Until next time, happy scrapping! X 
Saturday, 15 February 2020

Best Friends | Dust it Off Challenge


Hi everyone!
Back with another "just because" layout to share with you today. (I know, right?!) 
You may have seen my layout from last week that was inspired after watching a Facebook live from Vicki Boutin as she was creating watercolour backgrounds? (You can see the post with my layout HERE) After using Vicki's 'Color Kaleidoscope' collection for that one, I was inspired to create again whilst I still had it sitting out.

Here's what I created...
(Click on photos for a better view)


As I mentioned in my post last week, I don't have any VB mixed media supplies (yet!), so I had to make do with my current supplies. (If I use them I can totally justify any new purchases, right?!) One of my most under-used mixed media supplies is definitely my big set of Faber-Castell gelatos, so I thought it might be time to give them a workout. 

I began with a sheet of white cardstock as my background, and started by using the gelatos as a watercolour. To do this, I simply scribbled onto my non-stick craft mat, added a spritz of water to mix, and then moved my cardstock around over the top, touching it to pick up the colour as I went. Once I had finished with the first colour (teal), I went back and repeated the process with a light green.


Next, I grabbed a couple of small StencilGirl stencils from my stash. The first was a script style one called Rembrandt's Words. I love the large, loose font on this stencil, that was inspired by flowing script straight from an old ink pen. The second stencil is one of my absolute faves that I use often, and is called Organized Chaos, inspired by Van Gogh's "The Starry Night" painting. 

I chose to use my gelatos again, this time using a dry application method. To do this, I scribbled a small amount onto my non-stick craft mat and then used a stencil brush to pick up the pigment and brush it through the stencils. (I used a dark green and a dark blue.)


Next it was time for some papery fun! I already had a half sheet of paper from my previous layout with this collection, so I decided to make use of it first. I trimmed the edge off to shorten it, then tore it into a few strips. I used the pattern with the abstract circles for the main piece, then flipped the others over to show the contrasting green pattern on the reverse. I then layered them together and stuck them down on the page to provide my anchor point.


To make further use of the paper scraps I had left, I fussy cut a few of the coloured circles and tucked them in around the edges. I then created additional layers using patterned tissue paper and a small paper doily, before placing my photo on top. 


To embellish my page I used a mixture of the coordinating die cuts and stickers. I positioned my title alongside the photo and used the bold red arrow sticker (popped up on a little foam tape) to draw the eye into the subject. 

My handwritten journalling was added in the bottom right corner of the layout, which also helped create a natural diagonal flow through my page. 


To finish off, I added some small splatters of black ink and then some larger splotches using pink ink. I love the broad, eclectic mix of colours in this collection and hope to have another mixed media layout using it to share soon. 

I think I might make my own challenge to focus on using some neglected supplies from my stash and name it the #dustitoff challenge. If there is anything in particular you would like to see me use, or if you have any questions, please let me know in the comments. 

That's all from me today, thanks so much for stopping by. 
Until next time, happy scrapping! X