Showing posts with label abstract. Show all posts

Friday, 12 March 2021

Enchanted Garden painting | StencilGirl


Hi everyone!
Popping in today to share my latest project for the StencilGirl® Creative Team. For today's project I was tasked with the theme "Pastiche". If you haven't been following the team projects that have come before me, then you may not be familiar with the term? Simply put, a pastiche is a work of visual art, literature, theatre, or music that imitates the style or character of the work of one or more other artists. Unlike parody, pastiche celebrates, rather than mocks, the work it imitates.

I began by choosing the work of an artist whose work I find not only beautiful, but also incredibly inspiring. Being Australian, I couldn't go past picking a fellow Aussie, so the artist I chose was Clair Bremner. Clair creates paintings that are inspired by nature, and she uses an amazing combination of both colour and form to translate the things she sees into stunning works of art. I had long wanted to try working in Clair's style, so this provided me the perfect opportunity.

Here's a sample of Clair's work from her online gallery so you can see her style...

I chose this example of Clair's work, as I decided to use a similar colour palette and materials. I chose watercolour paper for my substrate (A3 size), and like Clair, I worked with acrylics.

Here's my piece, I entitled "Enchanted Garden"...


 I used a combination of brayer, silicone spatula, and brush to apply my base colours to the page. I worked in a random fashion, but unlike Clair's piece, I left some white space as I like the balance between busy and clean. 


With the base colours down on the page, it was then time to begin building the layers. The fist stencil I chose was Bouquet Greenery by Wendy Brightbill. This 9x12" stencil features large leafy branches, which I thought would work for trees in the scale I was working in. I used Naples Yellow paint from Monte Marte to provide a contrast to the background colours, and applied the paint using a stippling technique with a brush.


Next, I moved onto some Dusky Pink paint and the Playful Petals stencil designed by Jennifer Evans. I masked off a small section of the stencil and used the same stippling technique to add some groups of petals that I thought would make great bushes. 


At this point I felt my painting needed a little more "light", so I chose white paint for my next layer. The stencil I used was June Pfaff Daly's Inspired by Frida stencil. Once again, I masked off a small section of the stencil, this time a leafy branch, and used it to add some branches into my layers, making sure to overlap them with other portions of my design to help add depth to the piece. 


While I was using the white paint, I also added some sweet little fern branches in the foreground using the Maidenhair Fern stencil by Rae Missigman. I adore the whimsical style of the fern branches on this stencil, and thought it was perfect as part of my tribute to Clair's work. 

The final stencil I used was the super cute Daisies 6 by Terri Stegmiller. In order to be able to be very controlled with my placement, I masked off a single daisy and used Marine (a very dark blue) to add a few flowers around the page. (Because this stencil design was a little more delicate, I simply painted through the stencil with a small flat brush rather than stippled with the larger brush.)


Once all the painted layers were in place, I used a black Sharpie, white Sharpie and a Stabilo All pencil to add the finishing touches to my page. This was simply a case of adding a combination of small mark and lines over the top of the paint. (Make sure the paint is totally dry before doing this, or you will completely ruin the tip of your pens!)

I am so happy with how this piece turned out, and I really hope I did justice to Clair's amazing style. You can view more of Clair's work on her website: http://www.clairbremnerart.com/

If you would like to watch me create this painting, I have a video of my process available:


Thanks so much for stopping by today so I could share this with you. Until next time, happy creating! X

Thursday, 9 April 2020

This is the Life | Scrap the Girls April challenge


Hi everyone! I hope this finds you all well and coping with the ever-changing world we are living in right now? Things have been a little bit quiet on the scrapping front for me the past couple of weeks, as like so many other parents, I have had my children home from school. (And unfortunately for me, it means my scrap space AKA my kitchen table, has also become their school space.) Hopefully we will get the balancing act right soon, and I will have more time for myself again.

Anyway, I am here today to share my April design team layout that I created for Scrap the Girls. This month's challenge is all about adventure and travel...


And here is what I came up with...
(Click on photos for a better view)


As soon as I found out the theme for this challenge I knew I wanted to scrap a photo that was taken at my retreat on the Sunshine Coast back in November - definitely one of my favourite trips of the year! This was a shot of my roomies and I that was taken on our private rooftop (thanks to our photographer Nat). 

I took my inspiration for my page from the colours of the quote, using Gelatos to create a simple, abstract scribbled background, which I blended out a bit using baby wipes.


I then added a torn scrap of patterned paper (that sweet heart print from the Cocoa Vanilla Studio 'Happiness' collection) to serve as the anchor point for my design. I then added some cardboard to the back of my photo and mounted it on top. 


Next, I grabbed a pack of tropical themed die cuts (I think they might have been from the Reject Shop?) and started tucking them in around my photo. My aim was to keep the design of the piece simple, but at the same time have plenty of colour and interest to engage the viewer.


I finished off my layout with some typed journalling and a Cocoa Vanilla Studio die cut butterfly. (Let's face it, I never need a reason for butterflies, do I?)


I do hope you will play along with this challenge! We have Charms Creations as our Aussie sponsor this month. Unfortunately, Scrap Accent is no longer able to be our international sponsor, so we are on the hunt for a new one. If you know a a business or individual who may be able to fill this role please have them message Krisy via the Scrap the Girls Facebook page. In the meantime, our international winners will receive an invitation to do a monthly guest spot on our team. 

If you would like to see what else the team created for this challenge, check out their projects on our blog HERE
Until next time, happy scrapping! X

Wednesday, 16 October 2019

New kicks, stencilled street shoes | StencilGirl®


Hi everyone!
Dropping by today to share a recent project I created for the StencilGirl® Creative Team. For this piece I was tasked with the theme "dress it or wear it". After a bit of thought I decided to dress up a pair of shoes so I could wear them all over town! (Who doesn't ever need a pair of new shoes, right?!)


I picked up a pair of plain white canvas high top shoes from Kmart (which were only $10 - bargain!) and removed the laces. (I was actually in need of a new pair of high tops after my last pair that had served me so well were recently retired to the bin.) This type of shoe is ideal for a makeover as the canvas provides a perfect blank slate just calling for layers of paint and ink to be applied.


Before I began, I decided I wanted my shoes to be street style - urban and a bit grungy; so I started by brushing my shoes with some grey Flutter Colour paint from Flutterby Designs to tone down the stark white. I used a "dry brush" technique - whereby the brush is relatively dry but still holds paint, to give scratchy-style brush strokes. This provided a perfect background to begin building my layers on.

Now it was time to add some patterns! I chose the Crazy Quilts Calm & Frenzy stencil designed by Andrew Borloz to start with. This versatile 9x12" stencil features a variety of bold patterns arranged into a quilt style design. This is ideal for creating entire backgrounds, or like I did, for using a small section to add specific details to a piece.


I paired the stencil with a darker shade of grey acrylic paint and used the circular pattern from the top left corner to add some circles to my shoes. I used a stiff, flat brush and a stippling technique to add the paint through the stencil then dried the shoes with a heat tool so I could move onto the next layer.


For my next layer I again stuck with the circular theme; this time choosing the Collage Textures and Patterns, Circles designed by Gwen Lafleur. 


I chose the section of the stencil that features scattered circles with X's in the centres to add the next layer of detail to my shoes. This time, rather than acrylic paint, I chose to use black StazOn ink and a sponge dauber to apply it through the stencil. (Be prepared for some messy hands when you do this!) 


With layers of grey and black already in place, it was time to stray away from neutral tones and add a hint of colour to my shoes. I switched back to acrylic paint, choosing one of my favourite shades 'Night' by Dina Wakley and to add another layer over the top.

This time my stencil choice was Organized Chaos designed by Cat Kerr - which happens to be one of my absolute favourite stencils (probably not hard to guess judging by how well used it looks in my photos). I love the random, organic design of this pattern; which Cat says was inspired by Van Gogh's iconic painting, The Starry Night. 


Again, I used a stiff brush and stippled the paint through the stencil; using a small section and moving it around the surface of the shoes.

Now it was time for some fun! With my background largely complete, it was time to add some focal points and colour to bring some real personality to my shoes. The stencil I chose that I thought would fit with my own brief of urban and a bit grungy, was the Go Your Own Way Mini stencil designed by Mary C. Nasser.


I used the 4x4" size stencil for my project, but this same design is also available as a 6x6" stencil here if you prefer larger sized arrows. 

Again I reached for a Dina Wakley paint - this time in the vibrant purple shade called 'Blackberry'. (I was inspired to use this colour so I could match my shoes with my nails and the streaks of colour in my hair.) I immediately loved the way the purple arrows popped against the neutral tones of the background!


After drying the paint with a heat tool, I decided to carry the arrow theme further by stencilling arrows around the edges of the soles of the shoes. Again I used black StazOn ink and a sponge dauber to stencil an assortment of arrows right around each shoe. 


At this point my shoes I decided my shoes definitely needed an extra pop of colour to give them a bit more personality, so I grabbed my Dina Wakley 'Turquoise' paint. I squeezed out a small amount of paint and then added water to thin it down before dabbing it onto my shoes randomly using a soft, round brush. 


Once that had dried, I noticed how dirty the edge line of the soles had become due to small paint and ink smudges. My answer? Cover it up, of course! I took a large black Sharpie and coloured over the rubber edge all the way around the shoes. Not only did this do the trick covering up those dirty smudges, but it also added an extra cool detail to my shoes - winning!


I still thought my shoes needed a little extra colour; so I watered down some more Dina Wakley paint (this time I used the deeper colour 'Ocean') and took my round brush and shoes outside to add some splatters over the top. I was really happy with how the extra splatters "grunged" my shoes up even more. 


To finish off my shoes, I wanted to draw more attention to the purple arrows, as they were the focal point of my design. To do this, I used a Faber-Castell correction pen to add extra white detailing over the top of the purple paint, which I thought really made them pop!


And with that my shoes were complete! Once dry, I added the laces back in and stood back to admire my handiwork - I had one pair of super cool, unique shoes that cost me little more than $10 and some time!


And of course I HAD to put them on and show them off to my family right away...now my kids are all lining up for a pair, so I guess I will be busy stencilling some more shoes soon!


Thanks for stopping by so I could share this with you. Until next time, happy creating! X

Sunday, 10 March 2019

Abstract Floral painting | Colour Blast


Hi everyone!
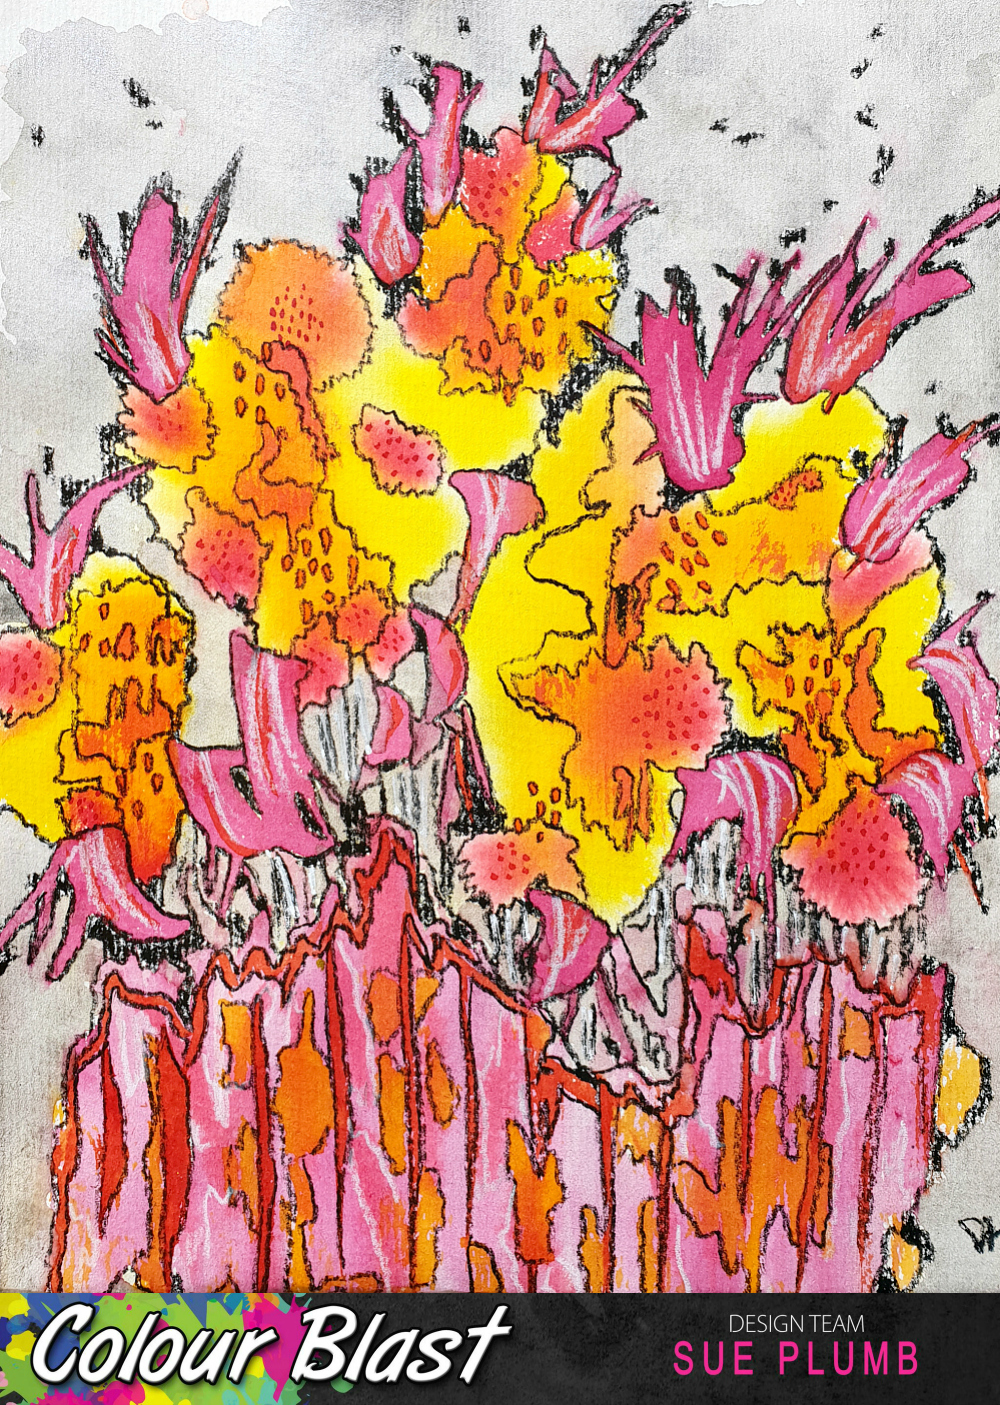
Popping in today to share a Colour Blast design team project with you. Today I have something a bit different - an abstract floral painting I created using Colour Artist Inks. 

This painting came about one day when I was having a bad day. I felt like losing myself in something creative, but just wasn't sure what I wanted to do. As I was sitting and looking out the window, I was staring at some flowering bushes over the fence in my neighbours yard. That was enough inspiration to get me started, so I pulled out a sheet of watercolour paper to see what would come out.

The result was an abstract floral painting, inspired by the colours and shapes of my neighbours plants...


I took photos along the way to document my process so I could share it. These are the supplies I started with - a sheet of watercolour paper and a range of Colour Artist Inks in warm tones (Slipper, Cranberry, Sunburnt, Citrus, Cider, Barley, and Spice.)


I started my misting my paper lightly with a water spray bottle to make it a little wet, to help the inks to wick out as they hit the paper. 
I began with the lightest tone - Citrus as my base, and then built on it from there; adding some smaller areas of Cider over the top; then smaller again with Cranberry. I used a small round brush and a gentle dabbing motion to apply the ink to the page, allowing the paper to naturally draw the colour from the brush.


You can see in the close up below how the inks wick out with the use of the water (bleed / spread across the page) and then in the second shot below how they look once they had dried.


Once the base colours had dried, I again used my small round brush, but this time used a sweeping stroke to apply some of the pink Slipper ink to the page. As these are dye based inks, they will reactivate and blend when wet, so I added the strokes into the spaces around and between the other colours.


I then allowed the Slipper ink to dry completely before adding more detail. The next colour I used was Sunburnt - used to apply the narrower sweeping strokes over the Slipper ink and the clusters of small dots. I used Spice to apply the small, short strokes. 


Now it was time to add my "fence" to the bottom section of the page. I used Slipper for the base colour, then Sunburnt and Cider for the detail and highlights over the top.


With all the inks in place, I left the page to completely dry before colouring in the background. I wanted a soft tone so as not to draw away from the focus of the picture, so I used Stormy Weather Colour Shimmer Spray (a nice soft, shimmery grey) and simply dipped my small brush into the bottle and painted in the remaining blank area of the page. I took care not to overlap any of the inked areas so as not to muddy the colours.


Once the background was dry, it was time to add the final details. I used my Stabilo All pencils (black and white) to draw in the detail over the top.


I started with the black pencil, using it to trace the lines around and between the colours; following the naturally occurring lines formed by the inks. I also used the black pencil to colour in any remaining spots of white around the edges, between the flowers and also on the background.


To finish off, I added a few highlights with the white pencil.


(I was so happy with the result of this painting that I even framed it!)


And there you have it - a fun, simple project that you can try yourself with very few supplies. You don't need any particular artistic talent to be able to create a project like this, just play with your supplies and see what comes out.
Until next time, happy creating! X