Showing posts with label Midnight collection. Show all posts

Friday, 11 June 2021

Beautiful Daughter | Cocoa Vanilla Studio


 Hi everyone, popping in today to share my latest design team project with you. For this one I was tasked to create something inspired by the mood board for the current Cocoa Vanilla Studio monthly challenge, which was designed by Michelle Stokes. 

Here's a look at the board...


The first thing that inspired me from the board was definitely the colours and the combination of different shades of pink, so I decided to create a layout of my daughter and go "full pink". I had a sweet photo of her that I took in our garden last year, where she was looking very dreamy, so I printed it out in black and white to keep it neutral.

My secondary inspiration from the board was the image of the heart with all the tassels hanging from it. This immediately made me think of the Tassels and Bows pack from the 'Unforgettable' collection, and along with my dreamy looking daughter, led me to the idea to create a dreamcatcher style layout to showcase the tassels.


For my layout, I decided to start with a sheet of white wood grain patterned paper from the 'Midnight' collection. This gave me a nice, neutral background with a bit of a boho vibe. I added some colour to the top portion of my page with two different shades of pink ink using the packaging technique to achieve a soft, unstructured look. 


Over the top of the ink I added the main part of my dreamcatcher. This was created using the die cut from the Large Die Cut and Backing kit from the 'Midnight' collection. I cut off the top third of the circle, then used a piercing tool to poke holes around the edge, which I threaded with some red and pink bakers twine. 


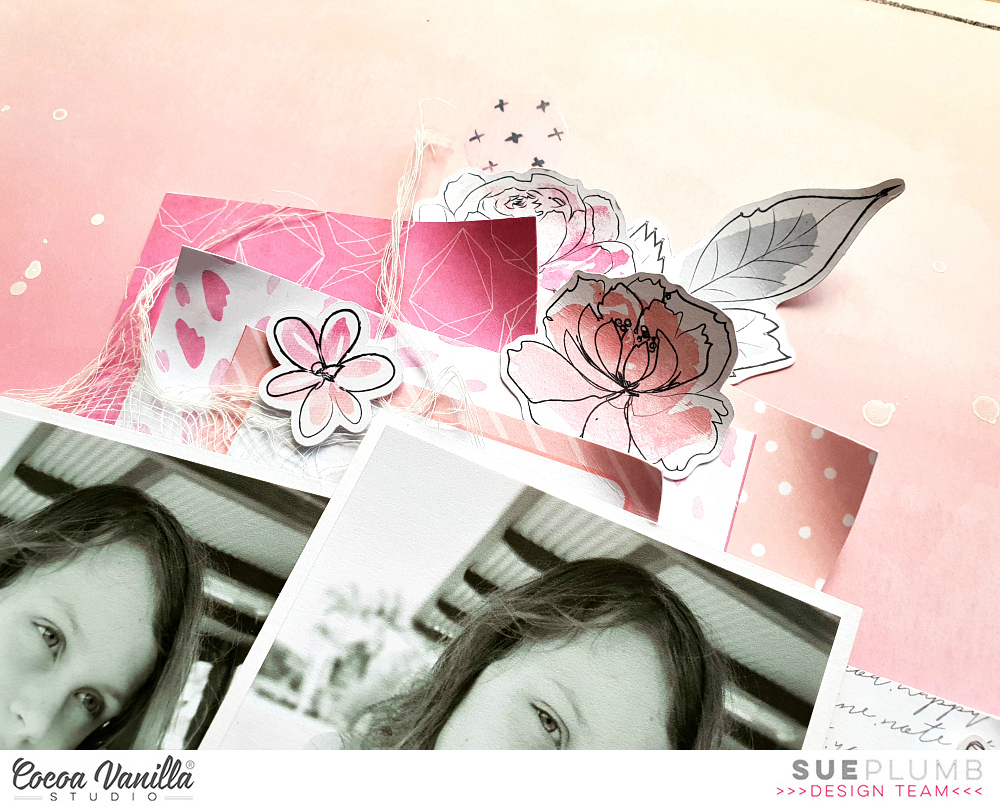
Next, I cut some paper layers to mat my photo with. I used a hot pink paper from the 'Unforgettable' 6x8" paper stack and a pink and white striped paper from the 'Midnight' 6x8" paper pad. I also added a white paper lace doily and some frayed gauze to my stack before adding my photo on top.


With my photo in place it was time to pretty things up! I used lots of floral pieces from the 'Unforgettable' Die Cut Ephemera pack to frame around my photo. I also added some small die cut flowers around the edge of my dreamcatcher where each hole with the twine was. 


Beneath the dreamcatcher, I added three tassels from the 'Unforgettable' Tassels and Bows pack, as well as three feathers from the 'Unforgettable' Die Cut Ephemera pack. I tied each tassel with the same twine I had threaded the dreamcatcher with. I tucked each of the pieces of twine under the title and then added a bow over the top.


I then added a few extra bits and pieces to my page - a flair button, the chipboard title beautiful, and some small phrase stickers - all from the 'Midnight' collection. From the 'Unforgettable' ephemera pack, I added some hearts and arrows (both inspired by the images in the board) and three die cut butterflies (because...butterflies!)

I was really happy with how this page turned out and I think it looks super pretty. I hope I have inspired you to play along with this month's challenge too. You can find all the details and enter via the Cocoa Vanilla Studio Community group HERE.

If you would like to watch how I put this all together, you can check out my process video:


Until next time, happy scrapping! X

Thursday, 12 March 2020

Hello You ~ Baby girl mini album | Cocoa Vanilla Studio


Hi everyone!
Today I am sharing a special mini album I created a little while ago for Cocoa Vanilla Studio using the beautiful 'Midnight' collection. This baby girl album was made for my daughter to tell the story of her birth and the weeks in hospital following. 


I began this mini album with an unbranded 6 ring pink planner I purchased from eBay. This planner came completely empty, and unlike the last planner I used (which was from Kmart), this one features a magnetic clasp to close it, rather than the elastic band. I also used an adjustable 6 hole punch (also purchased from eBay) that I set up to fit the rings in the planner.


I used pieces from most of the patterned papers from the collection, cutting a variety of sizes and shapes to use for the pages. I then punched each one with the hole punch, ensuring they were not all aligned the same so that they would sit at varying heights within the album. I also added some additional decorative detail to some of the pages using an assortment of border punches.

I created “tip-ins” for some of the pages using patterned paper adhered with washi tape. This allows you to extend on the amount of space you have on a page to add extra photos or journalling, or even hide journalling underneath, just like I did with my daughter’s birth story above.


Remember you don’t always need a photo on each page – it adds extra interest to an album to intersperse purely decorative pages, or pages that simply feature a sentiment throughout, such as the page featuring fussy cut flowers from the Bloom and Grow paper and a Die Cut Title word above.


Another way to help anchor photos into an album and ensure they appear as a cohesive part of the page design, rather than just stuck over the top, is to add embellishments that overlap part of the photos. Alternatively, don’t be afraid to use an entire photo as a page in itself and punch directly through the photo. (Matte photos tend to work better for this, rather than glossy.)


To continue to provide variety throughout the album, try turning some of the elements vertically on the page; or have a horizontal page opposite a vertical one. (It also adds an extra level of interactivity to have people rotate the album to look at them.)


A great way to include a series of photos is to print them as a photo strip and fold them accordion style with a tab sticker to pull it out with…


The photos fold out and then fold neatly back into the album, only taking up the same amount of space as one photo.


Create small pockets from scrap pieces of paper to hold journal tags. For a final interactive element, I uploaded a video taken during the drive home from the hospital with my daughter to my YouTube channel (set as private) and then created a QR code for it. This allows it to be scanned by a QR code reader on a phone that links to the video and plays it. (My children LOVE these!)


There is much more to this album than I could show here. If you would like a look at the entire album, I have a flip through on my YouTube channel you can watch below:


That's all from me today, I hope I have inspired you to try making your own mini album in this style - they are so much fun to do!
Until next time, happy scrapping! X

Wednesday, 12 February 2020

Beautiful | Scrap the Girls February challenge


Hi everyone!
Time for another design team share from me, this time for Scrap the Girls. This month's challenge is called "Dip Me in Colour" and is a very pretty colour inspiration board that looks like this...


For my take on the challenge I decided to document a photo of my daughter that was taken recently at a friend's birthday party. The birthday girl's mum just happens to be a photographer, so at the party she did a photo shoot for them. All the girls took a variety of outfits to choose from, and with a couple of extra ladies on hand to help with hair and make-up, she got some amazing shots of them all. (Isn't that a great idea for a party?!) For anyone local to me (Sunshine Coast / North Brisbane), check out Teresa's work at Purely Poetic photography HERE 

Here is my take on the challenge...
(Click on photos for a better view)


For my layout I decided to use the Cocoa Vanilla Studio 'Midnight' collection. (Which I have actually been using quite a bit of lately - I love a bit of stash-busting!) This range features the majority of colours from the inspiration board (except the aqua), so I chose to leave that out and include the touch of gold that was included in the inspiration picture instead. 


I began my page with the gorgeous Inspired paper for my background. I chose this paper because of the mixed media style and the spots that tied in with the inspiration image. I then added pieces of the Inky Depths, Moonlight, and Shine Bright papers to form a mat for my photo and title. I also added a gold doily before adding my photo on top, using some cardboard underneath to pop it up from the background.

To further draw the viewer's eye into the photo, I cut the Flower Crown cut file from Cut to You using white cardstock and layered it over the top, then popped a small chipboard heart on as well.


I placed my page title on the horizontal strip of paper to the right of the photo, and used the word beautiful, then added the small my darling banner below it (both pieces were from the Midnight Chipboard Pieces pack). I then added a large floral feature by fussy cutting a section of the stunning Bloom & Grow paper, which I tucked in alongside my photo. (Those sketchy style flowers are so divine!)


To balance my layout, I created a small embellishment cluster in the top left corner of the page using a torn piece of Inky Depths paper; a couple of flowers from the Die Cut Ephemera pack; and a chipboard banner.
I finished off by adding a few more ephemera pieces and some clear stickers from the Clear Stickers pack around my page. (Did I mention I how much I love clear stickers?)


Thanks so much for stopping by today so I could share this with you. Be sure to pop over HERE and see what the rest of the STG Design Team (including our newest members!) created to inspire you for this challenge. Our fabulous Australian sponsor this month is Cut to You and as always, Scrap Accent for our international entrants.

Until next time, happy scrapping! X

Thursday, 6 February 2020

Happy Moments | Cocoa Vanilla Studio


Hi everyone!
Today I have another Cocoa Vanilla Studio design team project to share with you that I created recently. This page was created for a "Holidays and Vacations" theme that we ran recently on the CVS blog to inspire people to dig into their holiday photo stash and get the memories documented.

I used a combination of the ‘Boys Rule’ and ‘Midnight’ collections. I know what you are thinking – a bit of a strange mix, right? Despite the very obvious differences between the two, they did work together surprisingly well and were a perfect compliment for the colours in my photo.


For my take on the theme I decided to document a photo that was taken at the Cocoa Vanilla retreat that was held last May in Coffs Harbour. Scrap retreats are definitely one of my favourite kinds of holidays – besides spending time with great friends, you get to enjoy a change of scenery, have a break from your everyday responsibilities, AND you get to create! What’s not to love about that?!


I started my layout with ‘Boys Rule’, with a sheet of Star Fall as my base,which I topped with piece of white cardstock, cut slightly smaller than the paper, to leave a narrow border around the edge. I then added four blocks of paper to my background using pieces of the Messed Up; Expressionist and Straight and Narrow papers. I distressed each of the blocks by scrunching and then flattening them back out; then ran them horizontally on my page to compliment the landscape orientation of my photo.


With my background complete, I then added some scrap cardboard to the back of my photo and decided on its placement on the page. I chose the beautiful floral print Bloom and Grow paper from the ‘Midnight’ collection to begin embellishing my layout, fussy cutting several pieces to tuck in around my photo to frame it.


With the flowers in place I then added the little banner that said the best from the ‘Boys Rule’ Chipboard Pieces pack, and a small black and white butterfly sticker from the ‘Midnight’ Accessory Stickers; placing both near my top floral cluster.

I created another small cluster below my photo by combining another fussy cut floral piece with a small leafy branch and heart, both from the ‘Midnight’ Die Cut Ephemera pack. In my cluster to the left of my photo, I also added the shine bright flair button from the ‘Midnight’ Flair Buttons set.


For my page title, I used the words happy and moments from the ‘Midnight’ Chipboard Pieces pack; and then I finished off my layout by typing up my journalling and applying it in strips (again tying into the horizontal theme) near the bottom of the page.


That’s all from me today. I hope you are feeling inspired to document some of your own holiday moments. Until next time, happy scrapping! X

Saturday, 2 February 2019

Bloom and Grow | Cocoa Vanilla Studio


Hi everyone!
Today I have something a bit different to share with you - a whimsical style page I created recently for Cocoa Vanilla Studio using the gorgeous 'Midnight' collection and a fabulous Cut to You cut file from Created by Gwen

The inspiration for this page came when I took this photo of my daughter in her new swimmers. The sun was shining on her face and her legs were in shadow; and as soon as I saw it, I immediately thought of the stunning 'Sunset Strip' paper from the 'Midnight' collection. (Please tell me that I am not the only one who sees a photo and it makes them think of paper that would match?! haha)


So my page began with a sheet of 'Sunset Strip' as my base and a sweet photo of my daughter. I wanted to remove as much distraction as possible so I fussy cut around her silhouette to remove the background from the photo. Looking at it made me think about how quickly she was growing up, and blossoming - so the idea to turn her into a flowering plant was born.


I decided to use the 'Open Leaf' cut file from Cut to You as my branches / wings and coloured them using Ranger 'Stormy Sky' Distress Oxide. (If you don't have a cutting machine, you can purchase these cut files already cut HERE and Gwen will send them to you!) I then backed them using the beautiful tiny floral pattern on the reverse side of the 'Inky Depths' paper and set them aside. 


I used the gorgeous little mason jar from the Chipboard Accents pack as my "pot", and then placed my photo so she was growing from it; adding the sweetness label from the Die Cut Ephemera pack and a little chipboard heart on top. I then created a little layered "garden" around my pot using assorted blooms from both the ephemera and chipboard accent packs. 


I then tucked the two branches in behind the photo, positioning them so that they would look like a pair of wings. I then cut a small floral feature from one of the ephemera pieces, placing it on her head like a flower crown and topping it with a small chipboard heart. I also added some extra leaves from the ephemera pack, tucking them in around the edges of the wings.


I used the bloom and grow piece from the ephemera pack as my page title, adding it in the bottom right corner of my page. I then added a few flowers from the Clear Stickers pack to the edges of the wings, and two little heart stickers to the points where the wings joined her body.


I used some small word stickers from the Accessory Sticker sheet to add the sentiment onto the wing, and a small butterfly sticker just beneath it. 
To finish off my page I splattered some Colour Blast 'Bubblegum' Colour Spray, and added a scattering of pale blue sequins that I had left over from the 'Hello Lovely' collection in my stash. 

That's all from me today, thanks for stopping by so I could share this with you. 
Until next time, happy scrapping! X

Thursday, 20 December 2018

Story of Us | Cocoa Vanilla Studio


Hi everyone!
Time again share another design team project with you. Today I am sharing a layout I created for Cocoa Vanilla Studio using the beautiful 'Midnight' collection; and just as its name suggests, I chose to work with the gorgeous deep midnight blue as my primary colour for this page.


I started my page with a sheet of 'Bloom & Grow' paper, which I cut down to measure approximately 9x12" and then added a strip of the 'Inky Depths' paper down the left side. I love the contrast of the block colour against the stripes, and the dark shades of these papers so much!

Next, I created a layered mat for my photo using pieces of the 'Inky Depths'; 'Inspired'; and 'Mixed Blessing' papers, which I layered with a paper doily as well. 


I then built a large floral cluster to the right of my photo using pieces from the die cut ephemera pack. I used foam tape to pop some of the flowers up and bent up the edges of them, and the leaves, from the page.

To the left of my photo I added a few more die cut flowers, again using foam tape to create dimension; before adding the every moment matters flair button on top.


Along the bottom edge of my photo I added the here + now quote that was cut from the 'All the Things' paper. For my page title, I used words from the die cut title pack. I used a double layer of foam tape to pop them up to the same height of the photo so they didn't get lost on the background.


To give the page a little more dimension I added few hearts from the chipboard accents pack, and I also added the sweet little tab with hearts which I tucked in behind the top edge of my photo.

To finish off my page I added a couple of small stickers from the accessory sticker sheet where my papers joined at the top of my page. I used a small banner and layered a small tab over the top of it.

That's all from me today, thanks for stopping by. 
The 'Midnight' collection is now available in the Cocoa Vanilla Studio store, along with some recently released page kits and some super specials from the Black Friday Sale. (But hurry, before they are all gone!)
Until next time, happy scrapping! X

Friday, 23 November 2018

Shine | Cocoa Vanilla Studio


Hi everyone!
Popping in today to share my latest Cocoa Vanilla Studio design team project with you. This 12x12" layout I created features the brand new 'Midnight' collection and some happy snaps of myself with Peg Hewitt and Lisa Oxley from a scrappy retreat earlier this year. (I so love this pair!)

I began with my strip of photos, drawing inspiration from the shape and colours to plan my design.


I wanted a fairly neutral background, so chose the gorgeous 'Sophisticated' paper with the sketched blooms as my base, adding a bit of Dina Wakley pink paint with a brayer to the central area of the page. 

I then added strips of the 'Inky Depths' and 'Inspired' papers horizontally across the middle of the page (even dusting off my distress tool for them!) I also trimmed a piece from the bottom edge of the base paper, and added an extra strip of the 'Inky Depths' paper along the top edge.


Once I had the focal area defined, it was all about the layers! I used a couple of strips of two papers from the 6x8" paper pad as a mat under my photo strip. I then used some of the die cut ephemera frames (cut into halves) and tucked them above and below the photos. Also below my photos, I added the what a time to be alive quote from the ephemera pack.


To the right of my photos I added the vase with flowers from the chipboard pieces pack, and then the sweet little banner from the same pack under the bottom edge of my photo strip. For my title, I used the shine from the cardstock titles pack and adhered it along the top edge of my photos; then a small chipboard heart directly onto my photo.


I often bend up the edges of many of my paper elements to give my page extra dimension, and after bending up the corner of the quote, I thought it need a little extra something underneath to help it flow. So I chose two small leafy branches from the ephemera pack and tucked them under the edge, bending the leaves up slightly away from the background. 

I also added a few extra chipboard hearts to the page.


To finish my page I added a couple of small word stickers to the right of my photo. These little quotes were from the accessory sticker sheet and I absolutely adore the typewriter font Zoe has used on them!

Thanks for stopping by today so I could share this with you. Don't forget to check with your favourite retailer to get your hands on the 'Midnight' collection. 
Until next time, happy scrapping! X

Saturday, 3 November 2018

Sweet Heart | Cocoa Vanilla Studio


Hi everyone! 
Today I am here to share my latest design team project created for Cocoa Vanilla Studio and my very first featuring the brand new 'Midnight' collection. I took the opportunity to use this stunning collection to document a couple of recent snaps of my equally stunning girl.


As I was tasked with creating a page for the recent "Pink" theme on the CVS blog, I chose to use the gorgeous "Shine Bright" paper as my page background with the luscious ombre pink tones. I also took the "Mixed Blessing" cut apart paper and put aside the pieces with pink to use in my layers.


In addition to the pieces of the “Mixed Blessing” paper I had already put aside, I also cut a strip from the script paper from the 6×8″ paper pad and a label from the “All the Things” paper. I gathered the pieces together, adding a frame from the die cut ephemera pack, and layered them to form the focal area for my page design, securing them in place with staples.


On top of my paper layers, I added some frayed gauze for soft texture before adding my photos on top. To give my page a little extra dimension I bent the edges and corners of some of the layers up before moving onto the embellishments.


I pulled another frame from the die cut ephemera pack, this time a smaller one, which I cut in half and tucked under either side of my photos. I then pulled out a selection of flowers and leaves and tucked them in around the layers, framing my photo. I added some foam tape to a couple of the small flowers to pop them up from the page. I also added the love you so label from the accessory sticker sheet to the die cut frame below my photo.


Also from the accessory sticker sheet was a small heart I added to the bottom of my photos; and alongside that, the bloom and grow flair from the flair button pack. For my page title I used two of the words from the die cut titles pack, which I popped up on some foam tape before adding them on.


To finish my page I added some “crosses” stickers from the clear sticker set; a small chipboard heart next to my title; and a sweet butterfly from the accessory sticker sheet. Then it was a few splatters of white mist and a doodled pencil border, and I was done.

The 'Midnight' collection is now on sale (and looks even more amazing in person), so check with your favourite scrappy retailer to see if they have it available.

Thanks for stopping by today so I could share this with you. Until next time, happy scrapping! X