Sunday, 25 November 2018

Be a Mermaid | Viva Las VegaStamps


Hi everyone!
Today I am sharing a sweet little stamped project I created recently for my daughter, and it's in stark contrast to my previous Viva Las VegaStamps share which featured my "zombie" cat. This time I opted for a small scale project - working on an index card, which fits perfectly into a small 6x4" frame that can then go into my daughters bedroom.


I started by applying a light coat of gesso all over the card, before using Faber-Castell gelatos to add some colour. I used a moist baby wipe to blend each colour, mixing the 3 colours together, but concentrating on having the darkest tone around the outer edge to border it. Once I was happy with the colour, I set it aside to dry.


I then took the Cat Mermaid stamp, which was to be my focal image, and stamped it onto some white cardstock using Staz On ink. I again used my gelatos to add colour; this time by adding a little to my craft mat and then using a water brush to pick up the colour so I could colour my image.


I then turned my attention back to my index card, using the gorgeous Sky of Stars Background stamp and Ranger Archival ink to add a whimsical touch. I also used the Scribble Heart stamp to add a little love.


Next, I fussy cut around my cat mermaid; before stamping the quote using the Always Be Yourself/Mermaid stamp onto cardstock. I again used a gelato to add some colour, then fussy cut the quote into two pieces.
Now it was time to construct my piece. I started by adding a small paper doily to the centre of the card, topped with some messy cotton thread, then added my cat mermaid on top.


I then added the two pieces of the quote above and below the cat.


For a bit of extra whimsy, I finished my piece with a sprinkle of sequins.


This was a super fun little project to make. I must admit that I wasn't really used to creating pieces on such a small scale when I began working on this team; but my amazing VLVS teamies inspired me to give it a go and now I love creating these delicate little pieces! 


Thanks so much for stopping by today so I could share this with you, I hope I have inspired you to get inky too! X

VLVS stamps used: 

Friday, 23 November 2018

Shine | Cocoa Vanilla Studio


Hi everyone!
Popping in today to share my latest Cocoa Vanilla Studio design team project with you. This 12x12" layout I created features the brand new 'Midnight' collection and some happy snaps of myself with Peg Hewitt and Lisa Oxley from a scrappy retreat earlier this year. (I so love this pair!)

I began with my strip of photos, drawing inspiration from the shape and colours to plan my design.


I wanted a fairly neutral background, so chose the gorgeous 'Sophisticated' paper with the sketched blooms as my base, adding a bit of Dina Wakley pink paint with a brayer to the central area of the page. 

I then added strips of the 'Inky Depths' and 'Inspired' papers horizontally across the middle of the page (even dusting off my distress tool for them!) I also trimmed a piece from the bottom edge of the base paper, and added an extra strip of the 'Inky Depths' paper along the top edge.


Once I had the focal area defined, it was all about the layers! I used a couple of strips of two papers from the 6x8" paper pad as a mat under my photo strip. I then used some of the die cut ephemera frames (cut into halves) and tucked them above and below the photos. Also below my photos, I added the what a time to be alive quote from the ephemera pack.


To the right of my photos I added the vase with flowers from the chipboard pieces pack, and then the sweet little banner from the same pack under the bottom edge of my photo strip. For my title, I used the shine from the cardstock titles pack and adhered it along the top edge of my photos; then a small chipboard heart directly onto my photo.


I often bend up the edges of many of my paper elements to give my page extra dimension, and after bending up the corner of the quote, I thought it need a little extra something underneath to help it flow. So I chose two small leafy branches from the ephemera pack and tucked them under the edge, bending the leaves up slightly away from the background. 

I also added a few extra chipboard hearts to the page.


To finish my page I added a couple of small word stickers to the right of my photo. These little quotes were from the accessory sticker sheet and I absolutely adore the typewriter font Zoe has used on them!

Thanks for stopping by today so I could share this with you. Don't forget to check with your favourite retailer to get your hands on the 'Midnight' collection. 
Until next time, happy scrapping! X

Wednesday, 21 November 2018

Right Here | Flutterby Designs


Hi everyone! 
Popping to share my latest Flutterby Designs project with you. Today I have changed things up and am keeping it simple with "clean" layout for a change. I have been incredibly busy lately, (something I am sure many of you can relate to), so I decided to create a page using a quick and easy grid style design and some older items from my Flutterby stash.


I started with a sheet of wood grain patterned paper from Cocoa Vanilla Studio for my layout base, as I knew the warm wood tone would coordinate well with my photo and the cards I had selected from the 'Any Direction' Everyday Etc card pack. 


I shuffled the card pieces and the photo around on my page until I was happy with their placement then stuck them down immediately, knowing I would work all the embellishments into the remaining spaces.

I started with a couple of stickers - the super cute sunglasses and road trip sticker were from the Good Vibes Only Sticky Quote sheet; whilst the mix tape sticker was from the Xtreme Teen Sticky Quote sheet. 


I added the click click click and always find adventure stickers from the Blackboard Sticky Quotes sheet; and used Blackboard Sticky Alphas to add the border mole patrol words. 

I dug through my wood veneer stash, finding the word adventure, a camera and some wood veneer stars. 


I cut the little aqua enjoy the journey phrase from one of the Snippet Strip sheets from the Cool Snippet Strips pack.

At the top of my page I added the enjoy the journey flair button from set #394.


Once I had everything down on my page, I splattered a little white mist on my page then stamped the date and I was done. (I told you it was a simple one today!)

Thanks so much for stopping by so I could share this with you. I hope I have inspired you to dig through your Flutterby stash and create something using some older bits and pieces too. 
Until next time, happy scrapping! X

Sunday, 18 November 2018

My Girl | Colour Blast


Hi everyone!
Popping in today to share my latest Colour Blast design team project with you. This 12x12" mixed media scrapbook page was created using Colour Shimmer Sprays; Colour Paste; Colour Artist Inks and Colour Spray; and features a recent photo of my daughter that I captured at the local park.


To create my page I started by applying both Blush and Tangerine Dream Colour Shimmer Sprays to my cardstock using a brush.


I then applied Snow White Colour Paste using a palette knife and a stencil, to add some subtle texture to the background. Once applied, I dried it off with a heat gun - it is at this point the paste comes to life, and the true colour and shimmer of the product is revealed.


With the base for my background complete, I then moved onto my papery layers. I used some scrap pieces of patterned paper from the Cocoa Vanilla Studio 'Life is Beautiful' collection, which I layered together to form a photo mat, then secured the stack with staples.


I then added the little stack to my page (again securing it with staples), before adding some frayed gauze and then my photo on top. 


The floral embellishments I used were designed by Wilna Furstenberg. I purchased the digital files from her online store at I Heart Studio and simply printed them out on some smooth white cardstock, then fussy cut them with scissors. I added the floral pieces using foam tape, and placed them so that they would frame the photo.


I then added the remainder of my embellishments - two sweet little acetate birds; as well as Cocoa Vanilla Studio resin flowers, flair button and enamel dots.


Next, it was time to add a little more colour to the page to help bring it all together. I used Citrus and Cider Colour Artist Inks to add some fine splatters using a small stiff brush.


I then repeated the process using Indigo Colour Spray before adding some small phrase stickers and my title (also a printable from Wilna Furstenberg).


If you would like to see exactly how this page came together, I have a process video available on my YouTube channel here:


**Please give me a thumbs up and subscribe if you visit my channel**

Thanks so much for stopping by today so I could share this with you. Until next time, happy scrapping! X

Thursday, 15 November 2018

S&P | Scrap the Girls November Challenge


Hi everyone!
Have you seen this month's challenge at Scrap the Girls yet? It's called "Get Lost" and is all about being inspired by your favourite fairytale. 
Here's a look at the board...


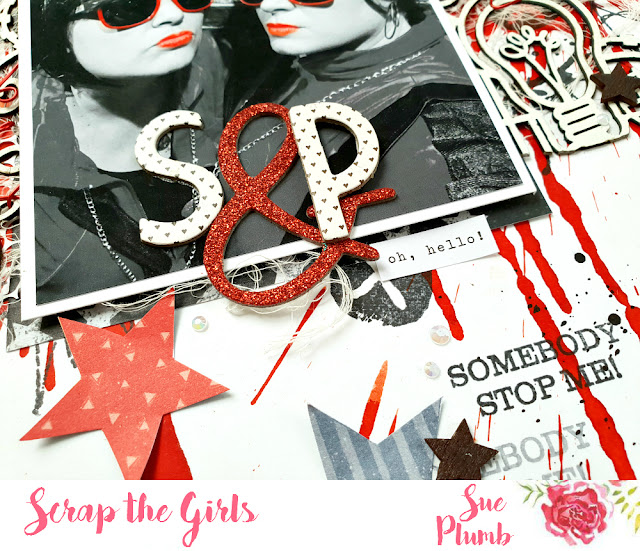
No prizes for guessing what inspired me from the board - those awesome black / white / red princess images, and the Snow White quote, of course! I chose to document a photo of my sister and I that was taken at a scrap retreat back in August when we were dressed up as Salt'n'Pepa. I altered the photo by taking all the colour out of it except for the red of our lips and sunglasses - I think it came up pretty cool!


I took the blood drip in one of the princess images as my jumping off point for my background, and used Colour Blast 'Sunburnt' Colour Artist Ink. I used the dropper from the ink bottle and dropped some big splats onto my page, before using a straw to blow and spread them out further. I also tipped my page up vertically to allow some of them to run down, just like in the picture.


With my colour down on the page, it was time to add some stamping! I used lots of stamps from Viva Las VegaStamps, starting with one of my faves - the Brick Background. I stamped my bricks on an angle so they would match the angle of the bricks behind us in the photo. I also identified three main large splats on my page and stamped over the top of them with the Scribble Circle stamp. I also added some extra marks using the X Circle stamp and words using the Somebody stop me! stamp.


Now it was time to add some texture and layers! I started by matting my photo using some 'Night Sky' paper from the 'You Rock' collection by Cocoa Vanilla Studio. On top of the mat I added some pieces of white punchinella (from D-lish Scraps) and also some frayed gauze.

I then took a piece of 2Crafty chipboard I received at the retreat called 'Corner Steampunk 2'. It had a frame corner with a cool lightbulb and some cogs attached to it. I cut the piece in half, and then coloured it white with a correction pen. I used the frame part under the top left corner of my photo and then the other piece to the right of my photo.


Next, I added some stars that were fussy cut from the Cocoa Vanilla Studio 'Starshine' paper, bending the edges up slightly for some extra dimension. I also added some pieces of red coloured wire which I twisted around some of the chipboard.


For my title, I used some Thickers from my stash and added it directly onto the bottom edge of my photo. I also added some small wood veneer stars (coloured black with a Sharpie) and some phrase stickers around my page.


To finish off, I added some small Uniquely Creative rhinestones scattered around the page, and then some final black splatters of Colour Blast 'Soot' Colour Artist Ink.

That's all from me today, I hope you will join us for this months challenge at Scrap the Girls. As always, there are prizes up for grabs so make sure you get your entries in by the end of the month to be eligible. For all the details, or to see what else the design team created, head to the STG blog
Until next time, happy scrapping! X

Tuesday, 6 November 2018

The Cat | Viva Las VegaStamps


Hi everyone!
Today I have a creepy mixed media scrapbook layout to share that was created for Viva Las VegaStamps. I used some of the recently released Halloween stamps and a snap of our family cat. Unfortunately our furry boy has a bit of a reputation for giving my daughter a scratch or a nip, so I made this page especially for her. (She instantly proclaimed it to be her favourite page I have ever made and it is already framed and up in her room! haha)


I went with a different size for this layout - opting for an 8.5x11" size page, instead of the usual 12x12" I usually create. So I started with a piece of white cardstock, and added some Dina Wakley acrylic paints to the background. First 'Elephant', followed by 'Umber', 'Black' and then 'Cheddar'. I alternated between using a brush and brayer to apply the layers; finishing off with 'Buff' applied to the area where my photo was going to go.


Once the paint was dry it was time to add some stamping! I began with the Cross Marks Background, stamping it randomly around my page using Staz On ink. I also added some larger marks using the Carved Xs stamp.


Once I had the marks down on the background, I added some feature images - the new Raven Looking Up in the bottom right corner; and the Ext Witch Hazel label a few times around the page. I also added the Beware Of: list, using the Set of Vampire Teeth to frame it at the top and bottom.


I couldn't create a page like this without any "blood", right?! I used Colour Blast 'Sunburnt' Colour Artist Ink and applied it by dripping it onto the page using the dropper, and also by splattering it using a small brush.


I then added my photo (I had pre-cut around the silhouette and attached some cardboard to the back); adding a small paper doily and some frayed gauze underneath it before securing it to the page. I altered my photo to give it some extra "creepiness" by rubbing a little red paint around his eyes and using a fine tip white Sharpie to white out his eyes.


I used a handmade DIY chevron embellishment from Charms Creations and altered it by stamping directly onto the fabric using the Row of Distressed Lines stamp. I then attached it to my page using Helmar 450 adhesive.


I stamped the May Contain Human Flesh quote onto some white cardstock, then fussy cut around it and stuck some cardboard underneath to pop it up from the background.


To complete my "list" and also to provide a title for my page, I added the words the cat using some old Sassafras Lass alpha stickers.


Thanks so much for stopping by today, I hope I have inspired you to get inky too! X

Stamps used:

Saturday, 3 November 2018

Sweet Heart | Cocoa Vanilla Studio


Hi everyone! 
Today I am here to share my latest design team project created for Cocoa Vanilla Studio and my very first featuring the brand new 'Midnight' collection. I took the opportunity to use this stunning collection to document a couple of recent snaps of my equally stunning girl.


As I was tasked with creating a page for the recent "Pink" theme on the CVS blog, I chose to use the gorgeous "Shine Bright" paper as my page background with the luscious ombre pink tones. I also took the "Mixed Blessing" cut apart paper and put aside the pieces with pink to use in my layers.


In addition to the pieces of the “Mixed Blessing” paper I had already put aside, I also cut a strip from the script paper from the 6×8″ paper pad and a label from the “All the Things” paper. I gathered the pieces together, adding a frame from the die cut ephemera pack, and layered them to form the focal area for my page design, securing them in place with staples.


On top of my paper layers, I added some frayed gauze for soft texture before adding my photos on top. To give my page a little extra dimension I bent the edges and corners of some of the layers up before moving onto the embellishments.


I pulled another frame from the die cut ephemera pack, this time a smaller one, which I cut in half and tucked under either side of my photos. I then pulled out a selection of flowers and leaves and tucked them in around the layers, framing my photo. I added some foam tape to a couple of the small flowers to pop them up from the page. I also added the love you so label from the accessory sticker sheet to the die cut frame below my photo.


Also from the accessory sticker sheet was a small heart I added to the bottom of my photos; and alongside that, the bloom and grow flair from the flair button pack. For my page title I used two of the words from the die cut titles pack, which I popped up on some foam tape before adding them on.


To finish my page I added some “crosses” stickers from the clear sticker set; a small chipboard heart next to my title; and a sweet butterfly from the accessory sticker sheet. Then it was a few splatters of white mist and a doodled pencil border, and I was done.

The 'Midnight' collection is now on sale (and looks even more amazing in person), so check with your favourite scrappy retailer to see if they have it available.

Thanks for stopping by today so I could share this with you. Until next time, happy scrapping! X