Monday, 20 November 2017

We Are Family | Flutterby Designs


Hi everyone!
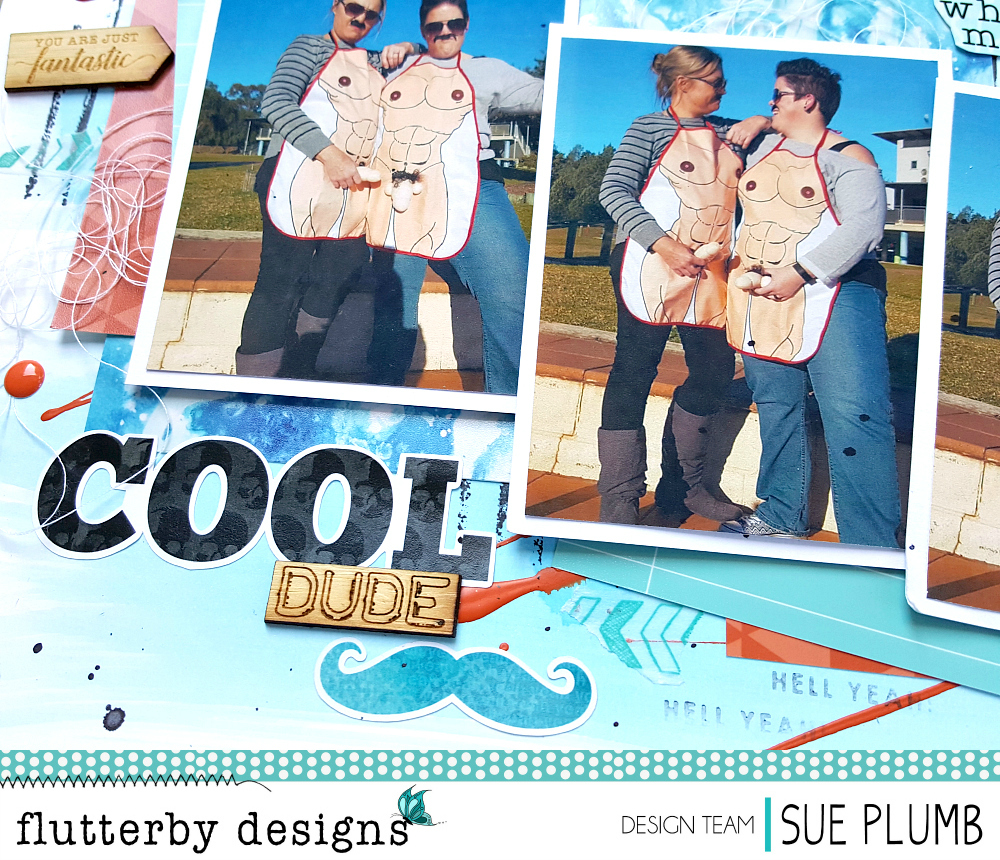
Time to share another Flutterby Designs project with you - this one is a mixed media layout featuring a photo of my sister Mandy & I taken at the Flutterby Designs 'Create by the Lake' retreat. I was really drawn to this photo because of the awesome backdrop we were standing in front of, so I wanted to translate some of that colour and style through to my background.

"We Are Family"

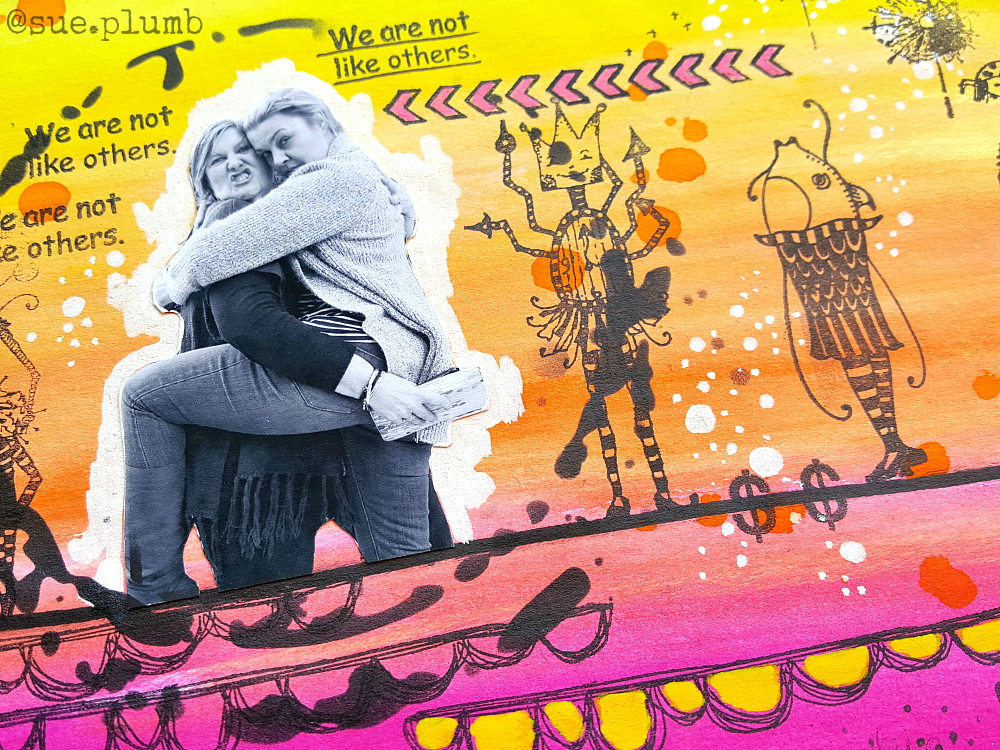
I started with some white cardstock and Flutter Colour paints - Bahama Blue; Tropicana Teal; Aquamarine Dream; and Green Limousine. I splattered drops of the four colours randomly around before using a brayer to mix and spread the paints vertically on the page. I then dried the paint with a heat gun before applying a small amount of Grape Soda paint to the central focal area of my page and spreading it across horizontally with the brayer. Next, I added a few random spots of Arctic White paint around the page and spread that on top of the other layers to tone the colour back a bit.


Once all the paint had dried; I took some Colour Blast 'Indigo' Colour Spray and used the end of the spray nozzle from the bottle to scribble around on top of the paint to give it more of that "street art" feel. Next, I took the 'You've Got This' stencil, and applied some texture paste through a few of the phrases randomly around the page. Finally, I splattered around some 'Bubblegum' Colour Spray and then set it aside to dry; then added a few scribbles using my Stabilo all pencil.


While the background was drying, I started assembling the pieces that would form the mat for my photo. I used a mix of Everyday Etc cards and filler cards (from the 'Flawsome'; 'Happy Together' and 'No Excuses' collections); which I cut and layered together. Once all the pieces were in place, I added my photo on top.


The we are family title for my page was fussy cut from one the the 'Happy Together' Everyday Etc cards; and I added a small wood veneer heart on top (that I had coloured black with a Sharpie); along with a few other hearts around my page.


To the left of my title, I stuck the love you longtime sticker, from the white Sticky Quotes sheet. Above my photo I added the you & me speech bubble and on my photo I added the you're my person banner (both from the 'Mad About You' Die Cut Bits & Bobs pack.)


To finish my page, I added the good vibes flair button (from set #421), which I nested on some messy cotton thread; and a few splatters of white ink around my page.

That's all from me today. I will be back in a couple of weeks with another project to share.
Until then, happy scrapping! 

Thursday, 16 November 2017

Retreat Feet | Scrap the Girls November Challenge


Hi everyone!
I'm sharing a super fun layout today that I created for the November challenge at Scrap the Girls. This month's challenge is called "You can tell a lot about a girl by her shoes" and it looks like this...


As always, you can use the board to inspire you in any way you wish, but I took the theme quite literally...and had the perfect photo for it! The photo was taken during the "Tight & Bright" theme night at the Flutterby Designs retreat - quite fitting, seeing as Flutterby Designs is our sponsor this month too.

"Retreat Feet"

How cool does that background look? Well that's a little bit exciting too - they are some of the brand new Artist Inks from Colour Blast! This was the first time I used them. They were fun and easy to use, and I was sooo happy to see how vibrant they are. To achieve this effect I simply applied them using a paint brush with my cardstock held vertically and let the inks run down. 


Given that I used a Flutterby retreat photo and that Flutterby Designs are sponsoring this month, I HAD to use some Flutterby goodies on my page. I used several Everyday Etc cards cut into layers behind my photo; along with a page tab tucked into my layers and another stapled directly onto my photo. I also used two hearts from Charms Creations which I topped with Flutterby Snippet Strips.


Below my photo, I added more Flutterby goodies - a flair button which I nested on some cotton thread; and the "shoes" quote, which I cut from an Everyday Etc card.
My title was created using Cocoa Vanilla Studio alphabet stickers and to finish my page I splattered around some black Colour Blast ink and added a few stamped phrases.

Thanks for stopping by today so I could share this with you. I hope this month's mood board will inspire you to join in on the challenge. You have until the end of the month to get your entry in to be in the running for the prize. Check out all the details on the Scrap the Girls blog.
Until next time, happy scrapping! X

Friday, 10 November 2017

Beautiful art journal page | Colour Blast


Hi everyone!
Popping in today to share my latest design team project for Colour Blast with you. Today I have an art journal page to share that I created using the brand new Colour Artist Inks. I was super excited to get my hands on these recently, and have had fun putting them straight to work. The first thing I noticed when I used the inks was the colours - they are so vibrant (and right up my alley!) I also loved the fact that the wide opening of the glass jars they are packaged in make them so easy to dip a paintbrush directly into. (Again - very important for me!)
Here is the page I created...

"Beautiful"

Besides the Colour Artist Inks; I also used Colour Blast black and white heavy gessos; Colour Paste and a Colour Spray. So many luscious layers, colours and textures!
I used the Mini Angelique stencil from The Crafters Workshop for the face; and an Everyday Etc card from the 'Flawsome' collection by Flutterby Designs for the quote. The butterfly stickers are From a Mothers Art by Kelly-ann.


If you would like to see exactly how I created this page, or perhaps create one yourself; I have a detailed step-by-step tutorial for this page on the Colour Blast blog HERE
If you do use my tutorial to inspire your own creation, I would love to see it!
You can share it via the Colour Blast Creative Corner Facebook group; or alternatively tag me on Instagram @sue.plumb so I can see it.


For anyone in Brisbane, I am demonstrating the Colour Artist Inks, (and other Colour Blast products) on the Colour Blast stand at this weekend's Logan Craft Alive show. 
If you are there on Saturday, please pop over and say hi and pick up some Colour Artist Inks too. 
For details about the show, head to the website HERE

Until next time, happy scrapping! X

Wednesday, 8 November 2017

Dream Big | Cocoa Vanilla Studio


Hi everyone!
It's time to share another design team project with you, and today I have a super pretty mixed media layout created for Cocoa Vanilla Studio. This page was created using the brand new 'Bohemian Dream' collection and my (neglected) Faber-Castell watercolour pencils. Which, as it turns out, was a match made in heaven! 

I wanted to document this sweet photo I captured of my daughter and our cat. She totally adores him (and likewise he her), and often I find them asleep together in her bed. 

"Dream Big"

I started with the wood grain print on the reverse side of the 'Kaleidoscope' paper as my base. I then took pieces cut from the 'Boho Bits' paper, along with pieces from the miniature version of the 'Beautiful Mess' paper from the 6x6" paper pad, and stuck them randomly around my page. 


I then took my watercolour pencils and sketched around and between each of the pieces, switching between different colours as I went. Once I had all the sketching in place, I went back over it with a small paint brush dipped in water to soften the lines and blend the colours out. 


Next, I cut a piece of the 'Gypsy Heart' paper from the 6x6" pad and placed it where my photo was going to go. I then added some messy cotton thread for soft texture before adding my photo on top. Above my photo, I tucked in the favourite tab from the die cut ephemera pack.


Then it was time to start adding some embellishments around my page. I was immediately drawn to the beautiful butterflies. (I am a huge fan of butterflies at the best of times, but the ones in this collection really have my heart - I wish I had a thousand of them!)


I managed to restrain myself to only five butterflies on the page. Two were from the chipboard accent sticker sheet; two from the die cut ephemera pack; and the final one (and my favourite), was the one below my photo which was fussy cut from the 'Boho Bits' paper. Below my photo was also the love you chipboard accent sticker sheet. 


I clustered a few of the butterflies with floral pieces from the ephemera pack. (The florals in this range are SO gorgeous!) Alongside my photo I also added the words you are best friends from the accessory sticker sheet, along with a chipboard heart.
To finish my page, I added a few hearts from the enamel shapes pack, and stamped the little moments phrase from the clear stamp set.

If you would like to get your hands on your own stash of the new 'Bohemian Dream' collection, you can find it in the Cocoa Vanilla Studio store HERE

Thanks for stopping by today so I could share this with you. I will have another project to share soon, so stay tuned. Until next time, happy scrapping! X

Monday, 6 November 2017

You Rock | Scrap the Boys November


Hi everyone!
Time to share another design team layout with you all - this time for Scrap the Boys. This month's challenge is a colour challenge and it looks like this...


I have to admit when I first saw this colour combination it didn't thrill me. (Nothing with brown usually does.) But once I figured that I could cover the brown using wood grain, and slightly tweak that sea green to a lighter aqua, I knew I could work with it. 
Here's what I came up with...


I started my background by laying down the orange using Colour Blast 'Amber' Colour Shimmer Dust and a wide brush. I then added some stamping using black ink and some stamps from Viva Las VegaStamps


I then created a layered mat for my photo to sit on using patterned papers from the Cocoa Vanilla Studio 'You Rock' collection and a printed kraft bitty bag and dip dye tag from D-lish Scraps. I also added some 'You Rock' die cut ephemera pieces.


Beneath my photo, I added a Charms Creations denim & hessian heart, which I topped with the Cocoa Vanilla You Rock flair. I also added a coordinating chipboard sticker arrow, and then a chipboard sticker star alongside my photo.


To finish off I added some small torn pieces of washi tape, 'You Rock' enamel shapes and some stamped phrases around my page. I also added a few splatters of mist.

That's all from me today. I hope you will join in on our challenge at Scrap the Boys this month. If you are looking for some more inspiration, or more details about the challenge or prizes, you can head to the Scrap the Boys blog HERE.
*Scrap the Boys also has a design team call out for 2018 - if you are a boy scrapper, head over HERE for all the details and get your application in!*
Until next time, happy scrapping! X

Saturday, 4 November 2017

Journal Cover | Viva Las VegaStamps Guest Designer


Hi everyone!
I am here today to share the final project I created as part of my guest designer spot for Viva Las VegaStamps last month.


This is a Paint-Me-Dori paintable fabric journal cover from Anita Tillman at MadeByNinnyNoo that I won as a prize at the Flutterby Designs 'Create by the Lake' retreat. I wasn't sure exactly what I wanted to do with it, until I was inspired by all the Viva Las VegaStamps! images I had stamped onto tissue paper (courtesy of Fiona Paltridge's stash).


I first gave the canvas cover a quick swipe of colour using Flutterby Designs 'Aquamarine Dream' Flutter Colour paint; then I cut out the images I wanted to use and applied them using a matte medium to create a collage. The beauty of this method is that as the tissue paper dries, it virtually disappears into the background, leaving only the stamped image behind, and is perfect for textured surfaces like this canvas fabric. 


Once the cover was completely dry, I added splashes of colour using my Posca paint pens; and then added some smears of Colour Blast black and white heavy gesso with my fingers. I think it came out great, and I am so happy with my unique journal cover. 


Here's a linked list of all the stamps I used on this project:

Thanks for stopping by today so I could share this with you. I will be back again soon with another project to share. Until then, happy scrapping! X

Thursday, 2 November 2017

Cool Dude | Flutterby Designs


Hi everyone!
It's time to share another design team project with you - this one for Flutterby Designs. This 12x12" mixed media page was lots of fun to create - which was partly due to the memories it invoked. These photos were taken at the Flutterby 'Create by the Lake' retreat back in July; and it's fair to say that Anita and I weren't the only ones laughing that day. 


This page was created using a mash-up of items from different collections, and I am so happy with how they all came together. I started with a sheet of white cardstock and applied a blue watercolour wash using a Colour Blast 'Cobalt' Colour Shimmer Dust and a wide brush. I also added some drizzles of Tangerine Orange Flutter Colour paint to add some dimension and contrast.


Once the paint had dried, I added some extra contrast using some of DeeDee Catron's most recent stamps from Viva Las VegaStamps and a phrase stamp from Typo; then some strips of torn washi tape. With the background done, it was time to create the main portion of the layout.


I cut up some Everyday Etc filler cards from the 'Flawsome' and 'Happy Together' collections to create a layered photo mat, along with some messy cotton thread for texture. I also tucked in a couple of page tabs amongst the layers. Alongside my photos, I added the fantastic wood veneer tab from the 'Flawsome' Wood Veneer Bits pack. 


The quote (I couldn't have chosen a better one for this page!) was fussy cut from an Everyday Etc card from the 'Partners in Crime' collection. I also added a few white Tiny Sticky Quote stickers around my page. 


My cool dude title was created using the cool sticker from the 'Xtreme Teen' Sticky Quotes sheet and the dude wood veneer from the 'Xtreme Teen' Wood Veneer Bits pack. The moustache sticker I added below it was also from the Sticky Quotes sheet.


I created a final embellishment cluster on the right side of my photos using a cog from the 'Xtreme Teen' Wood Veneer Bits pack; the LOL flair button (from set #377) which was nested on some thread; and a few coordinating enamel dots from the Bold set. 
To finish my page off, I stamped the date; added handwritten journaling and a few black splatters using Colour Blast 'Road Base' Colour Spray.

Thanks for stopping by so I could share this with you today. I will be back again with another project to share soon. Until then, happy scrapping! X

Saturday, 28 October 2017

Mixed Media Layouts | Scrapbooking Memories magazine

Hi everyone!
Just a quick post from me today to share the two layouts that were published as part of my "How To: Mixed Media" Creative Team article magazine Vol 20 No 4. In my article I discussed some of the techniques and materials I often use when I create mixed media layouts; and provided two sample layouts in different styles.

For my first page, I created a traditional paper-based page that featured subtle mixed media to enhance it. I used the Cocoa Vanilla Studio 'Make a Wish' collection and incorporated watercolor paint (applied directly to the page and splattered about with the brush) as well as stamping with stamps from Viva Las VegaStamps (with multiple colour inks).


For my second page, I took a different approach by starting with blank white cardstock and creating my own background. I used Flutterby Designs Flutter Colour paints; and Colour Blast Colour Paste and Colour Sprays to create a layered and textured base. I then added further layers of colour with paper and embellishments. (Papers and ephemera by Heidi Swapp; flair button and wood veneer by Flutterby Designs.)


Be sure to look out for my Creative Team article in the current issue which is one for the traditionalists, and all about paper based scrapping.
Until next time, happy scrapping! X

Thursday, 26 October 2017

My Fave Stars | Colour Blast


Hi everyone!
Time to share another design team project with you - this one was created for Colour Blast. This was a true "stash-busting" layout for me, in every way. I was recently inspired by a post from one of my scrappy besties Krisy Podolak about scrapping "old" photos. (You know the ones that you get printed, don't scrap right away and then they get put aside in a growing pile?) Well this collage, featuring a shot my Scrapbooking Memories cover from a couple of years ago, along with some photos of my boys seeing themselves on the covers was one from my pile.

"My Fave Stars"

I started this layout by creating my background on a sheet of cardstock. I sprayed Saffron Colour Spray through an old stencil from my stash. (Whilst the stencil was wet, I also created a reverse monoprint by laying another sheet of cardstock over the top to soak up the excess spray; which I will use for a future project.)


The next step in my process was to add some contrasting colour and texture; which I did by applying some Envy Colour Paste through a Flutterby Designs 'Stargazed' stencil. I also smeared the excess paste from my palette knife directly onto my page.


To add further contrast and interest, I took some Road Base Colour Spray and Lipstick Colour Shimmer Spray and splattered them both around my page. I then set my page aside to dry thoroughly.


Once it was dry, I then continued my stash-busting efforts and began adding the other elements of my page. I took the opportunity to use up some old Amy Tan papers, ephemera and washi stickers to create some layers. I then pulled out my sewing machine to add some stitching, which provided subtle texture.


Once my photo was in place, I added my title using up some older Thickers from my stash. (I had run out of the letter 'S', so I improvised by cutting up a 6 and an 8 instead.) I jazzed up my alphas by adding some faux stitching with a Sharpie pen.


Finally, I added a few stamped phrases and my handwritten journaling and my page was complete.


Thanks for stopping by today so I could share this with you. I hope I have inspired you to grab an old photo or two, some old supplies from your stash and to breathe new life into them by mixing them with Colour Blast products.
Until next time, happy scrapping! X

Tuesday, 24 October 2017

Art Journal Page | Viva Las VegaStamps Guest Designer


Hi everyone!
Popping in today to share another project created as part of my guest designer spot for Viva Las VegaStamps this month. This time, I have an art journal page to share that features a photo of myself with one of my fave scrappy chicks (and VLVS design team member) Fiona Paltridge that was taken on retreat. (If you know either of us at all, you would hardly be surprised by this shot! haha)


I started by laying down my bright background colour using Dylusions paints before adding the stamping directly onto the page. 


I wanted to created a page where I could feature some of the fabulous Mary Vogel Lozinak whimsical "freak" stamps from plate #1383; so I created this page to represent a shooting gallery, with myself and Fiona as the main targets.
I think Fi and I fit right in amongst them, don't you?


After I had stamped all the images onto the page I added some extra colour detail using my Posca pens.


Here's a linked list of the stamps I used so you can find them easily in the VLVS store:
Freaks


Thanks for stopping by today so I could share this with you. I have one more project for Viva Las VegaStamps coming up this month, so stay tuned!
Until next time, happy scrapping! X