Tuesday, 9 October 2018

The Best Dad | Cocoa Vanilla Studio


Hi everyone!
Here today with my latest Cocoa Vanilla Studio design team project for you. This time I am sharing a mixed media layout I created using the awesome 'Boys Rule' collection. I so love this range with all the blues, greens and grey! (I totally have a thing for grey, in case you didn't know.) It probably explains why the page I am sharing today features grey quite predominantly, both in the papers I selected, and in the acrylic paint I added to the background. I documented a photo of my sister, my dad and myself that was taken earlier this year. 


I started this page with the reverse side of the 'Star Fall' paper as my page base. I then took 3 different shades of acrylic paint and layered them randomly in the central area of my page using a brayer. Next, I cut a piece of the 'Good Times' paper and added it over the paint to define the focal area that I could then build the rest of my page from.


I then chose two papers to create a double layered mat for my photo - first, the deep blue of the reverse side of the 'Expressionist' paper, followed by the soft grey on the reverse side of the 'Messed Up' paper. (Seems I had a real run using B sides on this page!) I also added some cardboard between my photo and the mat to give it some extra dimension before sticking it down.


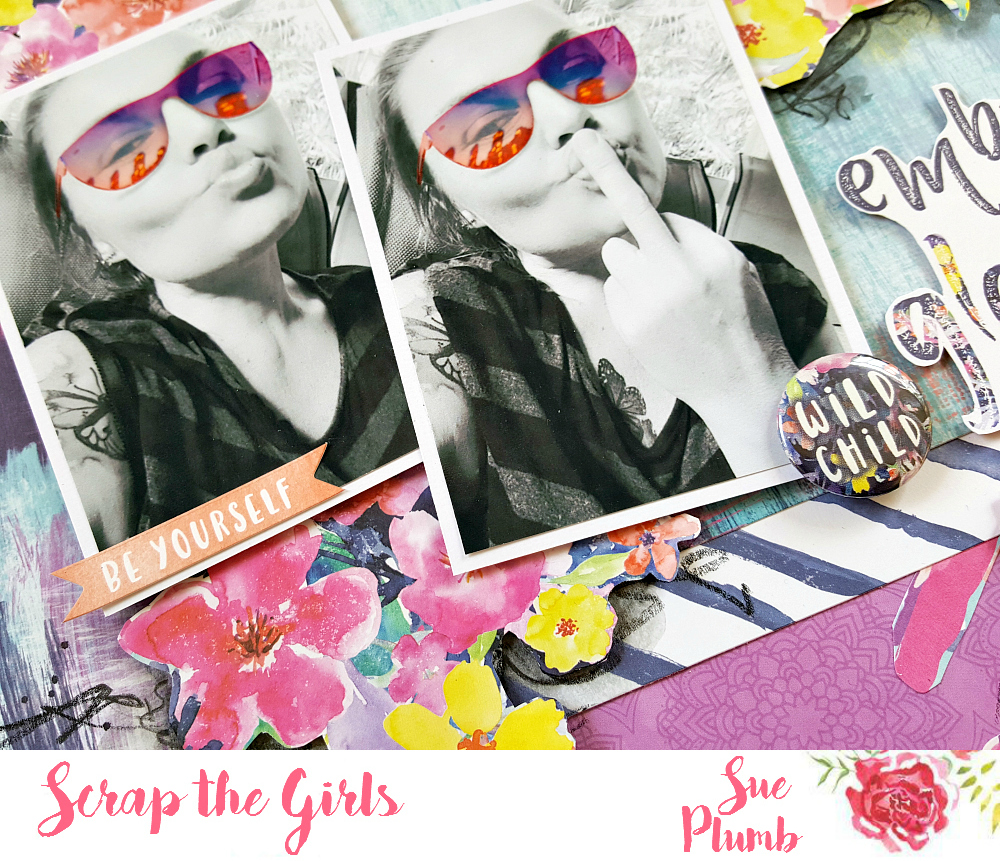
With my photo in place it was time to start adding some fun stuff! I looked for some small pieces I could tuck in around the page for extra interest. I used a couple of pieces from the Miscellany pack - a banner, and the one of a kind quote; a label and the strip of stars from the 'Boy Stuff' cut apart paper; and another small piece from the 'Fun & Games' cut apart paper


For my title, I used the you are words from the 'Bohemian Dream' chipboard title stickers sheet; the words the best from the 'Boys Rule' chipboard pieces pack. (I used some alphas from my stash for the word dad.) I popped some foam tape under the words that overlapped the photo to bring them up to the same height.


I love embellishing directly onto my photos; so I layered two stickers from the accessory sticker sheet, stamped the date, then topped it with a flair button to pop in the corner of my photo. I thought I needed something else to the left of my photo to balance the title on the right, so I cut a piece from one of the frames from the chipboard pieces pack and tucked it under the edge.


I added a label from the Miscellany pack for my journalling at the bottom of my page. The awesome and you're the best pieces both came from the die cut ephemera pack, and I attached them both with a little foam tape. I also added an assortment of stars from both the ephemera pack and sticker sheet.
To finish off, I added a couple of brush stroke stickers from the clear stickers sheet; three small crosses from the chipboard pieces pack; and a little splattering of Colour Blast 'Soot' Colour Artist Ink

Thanks so much for stopping by today. I will be back with something else to share again soon. Until then, happy scrapping! X

Friday, 5 October 2018

Embrace the Mess | Scrap the Girls October Challenge


Hi everyone!
Have you seen the October mood board challenge at Scrap the Girls yet? It's an absolute cracker (and totally up my alley!) The board is called "Fighter" and it looks like this...


There were so many elements of this board that inspired me - the colours; the florals in the dress; the lips; the theme of self empowerment; and that glorious image of the skeletal hand flipping the bird...totally me, right?! I had the perfect SnapChat photos up my sleeve for this one, and the perfect collection in Cocoa Vanilla Studio's 'Bohemian Dream' to go with them!

Here's the layout I created...


I used the gorgeous ombre pattern on the reverse side of the 'Abstract' patterned paper as my layout base. To create my focal area across the middle of my page, I added a large piece of the main side of the 'Abstract' paper. I also added two strips of the striped 'Dreamer' paper above and below it, to add some definition.


Once I had the basic structure of my page down, I decided where my photos were going to be placed. As the background was already busy enough, and because my photos were printed with borders I chose not to add a layered mat for them as I would usually do and I stuck them straight down on the page.


At this point my page was dominated by straight lines (and if you know me, straight is not my usual jam); so I wanted to add some elements to break them up. I chose the miniature version of the wild looking 'Kaleidoscope' paper from the 6x6" paper pad, and I fussy cut around the main pattern. I then cut it in half and placed half under the top edge of the blue striped paper, and the other half under the bottom piece. Now my page was starting to take on some messy character!


Next, it was time to bring in the floral element. I fussy cut three floral pieces from the stunning 'Abundant' paper and tucked them in under the edges of my photos to form a visual triangle, adhering them with foam tape to mount them up from the page. I then fussy cut my title quote from the 'Boho Bits' paper and added it to my page also using foam tape.


I couldn't resist adding a couple of small embellishments directly onto my photos. I used the small be yourself banner from the accessory sticker sheet; and the wild child flair button from the flair button pack.
I felt that my page needed a little extra "something" at the top, so I used the one of a kind sticker and cut off the edge of it so it would align straight along the top of the page and adhered it with foam tape.


Now all my page needed to be complete was some mess! I used my Stabilo All pencil to add some scribbled shadows under the edges of my floral pieces and then used a water brush to smudge them slightly. I added a few more random scribbles and lines around my page as well. To finish off, I added some splatters of Colour Blast 'Soot' Colour Artist Ink using a small brush. 


That's all from me today. Thanks for stopping by so I could share this with you. I hope you will join in with this month's challenge at Scrap the Girls. We have THREE fabulous sponsors this month - Corbett Creations and Cut To You for our Aussie winners, and of course, Accent Scrapbooking for our international winner too. You have until the end of the month to get your entries in, so get busy!
Until next time, happy scrapping! X

Tuesday, 2 October 2018

Live Your Art | Viva Las VegaStamps


Hi everyone!
Popping in today to share my latest Viva Las VegaStamps design team project with you. This mixed media scrapbook page was created using some awesome Banksy stamps and a couple of photos of my son indulging in some spray paint art action.


This page was alllll about the background! I drew my inspiration from the colours and shapes in the photos to guide me as I constructed my layers. I began by adding some teal Kaisercraft acrylic paint in the centre of my page using a brayer. I then used a wide brush to apply some Colour Blast black heavy gesso in a few spots over the top of the teal paint.


Next, I took a yellow Faber-Castell gelato and added a few little scribbles here and there before using a baby wipe to blend them out into the background. I then went back with my brayer and some white acrylic paint and stripped back the colour a little in a few places. I used the Donna Downey "Live Your Art" stencil and sponged the title in using Staz On ink, then used a Posca paint pen to add a few highlights.


Now it was time for some stamping! I used the Banksy Salvador Dali Street Artist stamp and placed him at the beginning of my title. I also used the Banksy Who's Bad stamp to add the words above him. In the bottom corner of my page I used the Banksy Ladder Painter just underneath my title.


I wanted to add a bit of extra interest and help draw the viewer's eye through my title, so I used the Row Of Chevrons stamp and stamped it several times at the beginning of the title words. I then took a pink gelato and added some random scribbles to the page to mimic the pink on the art in the photos. I also splattered some Colour Blast 'Rainforest' Colour Spray. 


Next, it was time to add some textured layers for my photos to sit on. I used a paper doily, some punchinella and some frayed gauze. I then added some cardboard to the back of my photos to pop them up before adhering them on top.


After the photos were in place, I was able to add the Look mum I am a street artist quote using the Banksy Look Mum stamp. (Could there have been a more perfect quote for this page?!)
To finish off, I added some twisted pieces of coloured wire which I secured in place with staples; and then a few dots and spots using my favourite Doodle Dots stamp.

Thanks for stopping by so I could share this with you. I hope I have inspired you to get inky too! X 

VLVS stamps used:

Saturday, 29 September 2018

Smile | Art & Soul September Challenge


Hi everyone!
Popping in today with an extra share for you - this one inspired by this month's challenge at Art & Soul Studio. As soon as I saw this mood board, I was immediately attracted to it when I saw "put a butterfly on it". (Those that know me know how much I love butterflies!)

Here's a look at the board...


The challenge criteria were to create an art journal page, a card or a scrapbooking layout. Use the mood board however you want but you must add a butterfly somewhere and as these challenges are sponsored by Art and Soul Studio please make sure that you use at least one product that is available from the store

I took my initial inspiration from the colours in the board, putting an emphasis on blue tones, with just enough orange for contrast. I also took inspiration from the flowers and tree branches, adding some floral pieces and leaves to my page. And of course, there are plenty of butterflies!


I started my page using a sheet of patterned paper from the 13@rts 'Until Dawn' collection. (I so love the blue tone of this paper - the fact it was wood grain was a bonus!)
I then added some acrylic paint to my background. I started with Flutterby Designs 'Arctic White' Flutter Colour paint, applied with a brayer. I then applied some Dina Wakley acrylic paints over the top - first 'Cheddar' using a brush, before adding a little 'Peacock' using my brayer again.  


Next, I added some Colour Blast 'Singin' the Blues' Colour Paste and applied it through my StencilGirl 'Urban Insiders Bar' stencil (designed by Seth Apter). I then went back with some more acrylic paint - this time Dina Wakley 'Night', which I mixed with water to make a watercolour, then applied some near the top of the page and allowed it to run down. I also splattered the excess around my page.


Now it was time for some stamping! I decided to combine some of my old favourites with some new stamps that were yet to get dirty. 
I started with the dash of colour paint splat stamp from 'Aall & Create set #28', stamping it in several spots around my page. I then used my Viva Las VegaStamps 'Gossamer Butterfly - large' and stamped it on either side of the page, (so that only half of it would be showing once I added my photos.) I also used my VLVS 'Butterfly Specimans' stamp and stamped it twice along the central line of my page. 


Next, I took a sheet of paper from the 13@arts 'Until Dawn' 6x6" paper pad. I fussy cut a floral piece from the paper, before using the remainder to stamp out some sketchy style leaves using a Dyan Reavley stamp. I then positioned the flowers and leaves on my page before adding some messy cotton thread and my photos on top. I added the Jen Hadfield 'Smile' puffy sticker directly onto my photo for my page title. 


At this point I decided my page need some more butterflies, so I pulled out one of my stunning new rolls of washi tape purchased recently from Chiyogami Designs. The one I used was called 'Wide Beautiful Butterflies 30mm' and I simply tore off individual butterflies and placed them around my page. I also added a few torn pieces of another washi I got from Chiyogami - a blue, grunge / mixed media style tape (no idea of style name, sorry).

I then stamped the chin up princess or the crown slips quote from Aall & Create set #41. (I thought it worked well with the selfie theme of the page - everyone knows chins up, right?)


The last butterfly I added was a random glittered sticker I had lurking in my stash (not sure of brand - it might have been from a cheap shop?) I also added some Cocoa Vanilla Studio 'Wild at Heart' blue glitter enamel dots. 


To finish off my page I added some splatters of Colour Blast 'Barley' Colour Artist Ink and some Dylusions 'White Linen' Ink Spray.

Here is a list of products I used that are currently available at Art & Soul Studio (linked):

Thanks for stopping by today so I could share this with you. If you would like to check out all the details of this challenge, head to the Art & Soul blog HERE
Until next time, happy scrapping! X

"Beautiful Disaster" Canvas Class - Scrap & Chat Retreat


Hi everyone!
Just popping in with a project share and a quick wrap up of the class I taught last month at the annual Scrap & Chat retreat in the Dandenong Ranges near Melbourne. (If you have never been on a retreat, let me tell you that there is nothing that compares to being around 60 like-minded people for a weekend full of creating. So good for the soul!)

I had so much fun teaching my class to all these gorgeous ladies...


The piece I taught was a mixed media canvas panel, entitled "Beautiful Disaster" and it was a great opportunity to fly the flag for a number of my favourite brands including Colour Blast, Cocoa Vanilla Studio, Flutterby Designs and StencilGirl.


The canvas was was coloured with my favourite Colour Blast product - Colour Artist Inks, and we used the warm tones of Slipper, Cranberry, Cider and Citrus for the background; then the cool blue colour of Oasis for adding some contrasting highlights. 


Besides the Colour Artist Inks, we also used one of my other favourite Colour Blast products - Colour Paste. We used Deep Water for contrast and texture, applied through a Flutterby Designs stencil (although there were a couple of ladies who used Lovely Lilac from my stash because we thought it would work better with the pieces they had created). 


We also used Colour Blast black and white heavy gessos on the canvases - using the white to strip back colour and offer the eye a place to rest; and black to add contrast and tie in with the StencilGirl 'Talaya: Goddess of Rain' stencilled image and the Flutterby Designs quote. This was probably the messiest part of the class as I encouraged everyone to test my motto that "fingers make the best brushes" - so fun! 


We finished off the canvases with some 'Bohemian Dream' vellum accent embellishments from Cocoa Vanilla Studio. The gorgeous colours of the printed vellum die cuts worked beautifully with the tones of the inks and paste. 


I so enjoyed the opportunity to fly the flag for some of my favourite products and to share my love of mixed media with such a lovely group of ladies. Thanks to everyone who attended!

If you would like me to come and teach at your local scrapbook store or event, I am happy to discuss your requirements and see if we can make it work. You can email me via the contact tab at the top of the page.
Until next time, happy scrapping! X

Thursday, 27 September 2018

Purr-fect Arsehole | Flutterby Designs


Hi everyone!
Popping in with my latest Flutterby Designs design team project for you. Today I am sharing an 8.5x11" mixed media scrapbook page I created featuring some photos of my cat when he was still a kitten. I had been wanting to document this series of snaps for a while and I knew exactly which quote I was going to use!


I began my layout with white cardstock, adding some Colour Blast 'Passion' Colour Shimmer Dust (mixed with water to make a watercolour paint) along the top portion of the page and then held it vertically to let it run down. I then layered over it with some Flutter Colour paints. First 'Grape Soda', applied roughly over the top of some of the watercolour paint, and also in the bottom right corner of the page. Next, I added some 'Stormy Grey', which I spread around using a brayer.


 Next, it was time for some texture and contrast. I used the 'Macaroon 5' stencil and Colour Blast 'Singin' the Blues' Colour Paste and applied it in three small areas of my page before drying with a heat gun. At this point I decided I wanted to strip back a bit of colour so I grabbed my 'Arctic White' paint and spread a little around with my brayer in my focal area. I then rubbed off the excess paint randomly around the page.


I then created a layered mat for my photo strip, using some Everyday Etc filler cards and a page tab from the 'One of Those Days' sheet, which I secured with small staples. Once I had all the layers in place I added my photos on top, mounting them up on some cardboard to pop them up a bit. Then it was time for my feature quote, which I fussy cut from one of the 'Fur-ever Friends' Everyday Etc cards and then placed above and below my photos.


At the top of my page I added the what the fuck? Snippet Strip, and you have got to be kidding black Tiny Sticky Quote.
Next, I created my title, which I placed in the bottom right corner of my page. I started by adding the word arsehole using the 'Sentence Enhancers' stencil, a sponge dauber and ink. I then added the purr-fect die cut from the 'Fur-ever Friends' Die Cut Bits & Bobs pack. Above that, I added the one of a kind Snippet Strip, and the hey you black Tiny Sticky Quote.


Alongside my title, I added the cat is in charge sticker from the 'Fur-ever Friends' Sticky Quote sheet. Then it was time for some finishing touches. I used my favourite 'Doodle Dots' stamp from Viva Las VegaStamps to add some random dots and spots around my page. I also used my Stabilo All pencil to add some page borders and scribbled details around my page. Finally, I added some splatters of aqua mist, stamped the date and I was done. 
Thanks for stopping by today so I could share this with you.
Until next time, happy scrapping! 

Monday, 24 September 2018

Don't Blink | Viva Las VegaStamps


Hi everyone!
Today I am here to share my latest Viva Las VegaStamps design team project with you. This piece was inspired by the September "For the Birds" monthly challenge and it showcases one of the amazing new release stamps, which I couldn't wait to use!

Here's a look at the challenge inspiration...


One of my arty friends (yes I am looking at you, Leanne Jago - I said you had a lot to answer for!) has been using index cards a lot lately, and I was inspired by the pieces she has been creating to use an index card for my project. (One of the good things about index cards, is that they are almost exactly the same size as a standard photo, so they fit nicely into 6x4" photo frames!)

Here's my card inspired by the challenge...

To begin my project, I used some gel matt medium to adhere some book paper onto the index card. I then applied Colour Blast white heavy gesso using a brush. I chose to use a brush as I wanted the texture of the brush strokes to show through; but in hindsight, next time I will go a little thinner with the gesso so the text is more visible on the finished piece.


After the background was prepared; I used black Staz On ink and the new Raven Looking Up stamp as the focal image of my piece. I then added some tree branches across the top and bottom of the card using the Branch Antlers stamps. I also inked around the edges of my card.


Next, it was time for some colour! I wanted my piece to have an eerie feel, so I opted for green as the main colour. I used Faber-Castell gelatos to scribble gently onto the card, then used a baby wipe to blend the colour out. 


I started with the darkest shade around the edges of the card, moving towards lighter shades in the middle. In the centre of the card I used a yellow, blended with a small amount of green; and along the edge of the raven's silhouette I also added a small amount of orange.


Once the colour was complete, it was time to add some text. I used the recently released That Look of Otherness stamp and combined it with Don't Blink to form my focal quote. I stamped each of them out on some scrap white cardstock, then used the orange gelato and a baby wipe for blending to add a small amount of colour over the top.


I then cut the words out and inked the edges of each piece with black ink. To add some texture to my project, I added some messy white cotton thread before sticking the pieces of the quote down.


To finish off, I used Colour Blast 'Soot' Colour Artist Ink and a small brush to add some fine splatters randomly around the card.

Thanks for stopping by so I could share this with you.
Don't forget to enter this month's Viva Las VegaStamps challenge for your chance to win some new rubber and a feature spotlight on the VLVS blog. (Link your entries HERE)
Until next time, happy stamping! X