Friday, 31 May 2019

Together featuring Uniquely Creative watercolour paints


Hi everyone!
(I know, back again so soon!) Today I wanted to pop in and share a layout I created "just because". After finishing up with the Colour Blast design team recently, I have found myself with a little extra creative time and more freedom to use different products, so I decided to dig into my stash and pull out one of my neglected supplies - my watercolour paint set from Uniquely Creative.


I was lucky enough to receive this sweet little set of paints when I did guest designer spot for Uniquely Creative and since that time they have remained largely untouched. I hate having under-used supplies hanging around so I decide to take them out and put them to use. 
I started by swatching them onto some watercolour paper, which I then adhered inside the lid of the tin for easy reference.


With that out of the way, it was time to put them through their paces on a larger scale so I grabbed a piece of cardstock and sat down to play. I had no plan, so I just painted an abstract background. Once it was dry I added some stamping over the top using a cool stamp from Carabelle Studio.


I then added some small pieces of torn washi tape before adding my photo strip. (How did I forget about these photos of Fiona Paltridge and I from a couple of years ago? What a crazy pair we make when we get together - which unfortunately is not often enough!)


I kept the remainder of my supplies very simple to embellish my page - a pack of die cut ephemera purchased from Aldi (yes, Aldi and only $2!) and some messy white cotton thread. 


I finished off my page with a few black splatters and a simple line of journalling using a Sharpie. I guess you could call this one a "budget" page - it took only limited supplies AND time - winning! 

Here's my finished layout...


I was really happy how these paints performed and will definitely be using them more often now! I checked the Uniquely Creative website and although this exact set of colours is no longer available, there is a 2019 palette available HERE (and very reasonably priced too - I might be needing that one next I think!)
Until next time, happy scrapping! X

Thursday, 30 May 2019

Limitless | Cocoa Vanilla Studio


Hi everyone!
I hope this finds you well! Today I am popping in to share a recent mixed media layout I created for Cocoa Vanilla Studio using the super cool 'Boys Rule' collection along with Dina Wakley acrylic paints.


I started by creating the background for my page; adding a variety of acrylic paints using both a brush and brayer to an 11x11" piece of white cardstock.
To add some extra depth I then added some small pieces of tissue paper; torn washi tape (from Chiyogami Designs); ink splatters and stamping using my Cross Marks Background stamp from Viva Las VegaStamps.


With the background in place, it was time to work on the feature elements of my page. I layered together a variety of patterned paper pieces (including Straight & Narrow; Expressionist; and Boy Stuff), and mixing in some paint sample cards from my stash. (I love using sample cards as they are so easy to coordinate, and are readily available for free from the local hardware store.)


Once I had the papery layers in place I then added my photo on top, using some scrap cardboard underneath to help pop it up from the page. Along each side of the photo I added the reach for the stars and you are awesome stickers from the Accessory Sticker sheet, mounting it up with a little foam tape. At the top of the page I added the word limitless from the Miscellany pack for my title.


Next, I folded down the top right corner of my cardstock and secured it with staples before I mounted it onto a sheet of the Expressionist paper so that I had a border showing all the way around the page. 
To finish off I added a few stars from the Chipboard Pieces pack.

Thanks so much for stopping by today so I could share this with you. I hope I have inspired you to pull out some of your stash and create something too. Until next time, happy scrapping! X

Saturday, 25 May 2019

Clowning Around | Viva Las VegaStamps


Hi everyone!
Today I am popping in to share a fun mixed media scrapbook layout that I created for Viva Las VegaStamps to document a couple of silly SnapChat selfies of my sister and I. (We just love clowning around! hehe)


To create this page I started with an A4 sized sheet of cardstock; then I mixed some Dina Wakley acrylic paints (I used a combination of 'Night' and 'Lapis') to get the right shade I wanted for my background. I applied it roughly using a spatula and set it aside to dry.

Whilst it was drying, I chose some stamps for my background. I wanted to continue the confetti theme from the photos and have the patterns cascading down the page, which I also planned to stamp using acrylic paint. 


I started with the Grunge Circles, which I stamped using 'Ruby' paint repeatedly down the page. I then used the Sky of Stars Background stamp with 'Cheddar' paint and followed the same line down the page.
I then switched to midnight blue ink and stamped the Smiley Face and Somebody Stop Me.


To go with the theme of my page, I stamped out a few images from plate #1383 designed by Mary Vogel Lozinak - Unicycle Lady; Man in Short Pants; and Director. I coloured each of the images using markers and then fussy cut around them. I also stamped the All Circuses quote. 


I added some frayed gauze to my page before adding my photos on top with the quote stuck along the bottom edge.


I then stuck the little characters across my page using foam tape to give them a bit of dimension. 


To finish off I added some scattered sequins for a bit of sparkle and I was done!

That's all from me today, thanks for stopping by. I hope I have inspired you to get inky too! X

VLVS stamps used:

Thursday, 23 May 2019

Be You! | Colour Blast


Hi everyone!
Popping in today to share my final design team project for Colour Blast. Yes, after two and a half years on the CB design team, the time had come for me to step down. After a lot of time and effort devoted to this team over the past couple of years, this now gives me some breathing room and the freedom to look for some new creative opportunities and avenues.

So today I am sharing the last layout that I created for CB using the 'Limited Edition' collection. The theme of this collection is all about being yourself so I thought I would document a couple of cheeky selfies (which pretty much sum me up. hehe)


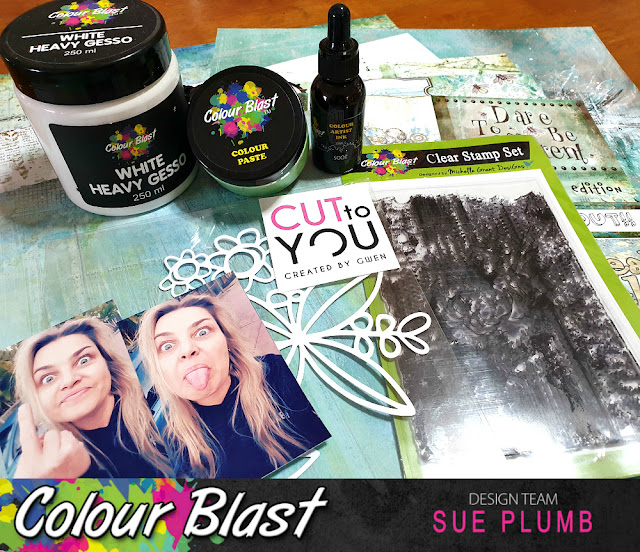
Here's a look at the supplies I started with...


I began with the One of a Kind patterned paper from the 'Limited Edition' collection as my page background. The first step was to add some White Heavy Gesso to the area I decided was going to be the focal point of my page. I did this using a small brayer.


Whilst the gesso was drying, I gathered some pieces of the 'Stand Out' patterned paper and layered them together to form a mat for my photos. 


I then went back to my background sheet and added some stamping around the edge of the focal area using the Peony Dreams stamp set from the 'Spread Your Wings' collection and 'Faded Jeans' Distress Oxide.


Next, I wanted to add some subtle texture to the page. I used the 'That Way' stencil from the 'Going My Way' release with 'Apple of My Eye' Colour Paste; applying small amounts randomly around the page using a palette knife.


At this point I felt my layout needed some black to tie in with the black in my photos and also to provide a some contrast. I used 'Soot' Colour Artist Ink, and simply used the dropper from the bottle to drip some directly onto the page. I then set my page aside for a little while to dry. 


Once it was dry, I added the layered mat I had created earlier; bending up the edges of each of the pieces to give the stack more dimension, before sticking my photos on top.


I then took the Floral Cluster cut file from Cut to You and tucked them in under the edges of my photos. I also created a circular frame using coloured wire, which I stapled on top of my photos. 


With all of the main structure in place, it was simply a matter of adding some finishing touches. I added some messy black cotton thread, which I tucked in amongst my layers.


I fussy cut three small bees from the Glorious Tags paper and added those to the page.


 I finished off my layout by adding three phrases cut from the Exception Word Sheet paper, placing two above my photos and one below.


That's all from me today, thanks for stopping by. Until next time, happy scrapping! X

Tuesday, 21 May 2019

Easter Traveler's Notebook Spreads | Cocoa Vanilla Studio


Hi everyone!
Just popping in to share some traveler's notebook spreads that I created for Cocoa Vanilla Studio for our recent TN theme. I decided to tackle this task by creating each spread with a common theme (Easter), but by using different collections and styles.

For my first one, I went all the way back to the 'Made of Awesome' collection that was released in 2015, and paired it with a cute photo of my boys from a couple of years ago.


I used a small piece of piece of one of the papers that I had left over; which I cut in two and placed either side of the spine. I then took the opportunity to use up some vellum stars and lots of left over accessory stickers, which I added in a cascading-style design down the left side of the page. (This is a great way to use up left over stickers!) I used a frame from the Die Cut Ephemera pack to frame my photo and added printed journalling to document the story.


For my second spread I switched to the gorgeous 'Bohemian Dream' collection as I thought it would work well with my photos taken at a fun morning of Easter hat craft at school with my boys.


Just as I did with my first spread, I used a piece of left over paper (this painted style one is called 'Abstract'), and I added some on each side of the spine. I then added my photos before using a combination of Accessory Stickers and Die Cut Ephemera to embellish the pages. To carry through the artistic style and the colour theme, I used coloured pencils to add some doodled highlights.


For my final spread I used the newest Cocoa Vanilla collection on the block - the gorgeous 'Happiness' collection to document a photo of my kids from this year.


I added a piece of the spotted Sprinkles paper to the left side of my spread and then used the reverse side of the Meadow paper to mat my photo and also cut some feature pieces for my page. I used a variety of Easter themed cut files (available free from Paper Issues) to cut the word bunny, some egg shapes and the little rabbit. I used some of the watercolour stickers from the Clear Stickers pack to add to my background on the right side of the page; then added the word sweet from the Die Cut Titles pack to complete my title.

That's all from me today, thanks for stopping by so I could share these with you.
Until next time, happy scrapping! X

Tuesday, 14 May 2019

Brave Wings | Colour Blast


Hi everyone!
Popping in with a recent Colour Blast design team project for you. Today I have a mixed media scrapbook layout to share featuring the 'Spread Your Wings' collection; combined with a bit of the 'Graffiti Grunge' collection; Colour Paste; Colour Shimmer Cubes and Heavy White Gesso.
I created this page to document a selfie of my best friend and I as we sat on top of Mount Beerwah (after climbing it in 36 degree heat.) 


Here's a look at the supplies I pulled out to start my project with...


I began with the Fly paper from the 'Spread Your Wings' collection for my background. To give the page some extra depth, I added some stamping using the Do It Stamp Set and 'Stormy Sky' Distress Oxide.

I then added a piece of the Fearless paper from the 'Graffiti Grunge' collection across the centre of the page, distressing the edges to give texture, before stamping over the left edge to blend it in with the background sheet.


Next, I wanted to tone down some of the colour and pattern, so I used a small brayer to apply Heavy White Gesso to the centre of my page.


Whilst the gesso was drying, I gathered up some paper pieces to create a layered mat for my photo. I arranged the pieces in a small stack and secured them with staples before sticking it down.

Next, I took the Peony Dreams paper and fussy cut some of the large floral designs from it, which I then tucked in under the edges of my photo mat. 


Once the floral pieces were stuck in place, I rubbed a small amount of white gesso over each of them to help blend them into the background.

Then it was time for some texture! I wanted it to be subtle, so I used a small floral design stencil with 'Snow White' Colour Paste and applied it in a few areas on the page and left it to dry.


To embellish my layout, I dug through my (extensive) flower stash and pulled out an assortment of paper and fabric blooms (most of these were from D-lish Scraps). I created a circle using a pip berry stem, which I layered behind and over my photo before sticking my photo down. I then adhered the flowers on my page using hot glue; starting with the largest flowers first and working my way down in size until I was happy with the arrangement.


With the flowers all stuck in place, I then dry-brushed a small amount of gesso over them. This helped tone down some of the brighter colours to make them more subtle.

To finish my page off, I fussy cut the with brave wings she flies quote from the Earth Angels paper and stuck it down using a strip of cardboard behind it to pop it up a bit.


I then took 'Apple of My Eye' and 'Singin' the Blues' Colour Shimmer Cubes (these are now discontinued, so simply substitute another product if you don't have them in your stash); and used a small brush to apply pools of colour to the page. This added subtle, shimmery detail to the layout once it had dried. 


You can see how brushing the gesso over the flowers not only toned down the colours, but also provided cohesion to bring the mix all together.


That's all from me today, thanks for stopping by so I could share this with you. Perhaps you might be inspired to pull out some old flowers from your stash and create something too? It's fun mixing old supplies with new!
Until next time, happy scrapping! X

Sunday, 12 May 2019

Love.Repeat - Art Journal Page | Viva Las VegaStamps


Hi everyone!
Today I have a mixed media art journal page to share that I created recently for Viva Las VegaStamps. This piece was inspired by a gorgeous art journal page shared last month by Jenn Engle. (You can see Jenn's page on the VLVS blog HERE) I really loved the balance between colour and white space on her page and wanted to create something similar - but with my own twist, of course.


I was working in my 9x6" Jane Davenport journal for this one (it has watercolour paper pages and takes wet media fairly well with no bleed through). I started by putting down multiple layers of Colour Blast Colour Artist Ink; drying between each one with a heat gun to get the "hard" water lines.


Once I had the colour down, I began adding some structure. I started with the Punchinella/Sequin Waste Border; which I stamped vertically using black Staz On ink.


Next, I used the Double Coffee Rings stamp with 'Mowed Lawn' Distress Oxide; stamping it several times over the top.


I then used the Cross Marks Background with black Staz On to add some marks around the edges of the colour.


Now it was time to add some texture to my page. I used small torn pieces of washi tape and some snippets of punchinella.


I also added a piece of paper doily, some plasterer's tape, and some frayed gauze - all layered in the central focal point of the page.


I then stamped out the focal image for my page using the Squiggle Heart stamp and Staz On ink onto some white cardstock and fussy cut around it. I used a shimmery watercolour paint to colour the heart before sticking it down onto the page.


To finish off, I stamped the sentiment Love.Repeat a few times and then splattered a little bit of blue ink around the edges.


I was really happy with how this page came out - thank you Jenn for the inspiration!


That's all from me today, thanks for stopping by. I hope I have inspired you to get inky too! X

VLVS stamps used:
Punchinella/Sequin Waste Border
Double Coffee Rings
Cross Marks Background
Squiggle Heart
Love.Repeat