Saturday, 3 September 2016

My Heroes | Show Us Your Stuff September Challenge

Hi again everyone!
Back today with another design team layout to share, this time for Show Us Your Stuff. This month's challenge is to use a sketch designed by Krisy Podolak, and to also include some mixed media. And as always, your project also needs to include a handmade embellishment.

Here is Krisy's sketch...


And here is what I created...

"My Heroes"

I just love this photo I snapped of my cheeky boys wearing their new "super hero" shirts with capes they got for their birthday; putting on their best tough faces.


I used a sheet of patterned paper from the Cocoa Vanilla Studio 'Made of Awesome' collection as the base for my layout. My mixed media background was created using a mix of Colour Blast 'Road Base' Colour Shimmer Spray; some of my new Viva Las VegaStamps and then topped off with some red Flutterby Designs Flutter Colour paint. I also added some small pieces of torn washi tape from D-lish Scraps.


My feature handmade embellishment was this cool flair button from Flutterby Designs, which I nested on some messy black cotton thread. (And how freakin' awesome is that cool drippy slime stamp too?)


I kept my embellishments relatively simple, as I didn't want to overwhelm the effect of the background. I used some die cut ephemera pieces, wood veneer, stickers, vellum stars and enamel dots - all from Cocoa Vanilla Studio.


The tiny alphas I used for my title were also from Cocoa Vanilla. I deliberately chose them so they would blend in with my layout, rather than stand out. Finally, I added some black splatters and some stamping and I was done.

I really enjoyed creating this layout! It was a great sketch to work with and perfect timing to give my new Viva Las VegaStamps a run. 

If you would like to join in with this month's challenge, you have until the end of the month to get your project linked up via the SUYS blog. Up for grabs for this month's winner is a fabulous prize pack from Krisy herself. In the meantime, make sure you support Krisy by popping over to her Popleopod blog and her popleopod Instagram to see her awesome projects and find links to her process videos too. 

Til next time, happy scrapping! X

Thursday, 1 September 2016

When Good Selfies Go Rad | Scrap the Boys September Challenge

Hi everyone! First of the month = happy day! Not only for all the new scrappy challenges that are released, but it's also the first day of spring here in Australia - hooray! Spring is definitely my favourite season.

The first layout I have to share with you this month is my design team layout for Scrap the Boys. I created this one when I was away on retreat and it features some selfies of my boys and I.

"When Good Selfies Go Rad"

I used the Cocoa Vanilla Studio 'Totally Rad' collection for this layout (seriously, I just don't tire of this amazing boy collection!)


I actually used up some of my scraps for this layout - layering together some of the patterned paper pieces I had left over from previous projects on top of the 'Stellar' paper with its fabulous wood grain print. (I am such a sucker for a good wood grain!) 


I embellished my layout using die cut ephemera pieces; stickers; wood veneer; a flair button; woodies; and enamel shapes all from the Totally Rad collection. The white alphabet stickers are actually from the Colour Me Happy collection.


(I love a title that's a good play on words! haha)


So, why am I in the photos when this layout was created for Scrap the Boys you might ask? Well that's because this month the challenge requires for YOU to be in the photo too! It doesn't have to be you with your son - it could be your husband / brother / father / friend, even the milkman if that's what you want! haha
Here is the challenge graphic to inspire you...


You have until the end of the month to get your layout created and link it up via the STB blog. This month there are two fabulous prizes including a 2Crafty Chipboard prize packs and a Snap! brand prize pack. 
So what are you waiting for? Get scrapping! X

Saturday, 27 August 2016

Hello School Days | D-lish Scraps Birthday Cyber Crop

Hi everyone!
Just popping in today to share my challenge and layout for the D-lish Scraps Birthday Cyber Crop with you.

Recently, D-lish Scraps very quietly ticked over it's 7th birthday. And a birthday can't pass by without a celebration, right? So boss lady Amanda decided that this month it was time to celebrate the milestone with a birthday cyber crop. In addition to the usual challenges from the design team, there are was also a couple of extra challenges from Amanda and even a special Just Add Paper kit released into the store. (You can find the kits HERE)

For my cyber crop challenge, I designed a good old fashioned BINGO challenge, which I based on birthday themed elements.


And here is my sample layout...


For my sample I used the vertical "balloons - card - cake" line, which were represented by flair buttons, a tag and several pieces of wood veneer. But given that this was my challenge, I thought I might sneak a few others on there as well, so I also managed to include washi tape, a bow, sequins, twine and handwritten journaling from the other squares.


My layout background was created using Dylusions paints straight onto white cardstock - I just love how bright and colourful they are! They matched this pic of my daughter and her friend at the school disco perfectly. Over the top of the paint I used some Faber-Castell Whipped Spackle with the 'Squared' Dusty Attic stencil. (The Dylusions paints and the Whipped Spackle were purchased from Scrapbooking from Scratch.) I also added some torn strips of washi tape (the roll was from a previously released Just Add Paper kit).


The wood veneer pieces I used were all coloured using my Posca pens, to match the warm tones used in my background. They included a large circle from the Corbett Creations circle set; and a square bracket frame that I cut in half and placed underneath the sides of my photo. I also used two flair buttons including one from a previous JAP kit. Also from a previous kit, was the orange tissue paper that I paired with a beautiful lace paper doily to form the layers under my photo.


In the corner of my photo I created an embellishment cluster that included a dip dye tag tied with twine; and a sparkly sequin bow. I also added an arrow paperclip to the edge of my photo. And just for a little extra bling, I added some loose sequins to my page.

If you haven't popped over the The Scrap Suite yet and checked out all the cyber crop challenges you will find the group HERE. Entries remain open for another 3 weeks, so you still have plenty of time to complete them, and you might win one of the store vouchers up for grabs too!

And before I forget, if you have ever thought about applying for a design team, then I highly recommend this one! Applications close on Monday, so get your skates on!!


Til next time, happy scrapping! X

Thursday, 25 August 2016

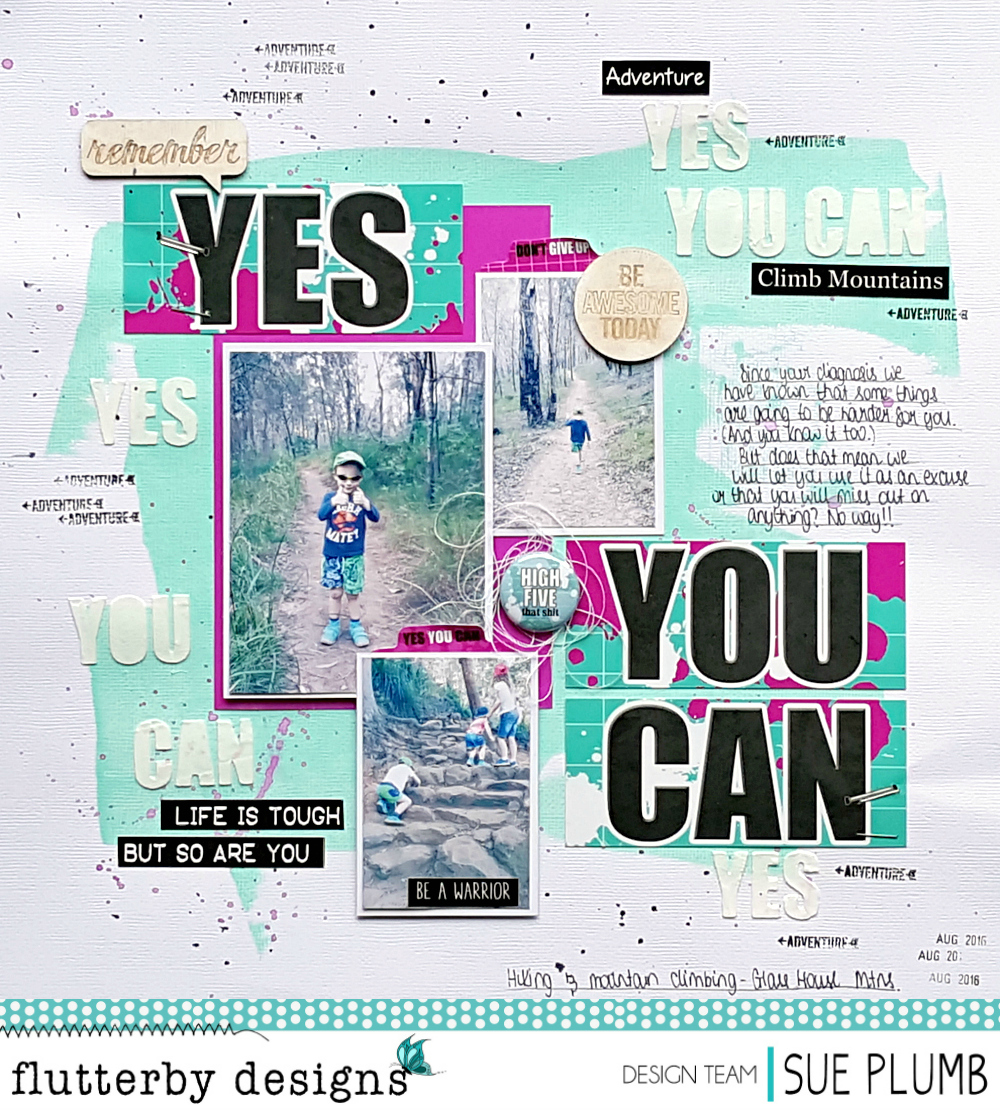
Yes You Can | Flutterby Designs

Hi everyone!
Popping to today to share my latest layout for Flutterby Designs using the brand new 'No Excuses' range. This range is bright, bold, fun and real - all the things that everyone has come to love and expect from Flutterby products!

Although this range is perfect to document personal goals and achievement; I decided to use it to document an important message for Hunter that I want him to always remember despite the physical challenges he faces.


I started my layout by swiping some Flutter Colour paint across cardstock using an old credit card and then splattered some magenta watercolour paint on top of it to help add some depth. Next, I used part of the 'You Got This' stencil with some Faber-Castell Whipped Spackle, to add some texture and dimension to my background by replicating the words from the title around the page.


I used one of the 6x4 cards from the 'No Excuses' Everyday Etc cards as the main focus of my layout, cutting it up into strips to use as my title. I also used one of the coordinating 'No Excuses' Filler Cards as a mat for my photos. I love how the bright pop of magenta helps draw the eye into the focal point of my layout.


I used two of the coordinating 'No Excuses' Page Tabs tucked in behind my photos; as well as a flair button (from set 406) that I nested on some messy cotton thread. I also used two wood veneer pieces - the new 'Be Awesome Today' and the 'Remember Bubble'. I coloured each of them with a white Posca pen and then used a baby wipe to rub the colour back a bit to allow more of the grain to show through.


Finally, I added one of the new 'Blackboard Sticky Quotes' and some 'Snippet Strips' around my page. They were a quick and easy way to reinforce the subject of both my photos and journaling.


A few black splatters, a couple of staples and some simple stamping and my layout was complete.
If you haven't checked out all the recent additions to the Flutterby store, then head over HERE to see what's new.
Til next time, happy scrapping! X

Tuesday, 23 August 2016

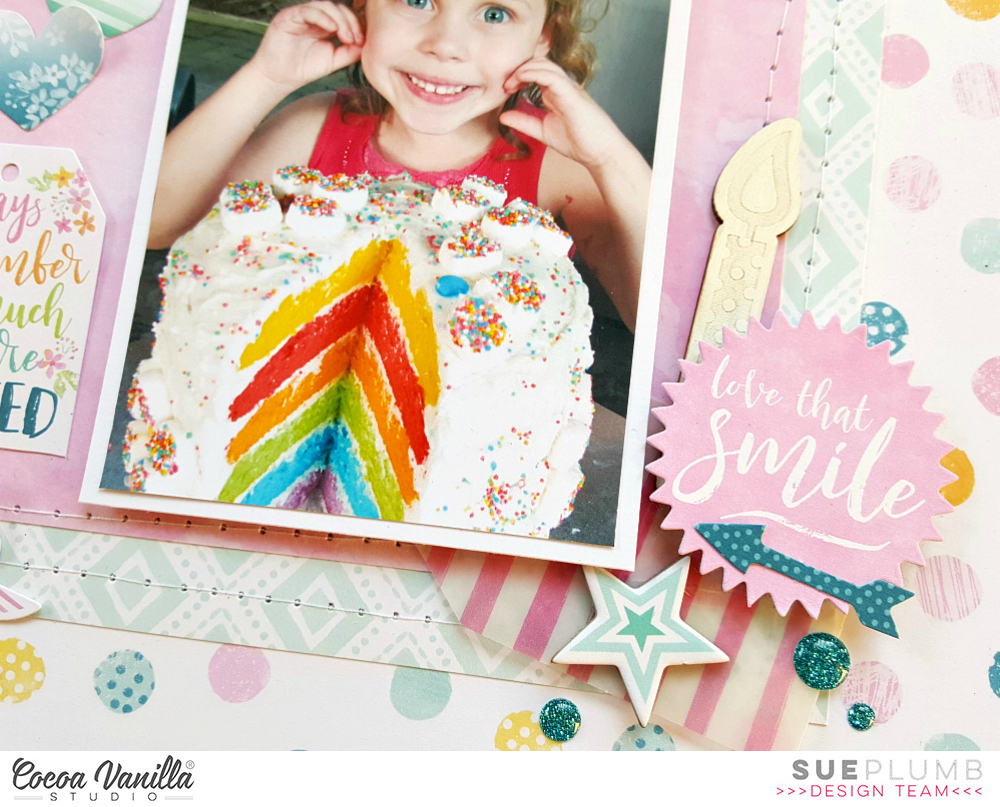
Hip Hip Hooray | Cocoa Vanilla Studio

Hi everyone!
I am so excited to pop in and share my first layout with the brand new Make a Wish collection from Cocoa Vanilla Studio!

Although this collection is birthday themed, as with most of Cocoa Vanilla's collections, it is very versatile and could be used for all sorts of projects. I couldn't resist going with a birthday layout though, featuring some photos of my daughter on her 5th birthday. At her request, I made her a layered rainbow cake and the look of joy on her face when she saw those colours made every moment I spent in the kitchen totally worthwhile.


As always when I work with any new collection, I didn't know where to start as there are just so many gorgeous things to choose from! I decided on layered design for my background so I could use multiple papers (Party Dots, Daydream and Hip Hooray). This design also allowed me to create a central area to contain my multiple photos and embellishments, leaving the surrounding space free to form a border. I also added some rough machine stitching for some subtle texture.


I mounted my photos to help them pop from the page, then set about adding my embellishments. In the top left corner I added one of the wood veneer pieces (which I coloured lightly using a Posca pen); a couple of pieces from the die cut ephemera pack and a few of the Sparkles enamel dots. I also added a Puffy Sticker and one of the small phrase stickers from the Accessory Stickers sheet directly onto my photo.


In the top right corner of my focal area, I added the "hip hip hooray" title card from the Party Mix cut apart sheet. On top of it I created a cluster containing ephemera pieces; a puffy sticker; wood veneer party hat and a chipboard sticker. (Everything is so cute I couldn't stop. I just wanted to add ALL. THE. THINGS. haha)


In the bottom right corner, yet another embellishment cluster. I used many of the same things (ephemera, wood veneer, chipboard sticker, enamel dots), but this time I layered them all on top of one of the gorgeous Vellum Accents - this one a striped tag.


More die cut ephemera here - I couldn't resist this beautiful little tag. The colours of the writing reminded me of the layers in the cake and the sentiment was perfect too!

I have to say, I am totally in LOVE with this collection! The colours, the styling, the embellishments - everything coordinates so effortlessly, it really is a joy to create with!


Don't forget that Make a Wish is not yet available, but is due to start shipping to retailers on the 9th September so keep an eye out for it at your favourite store next month!
Until next time, happy scrapping! X

Saturday, 20 August 2016

August Projects | D-lish Scraps

Hi everyone! Just popping in to share a round-up of my August projects I created for D-lish Scraps.

Starting off with this layout I completed last month whilst away on retreat. It features a photo of my gorgeous boys on the morning of their 4th birthday.

"4 Today"

I started this layout by creating my background using a mixture of mists and gelatos applied with plastic packaging to give a watercolour effect. I then added some stamping using my Scrap FX Hash stamps; torn strips of washi tape and navy mist splatters. Finally I added some Colour Blast Colour Paste using a Dusty Attic stencil (Distressed Grid), to give my background some textured dimension.


I created layers under my photo using a 5x7 chevron bag; grey paper doiley; lime tissue paper (from a previously released Just Add Paper kit) and gauze. I also used a Corbett Creations wood veneer word to form part of my title (which I coloured white).


I also coloured some of my all time favourite wood veneer stars, and then dotted some D-lish Dots Enamels around my page.


The second part of my title came from a Heidi Swapp embossed number 4, which I coloured using a gelato to match my background. I layered this on top of a dip dye printed tag tied with twine and used a shaped paperclip to secure it to my photo. I also added a flair button and more stamping using a roller phrase stamp and date stamp.


The next layout I am sharing was based on this month's 'Geometric Crush' Inspiration Board Challenge, using the coordinating Just Add Paper kit.

Here is the board...


I used the palette and pictures from the board as inspiration, but chose not to use the optional sketch this time. The awesome photo is of Brielle doing her best Dave Grohl impersonation with her guitar (she loves the Foo Fighters).

"#epic"

As soon as I saw this board I immediately knew I wanted to use this chevron print Cocoa Vanilla Studio paper (from the Totally Rad collection) for my background. It coordinated so perfectly with the board and the Just Add Paper kit. All the embellishments on this layout were included in this month's kit. (And I have plenty of left-overs too!)


Once again, I used my favourite method of colouring wood veneer (Posca pen), only this time in blue.


If you would like to play along with the current Inspiration Board Challenge and be in with a chance of winning a D-lish Scraps store voucher or a Just Add Paper kit, you can find all the details and rules HERE.


My final project I have to share, is a fun layout featuring a photo of Brielle and her best friend that I took recently.

"Nerds Shall Inherit the World"

I have had this Heidi Swapp "lightbulb" paper in my stash for quite a while, just waiting for the right project to use it on. And I figured that it couldn't be more appropriate than this one! I created a photo mat using pink punchinella; green spot tissue paper (from a previous Just Add Paper kit) and a white lace paper doily. I also added a Journal It's date tab tucked in behind my photo.


To further highlight my photo, I added a shaped paperclip; as well as a flair button (from the Woodgrain Hashtags set) which I nested on some messy thread. I also added 3 circles from the Corbett Creations wood veneer circle set around my photo (coloured with a red Posca).


Given the subject, I wanted my title to be a bit quirky, so I decided to sculpt the word "nerds" from a piece of bronze coloured wire, which I then attached with staples. I layered it on top of a Journal It's mixed ticket tab and underlined it with wood veneer glasses (from a previous JAP kit). I also added a Cocoa Vanilla tiny alphas; a phrase strip and another small line of stitching.


To finish off , I added another flair button (this one from the super cute Just My Type set); some small torn strips of washi tape and a scattering of D-lish Dots enamels for some extra colour pops.

That's all from me for today. Thanks for stopping by and checking out my D-lish Scraps projects! Til next time, happy scrapping! X

**Just a reminder that the D-lish Scraps Birthday Cyber Crop started over in The Scrap Suite Facebook group last night. There are some awesome challenges on offer (including some bonus ones from the boss lady), plus an exclusive limited edition Just Add Paper kit being released! Be sure to have a look!**

Tuesday, 16 August 2016

Wish | Show Us Your Stuff August Challenge

Hi everyone!
Popping in with another of my design team shares for you today, this one for Show Us Your Stuff. This is yet another layout I created whilst away on retreat, and was for this month's SUYS challenge that was designed by Anita Rodway...


It's probably important to remember that what some people would consider "ugly" paper differs from others. I found some reeeally old Kaisercraft papers in my stash that I deemed ugly, only to have a few people at retreat tell me they didn't think they were that bad. Well they were definitely the oldest thing I had, so I went with that.

And here's what I created...


As you can see I used lots of mediums on this page to transform my ugly papers. That's the beauty of mixed media - you can take something that you don't like and turn it into something you are happy with!

Included in my layered mediums were my fave Flutterby Designs Flutter Colour paints and my fave Colour Blast Colour Paste (steel). The Colour Paste was applied through a Dusty Attic stencil available from D-lish Scraps.


I also used lots of embellishments from D-lish Scraps including washi tapes (which I tore into small pieces and added to my background layers); resin flowers (from a previously released Just Add Paper kit); and sequins. I added extra texture behind my photo using crumpled printed tissue paper and gauze.


For my main embellishment cluster, I used a Charms Creations DIY heart, which I altered to match my layout by painting it with mist and then added some stamping over the top. I layered it with a D-lish Scraps dip dye printed tag, tied with twine; and a D-lish Scraps flair button, which I nested on some cotton thread.


The black foam arrows are from Burdy's Embellies; and you can also see some stamping I added to the background using a grid stamp and one of my roller phrase stamps.

I was really happy with how this one came out, and especially with the fact that I used some paper that was never going to see the light of day again otherwise! This is a great challenge to get you using up some of that old stash that you look at now and think "why?"
Entries for this challenge are open until the end of the month, and with a fabulous prize from Flutterby Designs up for grabs, what are you waiting for?
Happy scrapping! X

Saturday, 13 August 2016

Partners in Crime | Flutterby Designs

Hi everyone!
Today I am sharing my latest design team layout with you that I created for Flutterby Designs that was featured on the blog yesterday. It features one of my favourite Flutterby releases to date - 'Partners in Crime', and a photo of two of my best friends. This one was snapped last year at my 40th birthday party and as you can see, we really have no boundaries when we get together.


I started this layout by creating a custom background using the Flutter Colour Paints. (I love how perfectly every shade coordinates with the Flutterby goodies!) I simply used an old credit card to swipe some paints around my page (drying between each colour) and then drizzled the pink colour over the top.
You can also see where I used a couple of page tabs tucked in behind my photo.


This collection was made for my friends and I! We often talk about our "shenanigans", so as soon I saw this quote on one of the Everyday Etc cards, I knew it had to be a feature of this layout.


For my title, I used the Partners in Crime wood veneer piece, which I coloured black with a Posca pen. I also added the cute "together" flair button (from set 389) onto the corner of my photo, and nested it on some cotton thread.


To finish off my layout, I added some of the Confetti Circles wood veneer pieces to add some subtle dimension to my background. (I also coloured them black to coordinate with my title piece). I then splattered a bit of black mist and some stamping.


I love how easily this layout came together. (I also love that there are so many cards in the "Partners in Crime" card set to help me get through my pile of inappropriate photos with my friends! haha)

I will be back soon with another project to share with you. Until then, happy scrapping! X