Showing posts with label Corbett Creations. Show all posts

Wednesday, 4 March 2020

No! | Dust It Off challenge


Hi everyone!
I've got a special layout for my "Dust It Off" challenge to share with you today. You may have seen via my Facebook page that I recently had a long weekend away with some of my fave scrappy friends? This is an annual weekend that we do together that I look forward to all year. It's so relaxing - nothing to do but eat, drink, chat and scrap allllll weekend. 

And here they are! Aren't we a gorgeous bunch?
(And yes, those sunglasses were hiding some very tired eyes!)


So, back to my challenge. Whilst I was away I had taken some of my older stash to create a stash-busting layout or two. Someone - who shall remain unnamed (Amanda Hartmann! haha) spotted a large green pickup truck on an Echo Park sticker sheet amongst my stash. The truck sticker became a bit of a running joke and it was suggested I use it on a page. Never let it be said that I am one to back down from a challenge - I came home and used that damn sticker!

I present to you the resulting page featuring "big green truck" as it became affectionately known...
(Click on photos for better view)


To create this page, I started with some mixed media on white cardstock. I used 'Barn Door' Distress Oxide to make a watercolour style background, which I topped with splatters of Bee Arty 'Grass' and 'Lime' Colour Artist Inks. I also added the stamped crosses using one of my fave stamps from Viva Las VegaStamps


Next, I moved onto dusting off some stash! I chose papers from the Glitz Design 'Finnley' collection (which was released in around 2013!), as they featured the colour palette I was going for. I cut an assortment of pieces, which I stacked on my page, topped with a paper doily, and then stapled it all down. 

Next, I grabbed for some washi tape to add some extra layers (this was the same tape I used on my previous challenge layout, which featured a few different tapes - you can see it HERE). I also added some messy black cotton thread before adding my photo on top of the stack. 


Now it was time for the main event! I added some scrap cardboard to the back of the truck sticker (because I wanted to make sure it was a reeeeally prominent feature on my page) before adhering it below my photo. I added extra details to it by layering a couple more stickers and a tiny black acrylic arrow from Corbett Creations


Then I went a little embellishment crazy - adding lots of stickers from the Echo Park and Glitz Design sticker sheets; enamel dots from Uniquely Creative; two acrylic chevrons from Corbett Creations; a MAMBI sticker; a paper clip; half a Heidi Swapp die cut; and some D-lish Scraps coloured wire. (Almost all of which had been in my stash for several years or more.)


I finished off by stamping the you've got to be shitting me phrase using a roller stamp from Typo; more Glitz Design stickers for my title; and added my handwritten journalling - which tied in the reason for including the truck sticker on this page. 

So there you have it - big green truck sticker challenge complete (thanks Amanda!) I also managed to dust off a number of items from my stash - the oldest dating back almost 7 years. If you've got a suggestion of an item you'd like to see me use please let me know. You can comment here, on my Facebook page, or via my Instagram account. (And if you would like to play along too, I am using the hashtag #dustitoffchallenge on Instagram.)
Until next time, happy scrapping! X

Tuesday, 3 December 2019

Sweet Evil | Viva Las VegaStamps


Hi everyone!
Popping in today with a design team project that was created for Viva Las VegaStamps for you. This mixed media scrapbook layout features some of the creepy themed stamps from the last release and a photo of my sister and I dressed up for a "bad taste" theme night at a scrappy retreat. 


I began my layout with a sheet of white heavyweight cardstock, and created a watercolour style background using Distress Oxides. I did this by swiping the ink pads on my craft mat then spritzing with water, before laying the cardstock over the top to absorb the ink. I did this first with 'Iced Spruce' then dried it off and repeated the process with 'Carved Pumpkin'.


Once I had my background colour in place, it was time to add some stamping! I started with the Palmistry Palm, which I stamped over the top of the Distress Oxides.


I then stamped the Pirassoipi Bicorn and the Poison Caution stamps onto my background as well, using black StazOn ink again.


Once I had the stamping done, it was time to add my focal image, which was the photo of my sister and I that I had cut out. I mounted the image onto some scrap cardboard to help pop it up from the page.

To embellish my page, I stamped out the Cross Statue stamp three times onto some black cardstock using embossing ink, then heat embossed the images using gold embossing powder.


I then fussy cut around the crosses and added them to my page around the base of my photo.


Next, it was time for my title. I love a mixed font title, so I used a Kinder Kreations chipboard word hello, which I also embossed with Colour Blast 'Bling' Colour Embossing Powder; then the wood veneer word sweet from Corbett Creations; and then some Cocoa Vanilla Studio alpha stickers.


To add a little extra detail to finish off my page, I used the Sky of Stars Background stamp to add a few little stamped stars, then added a some wood veneer stars that I had coloured black with a Sharpie. I also added some small gold mist splatters.


And with that, my page was complete! Thanks so much for stopping by today so I could share this with you. I hope I have inspired you to get inky too.
Until next time, happy scrapping! X

VLVS stamps used: 

Friday, 15 March 2019

Pretty Fierce | Scrap the Girls March Challenge


Hi everyone!
Popping in today to share my take on the March challenge at Scrap the Girls. If you haven't already seen the challenge, it's called "90's Chick"...


"It's time to be a little nostalgic and be inspired by one of your Favourite 90's films.  Create a layout inspired by it.  Now, this challenge isn't about reliving old photos (you can if you want), nor is it about picking one of the films on the moodboard (but you can if you want to) rather it is about being inspired by the style of the era or the genre of the film and using it in a modern layout.  When you link up your entry (however you choose) you MUST share which movie inspired your layout to go in the running for a prize."


For my layout I chose to be inspired by the 90's cult slasher movie "Scream"...


And here is what I came up with...


 I chose photos of my daughter taken at Halloween to represent the horror genre; and the original movie poster as the inspiration for my page design - using a black and white (with a tiny touch of blue) colour palette.

I started my layout with black cardstock and applied some Mont Marte Dimension white acrylic paint to it roughly using a wide brush. 


I then added some stamping over the top using stamps from Viva Las VegaStamps; and some texture using a Dusty Attic stencil and Colour Blast 'Dusty Charcoal' Colour Paste. I also added some white and pale blue splatters using thinned down acrylic paint. 


Once my background was dry, it was time to build some layers for my photos to sit on. I used various pieces of tissue paper, a paper doily, punchinella, plasterers tape, washi tape, and frayed gauze (many of these items from D-lish Scraps); stapling them in place before adding my black and white photos on top.


I then added some embellishments to my page - small pieces of blue wire, stapled in place; some wood veneer stars that I coloured white with a Posca pen; and my title - a fabulous custom acrylic piece from Corbett Creations


Thanks for stopping by today so I could share this with you. I am so looking forward to seeing everyone's interpretations of this challenge! You have until the end of the month to enter, and our sponsor is the awesome D-lish Scraps.
For all the challenge details, or for more inspiration from the design team, check the blog post HERE
Until next time, happy scrapping! X

Wednesday, 6 March 2019

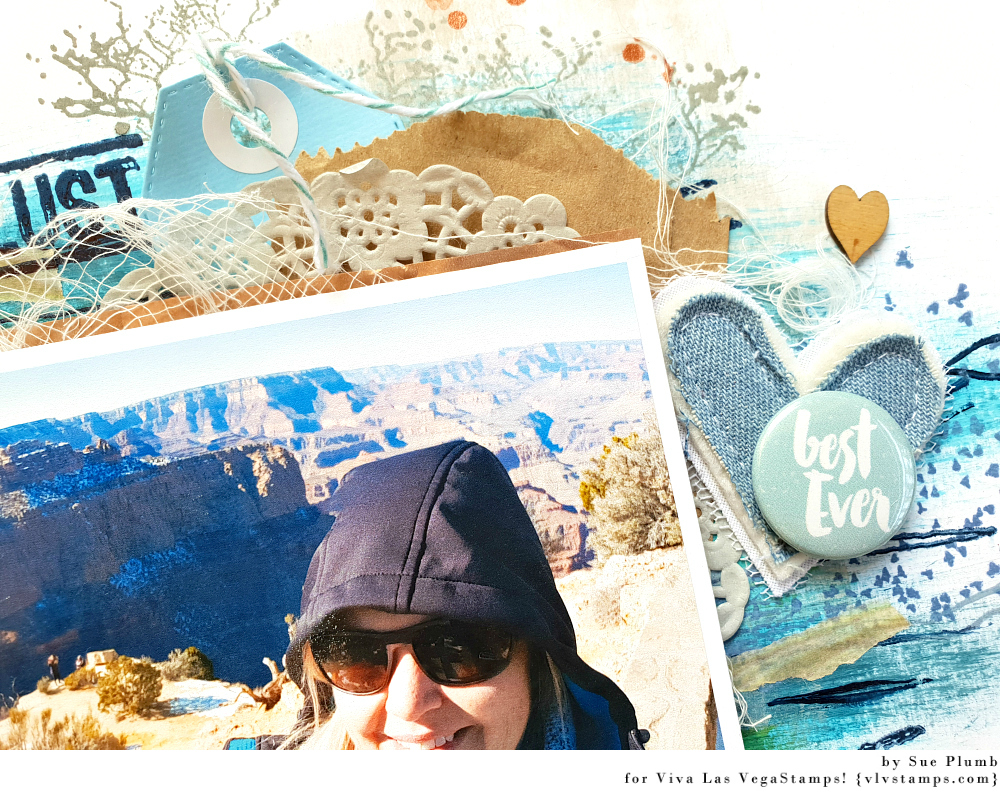
Best Selfie Ever | Viva Las VegaStamps


Hi everyone! 
Today I am here to share my latest Viva Las VegaStamps design team project with you. This mixed media scrapbook layout features an assortment of VLVS stamps; a painted background; and (what I consider) my best selfie EVER!


During my recent trip all the way from Australia to Arizona to attend Creativation, I was lucky enough to also squeeze in a day trip to the South Rim of the Grand Canyon. The canyon has been number one on my bucket list of places to visit for as long as I can remember, so to finally tick it off was an absolute dream come true!  (And hence why I have called this my best selfie ever.)

To compliment my photo, I chose to use some stamps from plate #927, which features a number of travel themed phrases and images. I decided to pair the stamps with a painted cardstock background using Dina Wakley acrylic paints by Ranger.


To start my page I began by brushing on some of the blue "Sky" paint using a wide brush, then added some of the deep blue "Marine" over the top using the same brush. Next, "Elephant" grey paint went over the top using a small brayer to apply it. Finally, I added some highlights using "Evergreen" with the tip of my finger.


With all the colour in place, it was then time to turn to my stamps to add some depth to my background. I started with the Stitching Lines and Sawtooth Stitching Lines stamps, which I used to add lots of horizontal lines to my page using StazOn ink. This was to mimic the textures and layers of rock I saw in the canyon walls.


Next, I wanted to add some extra interest in the top section of my page around where my photo was going to be placed. With so many lines already on my page, I wanted to use a more organic shape, so what could be more perfect than trees? 
I used the Leaves Blowing From Tree and Weathered Tree, stamping them both out a number of times using "Faded Jeans" and "Iced Spruce" Distress Oxides. I also added some text to my background using the Wanderlust stamp and StazOn ink.


At this point I also added some small torn pieces of woodgrain and chevron print washi tapes before I moved onto creating a layered mat for my photo to sit on. I used a combination of tissue paper, paper doily, tag, small kraft bag and some frayed gauze, which I secured to the page using staples before adding my photo on top.


I love adding things directly onto my photos on my pages, so I decided to stamp out a couple of things that I could adhere to the photo. I used the You Are Here and one of the Set of 2 Hands Pointing, which I stamped onto white cardstock using "Faded Jeans" Distress Oxide, and then cut around them.


Now it was time for the finishing touches. Alongside my photo I added a denim handmade heart from Charms Creations, which I topped with a flair button from Cocoa Vanilla Studio.


For my title, I used a wood veneer word from Corbett Creations and some Cocoa Vanilla Studio alphabet stickers.


I also added a few wood veneer hearts around my page and splattered some Colour Blast Sienna Colour Shimmer Spray.


The final piece of my page was to add my journalling (although to be honest, I could have written 1000 words about this day and still not come close to expressing how I felt.)


That's all from me today, thanks for stopping by. I hope I have inspired you to get inky too!

VLVS stamps used: 

Friday, 8 February 2019

Warrior Queen | Scrap the Girls February challenge


Hi everyone!
I hope you have all settled back into routine after the festive and holiday season. With the kids back to school here it's nice to get a bit of normality happening again. (Which means back to some regular creative time for me - yay!)

I am kicking off my design team shares this month with the February challenge at Scrap the Girls which is called "Warrior Queen" and looks like this...


There are different aspects of the board you can be inspired by - the colour palette; the quote; the image; or even the person pictured (Constance Hall). I drew on the visual aspects of the mood board to influence both my page design and my photo. I also received some goodies from one of this month's sponsors - Corbett Creations to include on my layout.

Here is what I came up with... 


I started this page with some heavy weight white cardstock, knowing I was going to be using mixed media on it. I used Colour Blast Colour Artist Inks for my background, using my favourite shades of Oasis, Slipper, Citrus and Cider to match the colour palette of the board. I applied them randomly around the central area of my page using a small brush, doing one at a time and then tilting the page up vertically to allow the colours to run down.


Once I had all the inks down, I moved onto creating some layers to go under my photo. I am still determined to bust some of my stash, so I dug out some really old Echo Park and My Little Shoebox patterned papers and die cuts and stacked them on the page randomly, securing the pile with staples to hold it in place. I also used up lots of old coordinating stickers and used them to add extra layers.    


Next, I found a Crate Paper chipboard frame to frame my photo but was disappointed to find that my photo was too narrow to fit. Never fear - washi tape to the rescue! I added some gold diagonal striped washi down each side of my photo, which allowed it to blend in with the gold edging of the frame, then a couple of smaller ripped pieces onto the frame to tie it all together. I then added it onto the paper layers I had on the page. 

For my title I used the "warrior queen" wood veneer which was kindly supplied by Corbett Creations. To alter it I simply painted it with Dina Wakley 'Peacock' acrylic paint and then adhered it on top of a speech bubble shaped die cut. 
Included in my pack from Corbett Creations, was also the pink acrylic lips, which I stuck onto the frame. This tied in perfectly with the just be happy sentiment I had added to my page. 


To finish off my page I added a few more stickers, including some chipboard ones (that really weren't even sticky anymore so I had to use glue), and a heap of enamel dots. (I really need to stop hoarding these things! LOL) I also added a few stamped sentiments and splattered some Colour Blast 'Lagoon' Colour Spray around the page. 

I was really happy how this page turned out - full of fun and colour! I hope you will join in with our "Warrior Queen" challenge this month. We have prizes up for grabs from both Cocoa Vanilla Studio and Corbett Creations for our Australian entrants, and from Scrap Accent for our international entrants. You can find all the details, plus lots more inspiration from the design team over on the STG blog HERE
Until next time, happy scrapping! X

Wednesday, 9 January 2019

Fun Stuff | Scrap the Girls January challenge


Hi everyone!
Today I am popping in to share my design team layout for the January "Time Traveller" challenge at Scrap the Girls. This month there is an awesome pin up themed challenge image to inspire you, along with an additional Pinterest board full of extra images. You can be inspired by any of the images from the challenge image or Pinterest board, but when you link up your entry your entry must mention what inspired you and why.

Here's the challenge board...


You can find the additional inspiration images on Pinterest HERE

And here is what I created...


My layout was initially inspired by the image of the three girls on the board and their pouty red lips. I found a cool SnapChat filter that magically turned me into a pin up style nurse, and then created a photo collage using three shots I took. I was also inspired by the colours from the other images, opting to use the black / white / red / nautical blue for my palette.


To start my page I created a mixed media background - first using red Dina Wakley acrylic paint applied with a brayer; then layering over it with Colour Blast black heavy gesso applied with a wide brush. Once dry, I applied Colour Blast 'Just Blue' Colour Paste through a Tim Holtz stencil to three areas of my page, then wiped off the excess paste from my palette knife onto the page. 


Once the background had dried I stamped some random hearts around the page using StazOn ink and a Scribble Heart stamp from Viva Las VegaStamps.

Then it was time for some texture and layers! I used pieces of patterned paper, tissue paper, paper doily, paper bag, plasterer's tape, washi tapes, a printed tag, wire and frayed gauze to create a layered mat for my photo collage.


Alongside my photos I added a handmade red & white butterfly heart embellishment from Charms Creations. I also added a couple of cute little blue acrylic hearts from Corbett Creations and some blue enamel dots from D-lish Scraps.


The quote I used was from a MAMBI sticker book, and the wood veneer stars (also from D-lish Scraps) were coloured red with a Posca pen. 

To finish off my page I stamped the sassy since the day I was born quote around my page with a Typo roller stamp, and I also splattered some Colour Blast 'Marine' Colour Artist Ink. Then it was a few scribbles with my black and white Stabilo All pencils and I was done!


This was such a fun page to do (and the fact I completed it when I was at retreat surrounded by some of my favourite people probably made it even more so). 

I hope you will join in on this months challenge - our fabulous sponsor is Cut to You from Created by Gwen. If you have a cutting machine and you haven't checked out her newest cut file designs yet, then make sure you check them out HERE 
If you don't have a cutting machine, never fear! Gwen also cuts her designs and ships directly to you - how cool is that? You can check out the range of custom cuts HERE

Until next time, happy scrapping! X