Friday, 28 July 2017

Masculine Layouts | Scrapbooking Memories magazine

Hi everyone!
Just a quick post from me today to share the two layouts that were published as part of my 'How To: Masculine' Creative Team article from Scrapbooking Memories magazine Vol 20 No 3. In my article I discussed some of the techniques and materials I often use when I create masculine layouts; and provided two sample layouts in different styles.

For my first page, I told a story about my hubby and his best mate when they were involved in a mountain rescue of some trapped climbers, so I had lots of journaling to include. I used some of my favourite scrappy supplies on this one - a combination of Cocoa Vanilla Studio and Flutterby Designs goodies. (Which blended extremely well together!)

"You Rock"


For my second layout, I took a mixed media approach for this photo of my boys at the beach drinking orange juice. I used the photo as inspiration for my colour palette and a combination of supplies from Colour Blast; Cocoa Vanilla Studio; Flutterby Designs; D-lish Scraps; and stamps from Viva Las VegaStamps.

"Hello Sunshine"

The next issue of Scrapbooking Memories magazine is hitting mailboxes and shelves about now, so be sure to look out for my next Creative Team article inside which is all about mixed media scrapping.
Until next time, happy scrapping! X

Monday, 24 July 2017

Hello Jail Bird | Cocoa Vanilla Studio

Hi everyone! Just popping in to share my latest design team project for Cocoa Vanilla Studio with you. Today I have a layout I created using the 'You Rock' collection; a bit of mixed media; and a funny photo of one of my boys that I took recently at a theme park.

"Hello Jail Bird"

I started my page with a sheet of the 'In Line' paper, and I chose to run the stripes vertically to mimic the bars in the photo. I then added some extra depth to my background using a Darkroom Door texture stamp; and some subtle watercolour paint using a Colour Blast Colour Shimmer Cube (Steel). I also added some small pieces of torn striped washi tape sticker; along with a printed phrase washi sticker to the top corner of my page.


Next, I gathered together some papers to create a layered mat for my photo. The papers I used included the reverse side of the 'In Line' paper; 'Night Sky'; and 'Random'. I also use the lightning bolt strip cut from the 'Stripped' paper and ran it vertically through the focal area of my page. I then added some messy black cotton thread for texture and mounted my photo on top.


To embellish my page, I started by adding a few fussy cut stars from the 'Starshine' paper; then a couple of chipboard accent stickers, which I layered directly onto my photo.


Next, I added several wood veneer shapes around my page; including the hello word that I used as part of my title. The remainder of my title was created using some Colour Me Happy black alphabet stickers and Totally Rad wood grain alphabet stickers. I also added a few small phrase stickers from the accessory sticker sheet.


Beneath my photo I added the awesome tag rubber charm, which I tied with a small piece of twine. To finish off my layout I added some splatters of Colour Blast Colour Shimmer Spray (Sienna & Stormy Weather) and Colour Spray (Road Base); and a few stamped phrases and date.

Thanks for stopping by today so I could share this with you. I will be back again in a couple of weeks with another project. Until then, happy scrapping! X

Friday, 21 July 2017

Relax | Colour Blast

Hi everyone!
I hope this finds you well today. I am currently off at the Flutterby Designs 'Create by the Lake' retreat (and I am probably shivering my butt off right now - Tamworth winter temperatures are a bit different to the Qld ones I am used to!)

It's time to share another design team project with you - this one was created for Colour Blast. This 12x12" mixed media layout features a recent photo of my daughter and I. For this page, I wanted to put the focus on a couple of the metallic tones from the Colour Blast range - Sienna (copper) and Bling (gold).


I began my page with a sheet of grey patterned paper (from Cocoa Vanilla Studio), which provided me a good neutral base to allow the metallic tones to shine. I then used a Darkroom Door texture stamp to define the focal area of my page, before I applying some colour using a Sienna Colour Shimmer Cube. I used a flat brush to apply the colour in both vertical and horizontal strokes over the stamped areas.


Once the colour had dried, I then added my next layer of colour over the top using Bling Colour Paste. I first applied it through a stencil (this one was from Flutterby Designs) in areas around where my photo was going to be placed; then I spread some small patches directly on the page using my palette knife.


The next step in my process was to add some contrasting splatters. I wanted to keep with the metallic theme, so chose Sienna and Stormy Weather Colour Shimmer Sprays. I created my splatters by taking the nozzles out of the bottle and flicking them at the page.


I then set my page aside to allow all the mediums to dry completely. Once dry, I added some small pieces of torn washi tape. At this point my background was looking like this...


The next step in my process was to emboss the wood veneer pieces I planned to use with Sienna Colour Embossing Powder. (Wood veneers from D-lish Scraps.) I love the beautiful colour & texture it gave them (even if I didn't have the best light to photograph them in).


Next, I started constructing my layout. I gathered together tissue paper, a metallic doily, a die cut glitter frame (which I cut in half) and some gauze, and layered it together to form a mat for my photo.


I then added some small pieces of copper coloured wire, which I twisted around before attaching with staples.


Next, I added a Charms Creations arrow alongside my photo, which I topped with a D-lish Scraps flair button.


Finally, I added my embossed wood veneer pieces; handwritten journaling and a few stamped phrases. (OK, and a few little black splatters with my Road Base Colour Spray - it just wouldn't be complete without them! haha)


Thanks for stopping by today so I could share this with you. I will be back again soon with another project.
Until then, happy scrapping! X

Wednesday, 19 July 2017

Absolutely F**king Gorgeous | Flutterby Designs

Hi everyone! Just popping in today to share my latest design team project created for Fltterby Designs. This is a 12x12" mixed media layout I created using the brand new 'Flawsome' collection that was recently released. This range is perfect for scrapping selfies, and what better selfie to scrap than a funny Snap Chat shot. As soon as I saw the colours in some of the cards from this collection, I immediately thought of this "drag queen" selfie I took recently...


I decided to use a black background to help the bright colours pop. I began by adding some 'Tropicana Teal' Flutter Colour paint to my cardstock using a short, flat brush and some randomly placed strokes. I then took some 'Arctic White' Flutter Colour paint and watered it down, before using another brush to splatter it across my background.


I then created a layered mat for my photo using several of the Everyday Etc cards from the collection and some messy cotton thread for texture. I also added one of the coordinating Page Tabs which I tucked in behind my photo; along with the BOLD wood veneer, which I layered with a Tiny Sticky Quote.


On the corner of my photo, I added the beautiful mole flair button, which I also layered with some more messy thread.


I fussy cut the absolutely fucking gorgeous words I used for my title from one of the Everyday Etc. I also added a few neon enamel dots to my page for some extra pops of colour.


To finish off, I added some small torn pieces to a couple of my page edges; the hello lovely Blackboard Sticky Quote; handwritten journal strips and a few staples. I am really happy with how this one came out and can't wait to create some more pages with this range!

Please note that the Flutterby Designs store is currently closed due to the Flutterby 'Create by the Lake' Retreat that kicks off tomorrow. The store will re-open on Monday 1st August. For everyone who is coming along to retreat - see you there!
Until next time, happy scrapping! X

Saturday, 15 July 2017

Hello Awesome | Scrap the Boys July Challenge

Hi everyone! Hope this finds you well in your part of the world. I can hardly believe we are halfway through winter here in Australia - time is certainly flying, and now the countdown to spring begins!
I am here today to share another of my design team projects with you, this time for Scrap the Boys. This month the challenge is a sketch, designed by Laura Whitaker and it looks like this...


Now, (I hope you are sitting down for this part) here is my take on the sketch...and for once I actually created a page that looks like the sketch!

"Hello Awesome"

I scrapped some fun photos I took recently of my boys on a day out at a theme park. (It seems the older they get, the harder it is for me to get a photo of them without silly faces *sigh*) I used the new Cocoa Vanilla Studio 'You Rock' collection for my layout, and added some mixed media to my background. 


I started with the ombre print 'Experimental' paper as my base, then added a light brushing of Colour Blast white heavy gesso to my focal area. I then added some stamping (stamps from Viva Las VegaStamps and Typo); and some small torn pieces of the washi tape stickers. Next, I added some Colour Blast 'Steel' Colour Paste using my Flutterby Designs 'Stargazed' stencil, and also smeared some randomly on my page with a palette knife.


Once it was dry, I created a layered mat to mount my photo strip on. I used a variety of 'You Rock' papers cut to different shapes and sizes, as well as pieces from the die cut ephemera pack and some messy cotton thread.


Beneath my photo I added one of the rubber charms, which I attached simply with staples (these charms are very soft, so it is easy to staple or even stitch them onto your pages). I then added a couple of lightning bolts from the wood veneer pack, as well as the hello and awesome pieces for my title.


To finish off my page I added a few crosses from the enamel shapes pack; and some black and white mist splatters.

Thanks for stopping by today so I could share this with you. I hope you will scrap some of your own boys and play along with us. You can head over to the Scrap the Boys blog HERE for more inspiration from our team, as well as all the details on how to enter. There are TWO prizes up for grabs for our lucky winners, so grab some supplies and get busy!
Til next time, happy scrapping! X

Tuesday, 11 July 2017

Be Yourself | Scrap the Girls July Challenge

Hi everyone! Time to share my take on this month's challenge at Scrap the Girls. This month's challenge is a fabulous mood board Krisy designed called "Dark Moon". I loved this board - it's a bit dark, eclectic and left of centre - of course, it was right up my alley. I decided to scrap my page in a style that tried to reflect those qualities.

First, here's a look at the board...


And here the layout I created inspired by the board...

"Be Yourself"

The first (and most obvious) element I drew from the board was the black and white stripes. As soon as I saw them, I knew I had to use this striped paper from Cocoa Vanilla Studio for my layout base. I then wanted to add a touch of colour, so I drew on the reddish tones from the face paint in the picture. I was also drawn to the typed quote on the mood board, and I was inspired to use one of my Viva Las VegaStamps quote stamps.


To create my background, I first applied some Colour Blast white Heavy Gesso to the centre of my page. This not only gave me a surface to apply my other mediums, but it also softened the look of the stripes in my focal area. I then added some Colour Blast Colour Spray (Sunset) using a brush, and then tilted my page to allow the colour to run around and pool in places. I also splattered some around my page.


There were a number of elements on my page that directly related to the quote I chose to use. In reference to the "beige square holes" I used some woodgrain print chipboard embellishments from the Cocoa Vanilla Studio 'Wild at Heart' collection. I added the silhouette photo of myself and positioned it so it was coming out of the frame. I also added a number of stars around my page to reflect the "supernova" reference in the quote; including the Viva Las VegaStamps star stamp that I positioned under the frame, and some fussy cut stars from the new Cocoa Vanilla Studio 'You Rock' collection.


I added extra depth to my background using more stamps from VLVS and some small torn pieces of Cocoa Vanilla washi tape sticker; as well as some subtle texture using messy cotton thread tucked behind my photo. The bitch please stamp was from Typo, and added a bit of extra sass to my page.


To help balance my design, I created a small cluster in the top corner of my page. I included more wood grain elements (die cut film strip and chipboard banner, both from Cocoa Vanilla Studio 'Wild at Heart' collection) as well as another fussy cut star.
To finish my layout, I added some splatters of Colour Blast Road Base Colour Spray.

I hope you will all play along with this month's challenge at Scrap the Girls. Remember that you can use any part of the mood board to inspire your own project. Entries close at the end of the month, and this month's winner will receive a prize from The Resin Rainbow. Looking forward to seeing your take on this board!
Until next time, happy scrapping! X

Saturday, 8 July 2017

My Heart is Full | Cocoa Vanilla Studio

Hi everyone! Popping in today to share my latest layout created for Cocoa Vanilla Studio. This week I had to create something for the theme of “the story”, which is all about including journaling on your pages.

The layout I have to share with you features the beautiful ‘Love Always’ collection, and a candid photo of my children that I took a few years ago. It was taken back when my boys were still babies; and Brielle used to give them a nightly bottle while I prepared dinner for the rest of the family. We had a deal with her that she could watch whatever she wanted on TV while she did it.

"My Heart is Full"

I started with the soft pink side of the ‘Class Act’ paper as my base, and added some mixed media to it before I went any further. I first added some stamping using a random text stamp (perfect for a story theme, don’t you think?) to both the top right and bottom left corners. I then used a Colour Blast Colour Shimmer Cube (Blush) to add some shimmery pink watercolour over the top, to further define the focal areas of my page. Next, I added some smears of Colour Blast Colour Paste (Steel); and some splatters of 'Stormy Weather' Colour Shimmer Spray, then set it aside to dry.


The next step was to create the layered mat for my photo to sit on. I used a variety of papers (‘Note to Self’; ‘Class Act’ and ‘Lovely Things’), which I layered together with some messy cotton thread before mounting my photo on top. I also used some of the same papers in my cluster at the top of the page, along with pieces from the die cut ephemera pack.


Above my photo, I added the word together that was cut from the ‘Lovely Things’ cut apart paper; as well as a small arrow from the puffy sticker sheet. Alongside my photo, I added another piece from the cut apart, as well as an arrow from the chipboard accent sticker sheet.


I added two die cut butterflies from the ephemera pack just below my top cluster; and dotted some of the Sparkles enamel dots around my page. 

To finish off, I added my typed journaling; the small my heart is full banner from the ephemera pack as my title and some splatters of Colour Blast 'Road Base' Colour Spray.
Thanks for stopping by today so I could share this with you. I am really happy that this journaling theme pushed me to get this story scrapped before the little details became a distant memory. I hope you are inspired to get some of your own stories documented - don't let the details become lost forever!
Ti next time, happy scrapping! X

Thursday, 6 July 2017

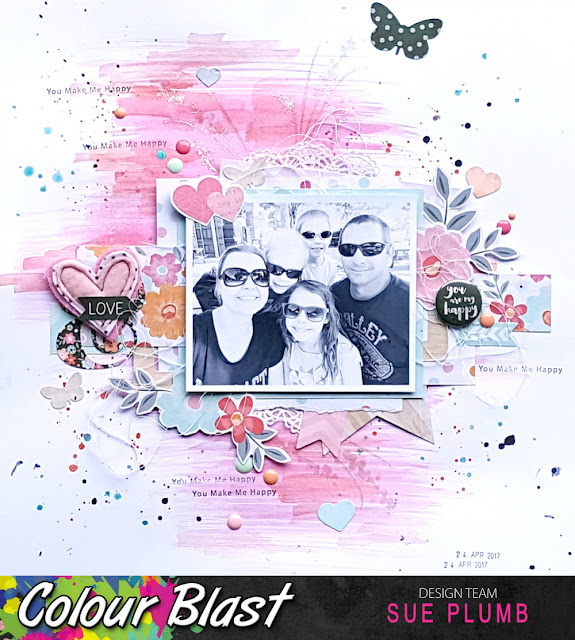
You Are My Happy | Colour Blast

Hi everyone! I'm back with another design team project today - this one created for Colour Blast. It's a 12x12" layout that features a recent photo of my family and I. As I had printed this picture in black and white, it left me free to use whatever colour palette I wanted, so I decided to go with something bright, fun, and a little bit pretty.


To create my page, I started with a sheet of white cardstock, and first applied some Bubblegum Colour Spray using a wide brush. (I simply tipped a small amount from the bottle into a cup wide enough that I could dip my brush into, then swiped it across my page.)


I then wanted to provide some depth to my background, so once the Colour Spray had dried, I added some highlights over the top using Tangareen Dream Colour Shimmer Cube. I used a small, flat brush, which I simply dipped in water, swiped across the moist surface of the cube, then applied to random areas of my background using short strokes. I also used my wet brush to splatter some of the colour around my page.


The next step in my process was to add some contrasting colour splatters using Deep Water Colour Shimmer Spray. To add these splatters, I took the nozzle out of the bottle and flicked it around my page.


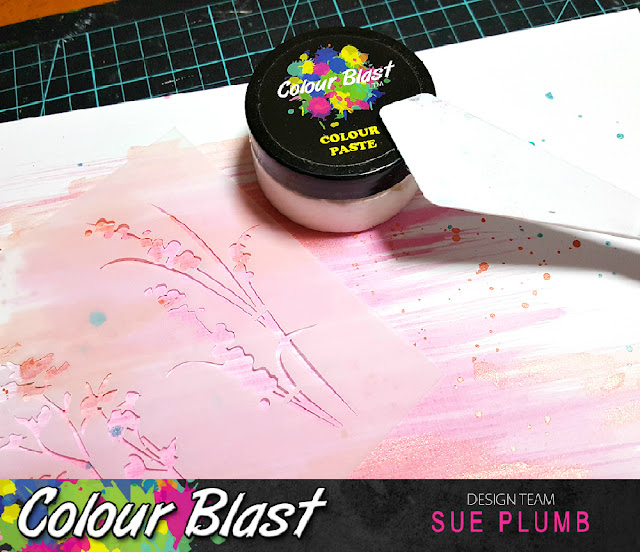
Once I had allowed all of my splatters to completely dry, it was time to add a little extra shimmer and some texture using Snow White Colour Paste. I chose Snow White, and applied it quite thinly with my palette knife, as I wanted the result to be very subtle on my page. (The pretty stencil I used was from D-lish Scraps.)


After the paste was applied I set my page aside to air dry completely (it didn't take too long, as it had been applied thinly). While it was drying I set about gathering together the other materials for my page. I chose to use papers and embellishments from the Cocoa Vanilla Studio 'Hello Lovely' collection; and as you can see, the Bubblegum and Tangareen Dream colors I used matched it perfectly!


You can see in the close up how the Colour Paste dried to a delicious sparkly finish.


To mount my photo, I created a simple mat using various pieces of patterned papers, which I also layered with a paper doily, some messy cotton and pieces of die cut ephemera. I also added a flair button from the same collection.


I also used some coordinating stickers and enamel dots to add extra pops of colour and dimension around my page. Alongside my photo, I added a Charms Creations heart as my feature embellishment.


Once I had completely constructed my layout, I felt my page needed a little more black, so I added a few splatters of Road Base Colour Spray and a few stamped phrases to finish it off.


Thanks for stopping by today so I could share this with you. I will be back again soon with another project to share. Until then, happy scrapping! X

Tuesday, 4 July 2017

Love This | Flutterby Designs

Hi there everyone! I am so excited to be here to share my latest design team project for Flutterby Designs with you using the brand new 'Flawsome' collection. This collection is BRAND NEW and was only released into the Flutterby store last night, and boy, are you going to want this one! This collection is all about embracing your personal flaws and knowing you are awesome regardless. (I know, sounds just like me - right?! haha)

For my layout I decided to go with a double dose of awesome, and scrapped a photo of me with one of my scrap buddies (Amanda Hartmann), which was taken at the Scrap & Chat retreat last year. To say this chick is awesome is kind of an understatement - I just love her and can't wait to retreat again with her this year!


The colours and designs of this collection are so cool - some of the cards contain images of Anita's own mixed media art journal pages. I wanted to continue that theme, so I started my layout by creating my own mixed media background.

 
To start, I brushed my cardstock with some Colour Blast black Heavy Gesso using a wide brush. I then repeated the process using Grape Soda and Aquamarine Dream Flutter Colour paints. Next, I added some Colour Blast 'Envy' Colour Paste using one of the new Flutterby stencils; then I drizzled some Arctic White Flutter Colour paint over the top.


Once my background was completely dry, I started creating a layered mat for my photo using some of the Everyday Etc filler cards. I used some of the art journal page cards (because they look freakin' amazing!) and I was totally crushing on the colours and the textured look they had. I also added the you're fucking awesome tab which I fussy cut from one of the 'Flawsome' Everyday Etc cards.


I used the love this art journal card from the Everyday Etc card pack as my title card, as it was perfect for the crazy, scrappy theme of my page. I also added some torn pieces of filler card to the diagonally opposite corners of my page to help balance the overall design.


I added the absofuckinlutely flair button on top of my title card, to further reinforce my theme (and let's face it, it's because I do absofuckinlutely DO love this!) I think I need at least twenty more of these flairs!!


Next, I added some messy black cotton under the edges of my photo; then the die cut diamond from the Bits and Bobs pack on top of it; and a couple of white Sticky Quotes directly onto my photo.
To finish off, I added some Rainbow Heart stickers randomly around my page, along with a few stamped phrases (stamp from Typo), and some Colour Blast Colour Spray splatters (Road Base and Bubblegum). Then I added my journaling and I was done.

Thanks for stopping by today so I could share this with you. If you haven't checked out this new release in all it's glory yet, then head to the Flutterby store HERE and snap some up!
Til next time, happy scrapping! X