Saturday, 31 March 2018

Wicked | Scrap the Boys March Challenge


Hi everyone!
Popping in to share my final post for the month, and it's my take on the Scrap the Boys March challenge, which is a sketh designed by Laura Whitaker. (I just realised I hadn't already shared it!) Today is your final chance to get your entries in, so make sure you get them loaded up! 
This is what the sketch looks like...


And this is my (twisted) take on it...


Rather than using a large star shape as shown in the sketch, I took inspiration from the star and used it as a theme for my page, which I carried through my papers and embellishments. I used the sketch as a rough guide for placement of the fussy cut stars, as well as the use of 3 photos (which I did as a collage) and I also included a tag in my layers.


The papers and embellishments I used are from the Cocoa Vanilla Studio 'You Rock' collection. I used the 'Night Sky' paper for my background, and added a dry brushed frame around the edge using Colour Blast white heavy gesso


I used pieces of the 'In Line'; 'Galactic' and 'Stripped' papers in my layers under my photo; then fussy cut lots of stars from the 'Starshine' paper to embellish my page with. I also used pieces from the die cut ephemera pack and stickers from the accessory sticker sheet - including the tag that I simply added a bit of twine to.


To finish off my layout and tie in the bright yellow colour from my photos, I used a Charms Creations star embellishment; which I topped with the wicked flair button from the 'You Rock' collection.

That's all from me today. If you don't already have your Scrap the Boys entry in, hurry, it closes tonight! Until next time, happy scrapping! X

Wednesday, 28 March 2018

Watercolour Bookmarks | Viva Las VegaStamps


Hi everyone! 
Sue Plumb here today to share my latest design team project with you. I have been inspired by some of the fabulous tags that some of the team have produced lately and wanted to try my hand at something similar. Being the practical Virgo I am though, I really wanted them to have a purpose, so I decided to make some new bookmarks for my daughter. (She reads constantly and is always losing her bookmarks.)


I wanted to create something colourful (she loves colour) and also something that was a little bit quirky, but also with positive theme for her.
I started by cutting some white cardstock into pieces measuring 2.5x7"; then stamped the background patterns on using Staz On ink.
The stamps I used for my three backgrounds were:


Once I had the backgrounds stamped I added the watercolour using Colour Blast Colour Shimmer Dust, which I mixed with water and applied simply with a brush. (I used the colours Paris; Peacock; and Velvet.) I then set them aside to dry while I moved onto the focal images.


I used some of the left over cardstock and Staz On ink to stamp out the images that were to be the focal points.
The three stamps I used were: 


I then used Faber-Castell watercolour pencils to apply colour to each of the images, which I then blended out using a water brush before cutting them out

I then chose 3 quotes to add to each bookmark:
I stamped them onto cardstock; cut them out; then blended a small amount of watercolour pencil over the top. I then used Miracle Tape to stick the images and quotes onto my backgrounds before putting them into a laminating pouch and running them through the laminator.


Once they were laminated, I cut around each of the bookmarks. I used a hole punch to add a hole to the top of the blue one before tying a small tassel to it with twine. (Tassel from D-lish Scraps.)


My daughter was THRILLED with her new bookmarks, so I think there will be more of them being made at some stage. (I think these would make great little thank you gifts / teacher presents / party favours for older children - anyone who loves to read, really!)  


Thanks for stopping by today so I could share this with you. I hope I have inspired you to get inky too!

VLVS stamps used: 

Until next time, happy scrapping! X

**Note: the book pictured is called "Nevermoor" by a wonderful Australian author called Jessica Townsend who lives locally to me. I highly recommend this book for anyone who has children that are Harry Potter fans, my daughter loved it**

Monday, 26 March 2018

Best Crew | Scrap the Girls March Challenge


Hi everyone! 
I am here today to share my take on the March challenge at Scrap the Girls. This month, Krisy has put together a challenge inspiration called "Don't Mess With Me" and it looks like this...


And here is my take on it...


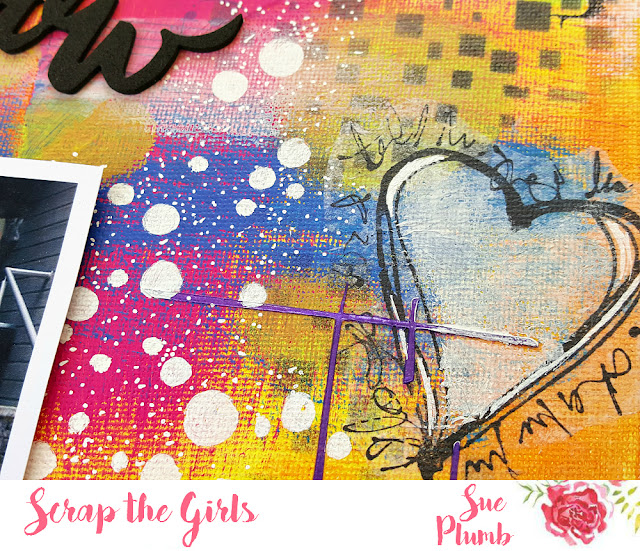
I went a little bit left of field for this one and created a canvas panel instead of a traditional layout. I also twisted the colour slightly, opting for a hot pink instead of the red in the board. The image of the woman in the board said "girl power" to me, so I chose to document a photo of the 2017 crew at the Scrap and Chat retreat. (This retreat is nothing if not a gathering of girl power at its finest. I am already counting down to this years retreat!)


To create my canvas, I started by sticking down some background texture using some torn pieces of old music paper. Then I started adding my background colours over the top using Dylusions acrylic paints, which I love for their vibrancy. I began with yellow and then built my other colour layers from there.


Next, I added some stamping using my favourite Brick Background stamp from Viva Las VegaStamps and some stencilling. I used a Dusty Attic Squared stencil with a sponge dauber and some ink; then used a Dusty Attic Crosshatch stencil with some Colour Blast Royalty Colour Paste


Once all the background layers were dry, I added some lace paper doilies from D-lish Scraps, before mounting my photo on top. My title was a mix of Cocoa Vanilla Studio alphabet stickers and American Crafts Thickers.

I then added the heart image to the right hand side of my canvas. This was an image I had stamped onto tissue paper using the Squiggle Heart stamp from Viva Las VegaStamps. I used a matte medium to adhere it then rubbed some gesso onto the centre of the heart with my finger.


To finish off my page, I added some Flutterby Designs wood veneer stars (coloured black with a Sharpie); and then added some white stencilled and doodled detail around my page using paint pens.

I hope I have inspired you to join us this month. We have the fabulous D-lish Scraps supporting us again, so make sure you get those entries in for your chance to win!
If you would like to see what else the rest of the team created for this challenge, head over to the Scrap the Girls blog HERE
Until next time, happy scrapping! X

Saturday, 24 March 2018

Sweet Heart | Class layout featuring Cocoa Vanilla Studio and Colour Blast


Hi everyone!
Back again to share another project with you. Today I am sharing the layout that I taught in one of my classes last weekend. It features the gorgeous Cocoa Vanilla Studio 'More Than Words' collection; various Colour Blast mediums; and of course, my equally gorgeous girl.


I started this page with the 'Noteworthy' patterned paper for my background. I couldn't leave it clean though, so added some layers of mixed media to it. I used a 'Stormy Weather' Colour Shimmer Spray (applied using the packaging technique); then some 'Blush' Colour Paste through the Flutterby Designs 'Bubble O'Fun' stencil; then some 'Barley' Colour Artist Ink finely splattered around.


Once the mediums were dry, I added a paper lace doily from D-lish Scraps where the focal point of my layout was going to be. I then added some scrap cardboard to the back of my photos before sticking them down on top of the doily.


To embellish my layout, I used the stunning 'Precious' paper with its floral pattern to fussy cut some pieces to frame around my photo. I tucked the edges under my photos, then lifted the edges of the floral pieces to add some dimension to my page. 
I also fussy cut a grey spotted label and the Sweet Heart label from the 'Treasure' paper and layered the two together (with foam tape between them) to form my title.


The love you to bits heart was also fussy cut from the 'Treasure' paper, and I added it below my photos (once again, using foam tape to add dimension). 
To finish off, I used stamps from the clear stamp set to add some various sized hearts and the phrase the best around my page. I then used a 'Blush' Colour Shimmer Cube and a fine brush to add a touch of colour to the hearts.

I had such a great time with all the ladies that attended my classes, thank you to everyone that came along! 

Thanks for stopping by today so I could share this with you. Until next time, happy scrapping! X

Thursday, 22 March 2018

Good Vibes Only | Flutterby Designs


Hi everyone!
Popping in to share my latest design team project with you, and my very first one using the brand new 'Good Vibes Only' collection from Flutterby Designs. This range is super fun - packed with colour, patterns and sweet summer motifs - perfect for scrapping all those fun holiday snaps. 
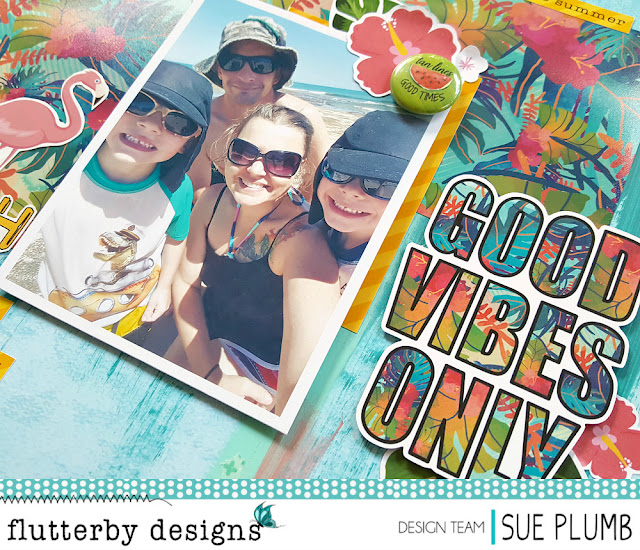
I chose to document a photo of my hubby, my boys and I at the beach during the Christmas holidays.


I started this page with one of the 12x12" sheets from the 'Good Vibes Only' Paper Pack. The one I used was called 'Salty Seas' and has a beautiful blue watercolour pattern. I decided to add a bit more colour though, so I grabbed my Flutter Colour paints and added some 'Bahama Blue'; 'Aquamarine Dream' and a few small highlights of 'Cotton Candy Pink' for contrast. 


The paint colours worked perfectly with the gorgeous tropical pattern on the Everyday Etc cards I chose to use. (Luckily there is one of these cards in both the 'Good Vibes Only' Everyday Etc Card pack and the coordinating Filler Card pack, and I could resist using both of them!)
Once I had my cards stuck down, I added my photo on top, using another filler card to add a pop of yellow to frame under the top right corner.


I created a small cluster in the top right corner of my photo using a couple of flowers from the 'Good Vibes Only' Die Cut Bits & Bobs pack; a leaf sticker from the Sticky Quotes sheet; and the tan lines flair button from the GVO Flair Button Set #2


My title came from the Die Cut Bits & Bobs pack, along with the leaves and flower I clustered below it. On my background I also added some small pieces of torn washi tape from the washi tape tag included in the 'Good Vibes Only' Full Collection Kit. (There are 5 different designs included on the tag.)


The final cluster I created was to the left of my photo. I fussy cut the beach selfie piece from one of the Everyday Etc cards; and tucked a die cut flower under the corner. I then added two of the phrase stickers from the Sticky Quotes sheet, and another one at the top of my page. 

And with that, my page was complete. I so love how this turned out - that tropical print is so divine (and such a perfect match for the colours in my tattoo!)
If you haven't seen all the new goodies in the shop, head over HERE and check them out. (Besides the 'Good Vibes Only' collection, there are also some fabulous new stencils!)

Until next time, happy scrapping! X

Sunday, 18 March 2018

I Wish You Were Here | Viva Las VegaStamps


Hi everyone! 
Popping in to share my latest design team project for Viva Las VegaStamps with you today. This mixed media scrapbook layout features lots of delicious painty layers, and (of course) plenty of fabulous stamps! It also features a fun photo that was taken on dress up night at the Flutterby Designs retreat last year.


I took lots of process photos while I created this page so you can see exactly how I put it all together - and perhaps even try creating your own version?

I started with my cardstock and a selection of Flutter Colour acrylic paints. I didn't have any plan when I applied them, I just followed my instinct.


I started applying the paints using a wide brush, allowing each colour to dry before adding the next; then moved on to using my fingers. (Fingers make the best brushes!)


Once all the paint was in place, it was time to pull out my stamps to give my page some structure and depth.
The stamps I used for my background were:


After I had stamped out my background marks, I decided I needed a little colour contrast; so I used my finger to rub a little pink paint into the centre of each circle.


With my background complete, it was time to start adding some focal images to my page that were going to help compliment my photo. I looked through the images I already had stamped onto tissue paper to see what would work with the theme of my page. 
The images I chose were:

The butterfly was to represent the fact that it was the Flutterby retreat, and the paintbrush was to represent creativity and tie in with the painted background I had created. I adhered my images using an acrylic matte medium.


Once I had the focal images in place, I wanted to add some words to my page. I used the following stamps:


It was then time to add some texture to my page, so I collaged a few bits and pieces onto my page (torn tissue paper; plasterer's tape; paper doily; cotton thread).


I then added my photo on top, which I mounted onto some scrap cardboard first using Miracle Tape
With my photo in place, I then added my handwritten journalling before adding a few random sequins to my page to finish it off.

Here's a closer look at the finished details...


Thanks for stopping by so I could share this with you. I hope I have inspired you to get inky too!

VLVS stamps used:

Friday, 16 March 2018

Hashtag This | Colour Blast


Hi everyone!
I am here today to share my latest design team project created for Colour Blast. This time I have a fun mixed media layout I created using the Colour Artist Inks (my fave medium at the moment!) As I was using a small photo, I decided to create a more minimalist style piece, incorporating plenty of white space. This also helps the colours to really pop off the page.


This page was relatively simple to create (and sometimes that's OK!) I started with white cardstock, and applied some white heavy gesso using an old gift card to the centre of my page where I knew the inks were going to go. Then it was time to add my Colour Artist Inks.


I started by applying the Oasis ink with a small paint brush, allowing the ink to pool as I went, before drying with a heat gun. I then repeated the process with the Marine ink (overlapping some areas of the Oasis ink); before finally adding some highlights using the Grass ink. Each time I applied the ink I used a heat gun to dry it quickly so I could achieve the hard "water line" look I was after. (As you can see in my process shot below.)


Next, it was time to add some stamping over the top of my ink and around my page. I used stamps from Viva Las VegaStamps to add depth and interest to my layout.
I used the following stamps:
- #HASHTAG THIS
- Scribble Circle
- Cross Marks Background


You can see how adding the extra layer with the stamping really helps bring the inks to life.


To add an extra pop of colour to my page, I added a quick bit of random scribble to my focal area using a blue Posca paint pen. Then it was time to add some layers where my photo was going to go. I added an assortment of materials - paper bag; die cut frame;paper doily; and frayed gauze.


Then I added some scrap cardboard to the back of my photo before mounting it on top.


After my photo was in place it was time to add a few embellishments to complete my page. I added a Flutterby Designs flair button and some messy cotton thread directly onto the corner of my photo.


I also added a couple of Flutterby Designs stickers alongside my photo.


Finally, I added a Charms Creations teal chevron to help draw in the eye into my photo.


To finish my page I added a few splatters of Lagoon Colour Spray and Apple of My Eye Colour Shimmer Spray.


Thanks for stopping today by so I could share this with you.

If you are in the Brisbane area and are interested doing a class using Colour Artist Inks, I will be teaching a class tomorrow (Saturday 17th March) at Brookfield and still have spots available. 
If you are interested in booking a spot, you can email me: sue.plumb.designs@gmail.com or head to my Facebook page Sue Plumb Designs to message me or for further details. 


Until next time, happy scrapping! X