Hi everyone! I am here today with my first February share for Cocoa Vanilla Studio. Given that it is Valentine's Day in less than a weeks time, the team at Cocoa Vanilla are celebrating with some love themed layouts to get you in the mood. And what could be more appropriate than a layout featuring the beautiful 'Love Always' collection, which celebrates all things romantic. This page also features one of my loves - my partner of almost 16 years.
Given that this photo of him was taken in a garden, my goal when I created this layout was to create a page that incorporated some of the floral elements from the collection, whilst still maintaining enough of a masculine edge that he wouldn't complain. I achieved this by using the Bouquet paper as a background sheet, and then sewing a square of the Lovely Things paper over the top, which left only a narrow border visible.
I added some subtle mixed media to my background to grunge it up a bit using some Colour Blast 'Peach Nectar' Colour Mica Powder, which I applied directly to my page with a waterbrush. I also decided that I wanted to make good use of the Lovely Things cut apart paper for this page, so I incorporated a variety of pieces into the layers under my photo, along with a piece of the reverse side of the Bouquet paper. Tucked into my layers was also a doily from the vellum accents pack.
I fussy cut a variety of elements to use around my page from the cut apart paper - the geo heart; floral accent piece under the side of my photo; and my title you had me at hello were all cut from the same sheet of paper.
Also tucked into the layers under and around my photo was a frame from the chipboard accent stickers; a scalloped border from the accessory sticker sheet; and some pieces from the die cut ephemera pack.
To tie in with the stitching, I included some small bunches of messy cotton thread around my page; and on top of one of them I nested one of the coordinating flair buttons. After that, it was simply a matter of adding some stamping and a few splatters of Colour Blast 'Road Base' Colour Spray and my page was complete.
Thanks for stopping by today so I could share this with you. If you are looking for the perfect collection to scrap photos of your own valentine, then the Love Always collection is available in the Cocoa Vanilla Studio store now, or alternatively you can ask for it from your favourite scrappy retailer.
Til next time, happy scrapping! X
Wednesday, 8 February 2017
Monday, 6 February 2017
Oh Hi | Scrap the Girls February Challenge
Hi everyone! I am very excited to be sharing my first layout as a member of the Scrap the Girls design team today. The February challenge is a sketch, which looks like this...
I had a lot of fun creating this one! I started with my background, which I used a Colour Blast 'Stormy Weather' Colour Shimmer Spray for. I simply tipped some out of the bottle, added a little water to dilute it, and then applied it with a wide brush across my page. I then used some Colour Blast 'Steel' Colour Paste and applied some random smears around the place to start building some texture. Next, it was a bit of stamping, using a couple of my new stamps from Viva Las VegaStamps; then a good drizzle of Flutterby Designs white Flutter Colour paint.
Once all the mediums were dry, it was time to add some more texture.
I recently had to retire my fave pair of jeans (well not really retire, but I did hack the ripped legs off and turned them into shorts), so I thought I would re-purpose some of the denim on this layout in place of using the smaller photos.
Then it was time to embellish! I added lots of pieces of die cut ephemera (from an older American Crafts Shimelle collection); and a few snippets of black punchinella and wood veneer pieces (both from D-lish Scraps).
I then added the boys will be boys flair button; star paperclip; a couple of acetate pieces; enamel star shapes; scrabble tile and a woodie, all from Cocoa Vanilla Studio. It was quite a random assortment of items and I love how they have all come together on this!
To finish my layout, I added some black and red splatters; handwritten journaling and stamped the date.
This month's sponsor at Scrap the Girls is Kit the Habit, so make sure you get your entry linked up before the end of the month to be in the running for the prize. And in the meantime, visit the STG blog for lots more inspiration from the new team.
Til next time, happy scrapping! X
Of course, I decided to put my own spin on the challenge; and despite doing a relatively good job sticking to the sketch itself, I couldn't help but have a little fun by throwing a bit of a "masculine twist" on my first girly layout.
"Oh Hi"
Once all the mediums were dry, it was time to add some more texture.
I recently had to retire my fave pair of jeans (well not really retire, but I did hack the ripped legs off and turned them into shorts), so I thought I would re-purpose some of the denim on this layout in place of using the smaller photos.
Then it was time to embellish! I added lots of pieces of die cut ephemera (from an older American Crafts Shimelle collection); and a few snippets of black punchinella and wood veneer pieces (both from D-lish Scraps).
I then added the boys will be boys flair button; star paperclip; a couple of acetate pieces; enamel star shapes; scrabble tile and a woodie, all from Cocoa Vanilla Studio. It was quite a random assortment of items and I love how they have all come together on this!
To finish my layout, I added some black and red splatters; handwritten journaling and stamped the date.
This month's sponsor at Scrap the Girls is Kit the Habit, so make sure you get your entry linked up before the end of the month to be in the running for the prize. And in the meantime, visit the STG blog for lots more inspiration from the new team.
Til next time, happy scrapping! X
Saturday, 4 February 2017
Purr-fect | Flutterby Designs
Hi everyone! Stopping by with another project share for you today, this one for Flutterby Designs. I am very excited about this layout as it features the brand new 'Fur-ever Friends' collection and new release Flutter Colour paints! (These are scheduled for release into the Flutterby Designs store tomorrow night at 8pm - you won't want to miss it!) This page also features our family's new kitten, Genghis.
Here is what I created...
I started this layout by creating my background using the new Flutter Colour paint set (the colours are so divine!) I used a few drops of the aqua paint in some water to create a watercolour paint, which I brushed over my cardstock using a wide brush. I then used one of the new release stencils along with some purple paint, and stippled some random bubbles onto my background. Finally, I added some splats of the new green paint over the top and left it all to dry.
Once my background was dry, I fussy cut my title from one of the Fur-ever Friends Everyday Etc cards and adhered it onto my photo. I then created a layered mat for my photo to sit on from the coordinating filler card pack. (I am not normally a purple person, but am so loving the colour combination here!)
Under my photo, I also added a frame (Frame 47 'Mad About You' Photo Cut Out), which I cut in half; a Fur-ever Friends page tab; and some messy cotton thread for texture. The tab on my photo came from the Fur-ever Friends die cut bits & bobs pack.
To add some extra dimension to my layout and to tie in with the circular theme I had going on, I also added some of my favourite wood veneer circles, which I painted with the new green paint. (How perfect is the colour match between the paint and the paper?!) Inside one of the circles I popped one of the Fur-ever Friends flair buttons (from the cat set).
Finally, it was time for me to put the finishing touches on my layout. I used the cute little paw print stickers and the meow sticker from the Fur-ever Friends Sticky Quotes sheet; some blue enamel dots (from the neon set); some stamping and black mist splatters.
I also added my handwritten journaling and a couple of white Tiny Sticky Quotes - there is no project that these stickers don't belong on! haha (PS - I hope you like the tongue-in-cheek way I used the meow sticker in my journaling.) ;)
So, mark it in on your calendars or set a reminder on your phone - the new release lines will go live in the Flutterby Designs store tomorrow night (Sunday 5th Feb) at 8pm (that will be 7pm if you are here in Qld like me). If you have a pet (and not just dogs or cats), you are going to NEED this collection!
Til next time, happy scrapping! X
Here is what I created...
"Purr-fect"
Once my background was dry, I fussy cut my title from one of the Fur-ever Friends Everyday Etc cards and adhered it onto my photo. I then created a layered mat for my photo to sit on from the coordinating filler card pack. (I am not normally a purple person, but am so loving the colour combination here!)
Under my photo, I also added a frame (Frame 47 'Mad About You' Photo Cut Out), which I cut in half; a Fur-ever Friends page tab; and some messy cotton thread for texture. The tab on my photo came from the Fur-ever Friends die cut bits & bobs pack.
To add some extra dimension to my layout and to tie in with the circular theme I had going on, I also added some of my favourite wood veneer circles, which I painted with the new green paint. (How perfect is the colour match between the paint and the paper?!) Inside one of the circles I popped one of the Fur-ever Friends flair buttons (from the cat set).
I also added my handwritten journaling and a couple of white Tiny Sticky Quotes - there is no project that these stickers don't belong on! haha (PS - I hope you like the tongue-in-cheek way I used the meow sticker in my journaling.) ;)
So, mark it in on your calendars or set a reminder on your phone - the new release lines will go live in the Flutterby Designs store tomorrow night (Sunday 5th Feb) at 8pm (that will be 7pm if you are here in Qld like me). If you have a pet (and not just dogs or cats), you are going to NEED this collection!
Til next time, happy scrapping! X
Thursday, 2 February 2017
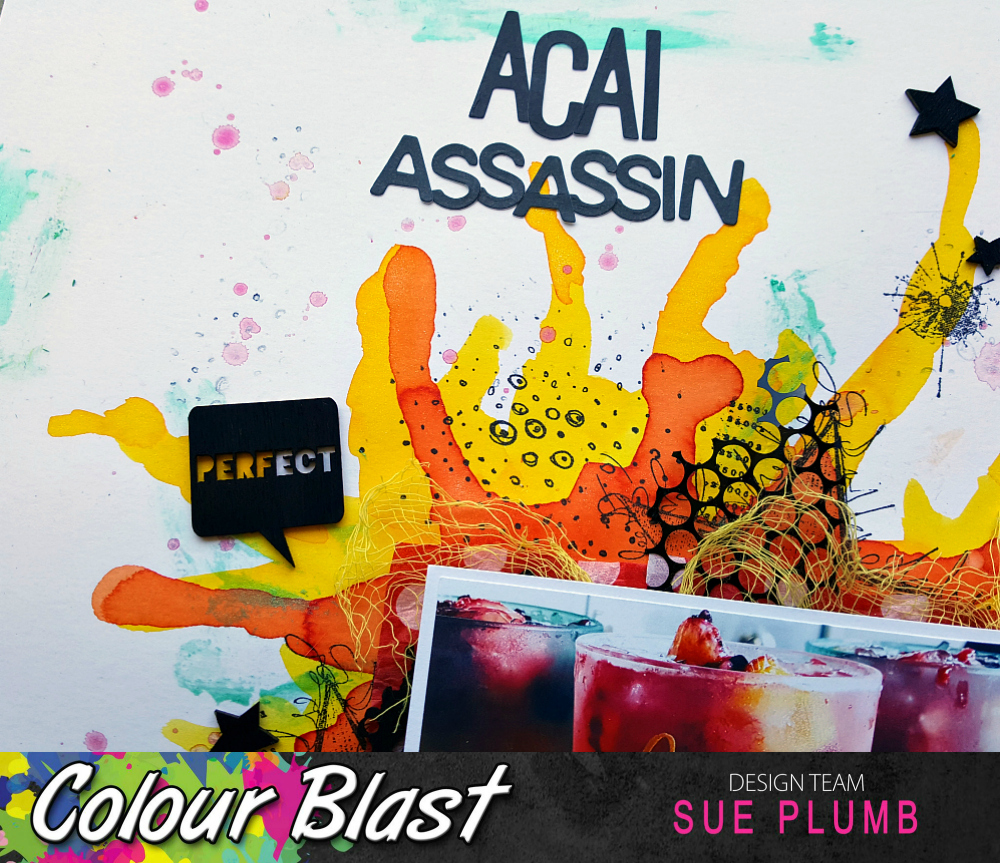
Acai Assassin | Colour Blast
Hi everyone! I am excited to be sharing my first project as a member of the Colour Blast design team. (Although I have created many pages using the products before, it's nice to share my first official one.) Today I have a layout to share that features one of my favourite things - cocktails! To match the theme of my shot, I wanted to create a background not only incorporating the colours from the image, but also one that looked as though drinks had been spilled on it.
I started my page by mixing up a couple of Colour Shimmer Dusts with water (Sunflower and Candy) and first applied the Sunflower to my cardstock using a water brush. I then applied some drops of the diluted Candy Shimmer Dust over the top and then tilted my page around to let them run together. (Make sure you use complimentary colours for this - you don't want to make mud!)
Next, I used Colour Shimmer Spray in Fire Engine to add some splatters around the page. (I simply unscrewed the cap and used that to flick it about.) Then I added some stamping using some of my fave Viva Las VegaStamps and black ink to provide contrast to the page.
At this point I decided that I needed to draw in the teal tone from the photo, but I didn't want to overwhelm the predominance of warm tones I had already used. So I grabbed my Envy Colour Paste and used my finger to smear some subtle colour around my page.
After the background was dry, it was simply a matter of adding the remaining elements of my page. I used tissue paper, punchinella, wood veneer and muslin (all from D-lish Scraps) to form layers under my photo. I love the different contrasting textures this combination provides.
I then added my embellishments - more D-lish Scraps wood veneer pieces; a Charms Creations star; and a flair button from Flutterby Designs; as well as some messy cotton thread for further texture.
Then it was simply a matter of adding my journaling, a title (I used Cocoa Vanilla Studio alphas) and the date and I was done!
Thanks for stopping by to check out my first Colour Blast project. I will be back soon with more projects to share.
Until then, happy scrapping! X
I started my page by mixing up a couple of Colour Shimmer Dusts with water (Sunflower and Candy) and first applied the Sunflower to my cardstock using a water brush. I then applied some drops of the diluted Candy Shimmer Dust over the top and then tilted my page around to let them run together. (Make sure you use complimentary colours for this - you don't want to make mud!)
Next, I used Colour Shimmer Spray in Fire Engine to add some splatters around the page. (I simply unscrewed the cap and used that to flick it about.) Then I added some stamping using some of my fave Viva Las VegaStamps and black ink to provide contrast to the page.
At this point I decided that I needed to draw in the teal tone from the photo, but I didn't want to overwhelm the predominance of warm tones I had already used. So I grabbed my Envy Colour Paste and used my finger to smear some subtle colour around my page.
After the background was dry, it was simply a matter of adding the remaining elements of my page. I used tissue paper, punchinella, wood veneer and muslin (all from D-lish Scraps) to form layers under my photo. I love the different contrasting textures this combination provides.
I then added my embellishments - more D-lish Scraps wood veneer pieces; a Charms Creations star; and a flair button from Flutterby Designs; as well as some messy cotton thread for further texture.
Then it was simply a matter of adding my journaling, a title (I used Cocoa Vanilla Studio alphas) and the date and I was done!
Thanks for stopping by to check out my first Colour Blast project. I will be back soon with more projects to share.
Until then, happy scrapping! X
Friday, 27 January 2017
Best Summer Fun | Cocoa Vanilla Studio
Hi everyone! Just popping in today to share my latest layout for Cocoa Vanilla Studio using the delicious Endless Summer collection again. This time, I have opted for a summer themed boy layout featuring a couple of pics of the boys I snapped at the local pool. I love how versatile this collection has been for me, allowing me to use it in a variety of styles.
"Best Summer Fun"
I used a combination of both the Coastal Chill and Sunbleached papers as the base for my layout. I also added a couple of pieces of the Aloha Sunshine paper as a mat where I was going to place my photos. I then used one of my new stamps from Viva Las VegaStamps to add a bit of subtle background interest behind my photos and where my title was going to go.
Once my photos were in place, I used the film strip (cut into two pieces) from the die cut ephemera pack on either side of my photos along some messy cotton thread, and a die cut cloud above my photo. I echoed the cloud theme using a couple of wood veneer clouds.
To tie in the wood elements further, I also added a wood veneer tab onto one of my photos; the wood grain print flair button; a couple of Woodies; and a wood veneer arrow around my photos. I also popped in the cute icecream puffy sticker; more die cut ephemera pieces; and some enamel shapes.
To follow the theme I had created, I used a combination of wood veneer pieces for my title, which I spaced simply along the horizontal strip across my page.
To finish, I added some simple journaling; a few stamped phrases and the date; and some splatters of blue mist.
Thanks for stopping by today so I could share this with you. I will be back again soon with another project to share.
Until then, happy scrapping! X
Thursday, 19 January 2017
You Stole My Heart | Flutterby Designs
Hi everyone!
I hope all my fellow Aussies are enjoying their summer; time is certainly getting away from us and it will be back to school time before we know it! I know I have been a little quiet on here the past couple of weeks, but rest assured I have had PLENTY going on behind the scenes and there will be lots of projects to share soon.
Today I have another Flutterby Designs layout to share with you - this one was again created using the Mad About You collection, and in stark contrast to my other pages created with this collection, is a nice, soppy, romantic one...
The photo I used was one that was taken on a trip to Rainbow Beach on the Fraser Coast in Queensland a few years ago. It was my partner's birthday (which also happens to be our anniversary) and I was 23 weeks pregnant with our boys at the time. He found this heart shaped rock for me on our walk up to the sandblow, and that was what he was holding in front of my belly in the photo. (And yes, I still have the rock!)
I knew exactly which of the Mad About You Everyday Etc photo cards I was going to use as my title card for this layout, so wanted to create a mixed media background to match it. I started with my teal Flutter Colour paint, which I watered down to make a beautiful watercolour paint. Then using a wide brush, I simply brushed it across my cardstock. After that I added some stamped bubbles and a little texture using some of my Viva Las VegaStamps stamps. I then used one of my Flutterby mini stencils and white Flutter Colour paint to apply some random small circles over the top, which I did by stippling the paint on with a stiff brush through the stencil. I also mixed a little white paint with water and splattered some around my page, along with some blue mist.
Once the background was dry, I chose some of the Mad About You Everyday Etc filler cards to use as a layered mat for my photo. I used a wood veneer geotag to draw attention to my photo, which I altered simply with some watercolour paint. I also added the XOXO page tab and used the small frame from the Mad About You Sticky Quotes sticker sheet (I cut it in half and layered the pieces back on top of each other). On top of the frames I popped a couple of white tiny sticky quotes.
I used several wood veneer circles and the smaller confetti circles around my page, which I also coloured simply using a watercolour paint. You can see where I roughly wrapped some cotton thread around the circle used to highlight the quotes next to my photo.
For my embellishment cluster on the corner of my photo, I layered the & sticker from the sticky quick quotes sheet with a Charms Creations heart, some more cotton thread, and the gorgeous I love you to infinity & beyond flair button (from set #422).
Along the bottom edge of my page I added the die cut script i love you quote from the Mad About You Die Cut Bibs & Bobs pack. I popped an extra tiny sticky quote below it and a die cut heart (painted with watercolour to match my geotag veneer) next to it.
After all that was done, I added a few more die cut hearts, some sequins and a few stamped phrases and my page was complete. I was really happy with how it all came together...despite the lack of any of my favourite "sentence enhancers" on this one.
I will be back soon with another project to share. Until then, happy scrapping! X
I hope all my fellow Aussies are enjoying their summer; time is certainly getting away from us and it will be back to school time before we know it! I know I have been a little quiet on here the past couple of weeks, but rest assured I have had PLENTY going on behind the scenes and there will be lots of projects to share soon.
Today I have another Flutterby Designs layout to share with you - this one was again created using the Mad About You collection, and in stark contrast to my other pages created with this collection, is a nice, soppy, romantic one...
The photo I used was one that was taken on a trip to Rainbow Beach on the Fraser Coast in Queensland a few years ago. It was my partner's birthday (which also happens to be our anniversary) and I was 23 weeks pregnant with our boys at the time. He found this heart shaped rock for me on our walk up to the sandblow, and that was what he was holding in front of my belly in the photo. (And yes, I still have the rock!)
I knew exactly which of the Mad About You Everyday Etc photo cards I was going to use as my title card for this layout, so wanted to create a mixed media background to match it. I started with my teal Flutter Colour paint, which I watered down to make a beautiful watercolour paint. Then using a wide brush, I simply brushed it across my cardstock. After that I added some stamped bubbles and a little texture using some of my Viva Las VegaStamps stamps. I then used one of my Flutterby mini stencils and white Flutter Colour paint to apply some random small circles over the top, which I did by stippling the paint on with a stiff brush through the stencil. I also mixed a little white paint with water and splattered some around my page, along with some blue mist.
Once the background was dry, I chose some of the Mad About You Everyday Etc filler cards to use as a layered mat for my photo. I used a wood veneer geotag to draw attention to my photo, which I altered simply with some watercolour paint. I also added the XOXO page tab and used the small frame from the Mad About You Sticky Quotes sticker sheet (I cut it in half and layered the pieces back on top of each other). On top of the frames I popped a couple of white tiny sticky quotes.
I used several wood veneer circles and the smaller confetti circles around my page, which I also coloured simply using a watercolour paint. You can see where I roughly wrapped some cotton thread around the circle used to highlight the quotes next to my photo.
For my embellishment cluster on the corner of my photo, I layered the & sticker from the sticky quick quotes sheet with a Charms Creations heart, some more cotton thread, and the gorgeous I love you to infinity & beyond flair button (from set #422).
Along the bottom edge of my page I added the die cut script i love you quote from the Mad About You Die Cut Bibs & Bobs pack. I popped an extra tiny sticky quote below it and a die cut heart (painted with watercolour to match my geotag veneer) next to it.
After all that was done, I added a few more die cut hearts, some sequins and a few stamped phrases and my page was complete. I was really happy with how it all came together...despite the lack of any of my favourite "sentence enhancers" on this one.
I will be back soon with another project to share. Until then, happy scrapping! X
Tuesday, 3 January 2017
H & K | Flutterby Designs
Hi everyone! Popping in today to share my first layout for Flutterby Designs for 2017. This one features a photo of my boys that I took recently as I dropped them off for daycare. No reason - a "just because". Sometimes those photos are the best ones, aren't they?
I used the Mad About You collection for this one - proving that this range doesn't have to be just for those you are mad about, it can also be for the ones who drive you mad! ;)
I started by adding a bit of colour to a sheet of patterned paper using some Flutter Colour paints. (I applied simply by spreading them across my page with a palette knife.) Once dry, I added some Colour Blast Colour Paste through one of my Flutterby mini stencils on top of the paint, and then topped that off with a drizzle of pink Flutter Colour paint.
I adore this together Everyday Etc card - I have to admit I have been hoarding it until now because I loved it so much. I layered it on top of a hot pink Filler Card (which I also used part of behind my photo) to help pick up the pink from the heart on it.
Besides the Filler Card, you can also see I used part of a frame from the Mad About You Die Cut Bits & Bobs pack under my photo, which I topped with some messy thread and a gorgeous flair button. Above the photo, I added a Page Tab and the cute die cut geotag (also from the Bits & Bobs pack).
I embellished directly onto the photo using an offcut from a Filler Card, a sticker from the Mad About You Sticky Quick Quotes sheet, and a rainbow heart sticker.
I really wanted to use the & card as part of my title, so decided to fussy cut it out and then use another Filler Card to handcut the H and K from, which I attached with some tiny staples. On top of the ampersand I added a Tiny Sticky Quote and a die cut heart.
For the final part of my layout, I added a couple more of the Sticky Quick Quotes stickers, a tiny Sticky Quote and another die cut heart. I used a wood veneer circle (which I coloured white with a Posca pen) to highlight the "you drive me crazy" quote. After that, a few black splatters of mist and I was done!
Thanks for stopping by today so I could share this with you. *A reminder that the Flutterby Designs store is currently closed for the Christmas / New Year break and will be back online on Wednesday the 11th January.*
I will be back soon with another creation to share. Until then, happy scrapping! X
I used the Mad About You collection for this one - proving that this range doesn't have to be just for those you are mad about, it can also be for the ones who drive you mad! ;)
I started by adding a bit of colour to a sheet of patterned paper using some Flutter Colour paints. (I applied simply by spreading them across my page with a palette knife.) Once dry, I added some Colour Blast Colour Paste through one of my Flutterby mini stencils on top of the paint, and then topped that off with a drizzle of pink Flutter Colour paint.
I adore this together Everyday Etc card - I have to admit I have been hoarding it until now because I loved it so much. I layered it on top of a hot pink Filler Card (which I also used part of behind my photo) to help pick up the pink from the heart on it.
Besides the Filler Card, you can also see I used part of a frame from the Mad About You Die Cut Bits & Bobs pack under my photo, which I topped with some messy thread and a gorgeous flair button. Above the photo, I added a Page Tab and the cute die cut geotag (also from the Bits & Bobs pack).
I embellished directly onto the photo using an offcut from a Filler Card, a sticker from the Mad About You Sticky Quick Quotes sheet, and a rainbow heart sticker.
I really wanted to use the & card as part of my title, so decided to fussy cut it out and then use another Filler Card to handcut the H and K from, which I attached with some tiny staples. On top of the ampersand I added a Tiny Sticky Quote and a die cut heart.
For the final part of my layout, I added a couple more of the Sticky Quick Quotes stickers, a tiny Sticky Quote and another die cut heart. I used a wood veneer circle (which I coloured white with a Posca pen) to highlight the "you drive me crazy" quote. After that, a few black splatters of mist and I was done!
Thanks for stopping by today so I could share this with you. *A reminder that the Flutterby Designs store is currently closed for the Christmas / New Year break and will be back online on Wednesday the 11th January.*
I will be back soon with another creation to share. Until then, happy scrapping! X
Sunday, 1 January 2017
High 5 | Scrap the Boys January Challenge
Happy New Year everyone!
I hope you all had a fabulous New Year's Eve! (As I am writing this post well in advance, I am guessing there is a fair chance that I may be nursing a hangover today...hehe)
So I am here today to share my first design team layout for the new year - kicking off as I usually do, with Scrap the Boys. The first challenge for the year is all about numbers...
I created this layout as a tribute to one of my boys - Hunter. Every time I see him do things like climb mountains (just like in these recent photos), he inspires me. He has an amazing attitude to life and doesn't give in. I often remind myself that I need to be more like him.
I used a combination of the Cocoa Vanilla Studio Totally Rad collection; the Flutterby Designs No Excuses collection; and stamps from Viva Las VegaStamps for this layout and I LOVE the result! You can see that I also included some extra mixed media in the form of white Flutter Colour paint, green Dylusions ink spray (applied with a waterbrush) and some splattered navy mist.
It's no secret I love layering - here you can see where I have clustered together a Cocoa Vanilla acetate star, label sticker, die cut ephemera pieces and flair button, along with some cotton thread for texture.
The large high 5 title was cut from a Flutterby Designs Everyday Etc card, as was the excuse quote I ran vertically down the right edge of my page, and I also included a few Flutterby tiny sticky quotes too.
Here you can see close up some of the awesome stamps I used from Viva Las VegaStamps, and also a few of the embellishments from Cocoa Vanilla Studio - button, enamel dot, woodie, acetate star.
Thanks for stopping by today. I hope you have popped the Scrap the Boys January challenge on your list now. You have until the end of the month to link your entry up via the STB blog. And don't forget to pop over and see what the rest of the team created too!
Til next time, happy scrapping! X
I hope you all had a fabulous New Year's Eve! (As I am writing this post well in advance, I am guessing there is a fair chance that I may be nursing a hangover today...hehe)
So I am here today to share my first design team layout for the new year - kicking off as I usually do, with Scrap the Boys. The first challenge for the year is all about numbers...
And here is what I came up with...
"High 5"
I used a combination of the Cocoa Vanilla Studio Totally Rad collection; the Flutterby Designs No Excuses collection; and stamps from Viva Las VegaStamps for this layout and I LOVE the result! You can see that I also included some extra mixed media in the form of white Flutter Colour paint, green Dylusions ink spray (applied with a waterbrush) and some splattered navy mist.
It's no secret I love layering - here you can see where I have clustered together a Cocoa Vanilla acetate star, label sticker, die cut ephemera pieces and flair button, along with some cotton thread for texture.
The large high 5 title was cut from a Flutterby Designs Everyday Etc card, as was the excuse quote I ran vertically down the right edge of my page, and I also included a few Flutterby tiny sticky quotes too.
Here you can see close up some of the awesome stamps I used from Viva Las VegaStamps, and also a few of the embellishments from Cocoa Vanilla Studio - button, enamel dot, woodie, acetate star.
Thanks for stopping by today. I hope you have popped the Scrap the Boys January challenge on your list now. You have until the end of the month to link your entry up via the STB blog. And don't forget to pop over and see what the rest of the team created too!
Til next time, happy scrapping! X
Saturday, 24 December 2016
Push Yourself | Flutterby Designs
Hi everyone! Well here we are..."it's the final countdown" (I hope you sang that in your head like I did!) I hope this finds you all well and not too frantic in the final Christmas countdown. (With 3 young kids in our house, it's fairly safe to say the level of excitement here is currently sitting around DEFCON 2! haha)
Anyway, I am here today to share another of my Flutterby Designs creations with you. Today's layout was inspired by my current journey of getting myself in better shape. After having spent so much of my time and energy looking after everyone around me in recent years, I was coming a very poor last. So I have changed my eating habits and am getting my lazy ass moving again. It's very true when they say that the hardest part is starting. But I am finding it is also difficult to maintain the momentum some days, especially doing it all on my own. I created this page so that I can display it to remind me to keep going every day.
After prepping my cardstock with some of the new Colour Blast heavy gesso, I created a background using a combination of Colour Blast Colour Sprays and stamps from Viva Las VegaStamps. I wanted to stick with neutral tones (much like my shoes pictured), that would allow some bright colours to pop from it. I then added texture using some Colour Blast Colour Paste and one of my Flutterby mini stencils, then flicked some white Flutter Colour paint over the top.
I used the No Excuses collection for this layout. The Everyday Etc card I chose to use for the push yourself title and the no one is going to do to it for you quote both really struck a chord with me as I tell myself this every day. I used some of the coordinating filler cards which I cut into pieces and layered together as a mat for my photo.
I highlighted my photo by adding a white cord frame on top of it, then used a few wood veneer circles (colored black) to help echo the circular theme. I also coloured the everyday wood veneer black to match.
Some messy cotton thread helped add some subtle texture; whilst the neon enamel dots added a few extra pops of coordinating colour and tied in with the other circular elements. A few well chosen white tiny sticky quotes placed around my page helped to reinforce my theme as well.
And what Flutterby creation of mine would be complete without a flair button? This be your own hero one, from set #410 which coordinates with the No Excuses range, was just perfect!
Thanks for stopping by today so I could share this with you. If you are making new year resolutions to get in shape, then make sure you put the No Excuses collection on your list to document your progress!
Finally, I would like to take this opportunity to wish you and your families a very merry Christmas and happy new year. I will be back again to share lots of my Flutterby creations in 2017.
Til then, happy scrapping! X
Anyway, I am here today to share another of my Flutterby Designs creations with you. Today's layout was inspired by my current journey of getting myself in better shape. After having spent so much of my time and energy looking after everyone around me in recent years, I was coming a very poor last. So I have changed my eating habits and am getting my lazy ass moving again. It's very true when they say that the hardest part is starting. But I am finding it is also difficult to maintain the momentum some days, especially doing it all on my own. I created this page so that I can display it to remind me to keep going every day.
I used the No Excuses collection for this layout. The Everyday Etc card I chose to use for the push yourself title and the no one is going to do to it for you quote both really struck a chord with me as I tell myself this every day. I used some of the coordinating filler cards which I cut into pieces and layered together as a mat for my photo.
I highlighted my photo by adding a white cord frame on top of it, then used a few wood veneer circles (colored black) to help echo the circular theme. I also coloured the everyday wood veneer black to match.
Some messy cotton thread helped add some subtle texture; whilst the neon enamel dots added a few extra pops of coordinating colour and tied in with the other circular elements. A few well chosen white tiny sticky quotes placed around my page helped to reinforce my theme as well.
And what Flutterby creation of mine would be complete without a flair button? This be your own hero one, from set #410 which coordinates with the No Excuses range, was just perfect!
Thanks for stopping by today so I could share this with you. If you are making new year resolutions to get in shape, then make sure you put the No Excuses collection on your list to document your progress!
Finally, I would like to take this opportunity to wish you and your families a very merry Christmas and happy new year. I will be back again to share lots of my Flutterby creations in 2017.
Til then, happy scrapping! X
Subscribe to:
Posts (Atom)