Thursday 31 August 2017

Too Glam to Give a Damn | Colour Blast

Hi everyone! Popping in to share my latest Colour Blast design team project with you. Today I have a project I actually created whilst on retreat, featuring a fun Snap Chat photo of my daughter and I together and (of course), lots of Colour Blast goodness!


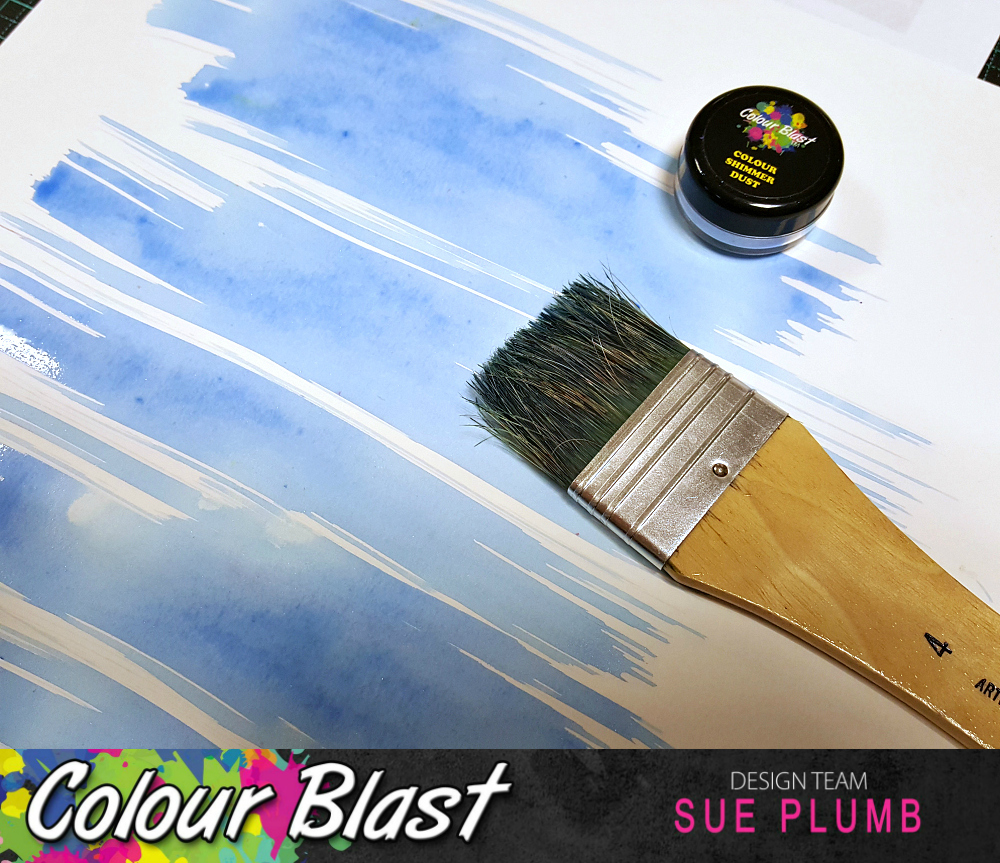
My colour palette for this page was guided by the colours in the photo, so I started by creating my background using some Duke Colour Shimmer Dust, which I mixed with a little water and brushed onto my cardstock.


As part of our goody bag we received at retreat, we were given the "too glam to give a damn" cut file cut from white cardstock; which I decided to use as my layout title. I painted it using a small brush and the Colour Shimmer Dust left over from my background.


The next step on my background was to apply some contrast, so I used a star stencil from Flutterby Designs to apply some Blush Colour Paste to random areas of my page. I also used my palette knife to add a few random "smears" of colour, then set it aside to dry.


The final step in my background was to apply some extra splatters of colour, so I used Colour Shimmer Sprays (Blush, Stormy Weather and Bling) and flicked them around the page.


Once all my mediums were dry, I constructed the remainder of my page. I started by adding a paper doily to the focal area of my page to act as my photo mat and topped it with some frayed gauze.


I then backed my title piece with a project life card and a small piece of scalloped glitter card.


I then mounted my photo and title piece on some scrap cardboard to raise them up, and tucked an extra piece of the scalloped card and some messy pink thread in behind each of them.


Next, I added a Charms Creations handmade heart embellishment, which I topped with more pink thread and a flair button from Cocoa Vanilla Studio.


To finish off my page, I added a few punched glitter butterflies; some sequins and stamped phrases and I was done! (Pages like this are ideal for those who are on a scrapping budget, as there were very few additional materials used beyond the mediums.)


Thanks for stopping by today so I could share this with you. I will be back again soon with another project. Until then, happy scrapping! X

Sunday 27 August 2017

F*ck Yeah | Flutterby Designs Retreat Challenge

Hi everyone! Just a quick post from me today to share a layout I created recently for a challenge at the Flutterby Designs 'Create by the Lake' Retreat. The challenge was a quote challenge and this is what I created...

"Fuck Yeah"

I was in a definite mixed media kind of mood at retreat, so of course I used some of my Colour Blast goodies to create my background. I started with some stamping on my cardstock, using a Carabelle Studio stamp (borrowed from Krisy Podolak), and one of my own Darkroom Door stamps. I then mixed up some Duke Colour Shimer Dust with water and used a water brush to apply it to my background. I also added some splatters while I had a wet brush.


Next, I created some layers for my photo to sit on. I used one of the Everyday Etc cards from the new Flutterby 'Flawsome' collection; some tissue paper; a small paper bag; die cut glitter frame; paper doily and some frayed gauze for texture.

Anita had printed each of the challenges onto cards for us, so I decided to use the challenge card and cut the quote directly from it to adhere to my layout.


Next, I shaped a circular wire frame for my photo, which I attached using tiny staples before adhering my photo to the page. I popped a Charms Creations star, topped with one of the flair buttons from the 'Flawsome' range, alongside my photo.


To draw in more black, I added some wood veneer circles and arrows around my page; then the fuck wood veneer (my last one! *sob*), all of which were coloured black using a Sharpie pen. I completed my title using some black alpha stickers from Cocoa Vanilla Studio.


To finish off, I added some stamped phrases with a Typo stamp; and some splatters of Colour Blast 'Stormy Weather' Colour Shimmer Spray and 'Road Base' Colour Spray. So in love with the grungy, edgy, feel of this page!

I was fortunate enough to win a prize for this page - a fabulous "Paint-me-Dori" from MadeByNinnyNoo. I was SO thrilled to win this prize, as I had checked them out after seeing Anita Rodway share her amazing "self portrait" finished cover. If you are a fan of Traveler's Notebooks or art journaling, then I highly recommend you check these out. The quality is fantastic! You can find NinnyNoo on Instagram HERE and you can find her Etsy shop HERE. I will share a post with my finished cover soon!

Thanks for stopping by today so I could share this with you. I have been doing lots of creating with two recent retreats under my belt, so there are lots more projects still to come!
Until next time, happy scrapping! X

Thursday 24 August 2017

Love Us | Charms Creations Guest Designer

Hi everyone! Just popping in to share a layout I created for my guest designer spot for Charms Creations this month. I was already a big fan of Charms handmade embellishments (and have been since the very beginning!), so I was thrilled when she asked me if I would do a guest spot for her. You have probably seen her embellishments popping up regularly on my pages for some time, and there are plenty of pages I could have shared, but I wanted to create some fresh ones to showcase them.
This is the first...

"Love Us"

I started this page with a sheet of black cardstock, which I brushed lightly with some Colour Blast heavy white gesso and a wide brush. I then used my 'Hugs & Kisses' stencil from Flutterby Designs to apply some Colour Blast 'Fire Engine' Colour Paste to selected areas of my page. Over the top of the paste, I drizzled some 'Artic White' Flutter Colour paint.


Once my background was dry, I then started work constructing the main focal area. I chose a variety of elements to form my layers including Everyday Etc filler cards and a page tab from the Flutterby Designs 'Mad About You' collection; a paper doily and striped bitty bag from D-lish Scraps; die cut pieces of glitter cardstock; and some black cotton thread. I stapled some of the layers together before sticking it all down onto my page and adding my photo on top.


I then added my Charms Creations embellishments - I used the Glitter Glam heart & star set, which are a new addition to the Charms range. I placed the heart along one of my paint drizzles in the top right corner of my layout; and then placed the star on the bottom left corner of my layout, topping it with a Flutterby Designs flair button.


I also added some stickers from the coordinating 'Mad About You' Sticky Quotes sheet and pieces from the Die Cut Bits & Bobs pack around my page.


My title was fussy cut from a couple of the 'Mad About You' Everyday Etc cards and it was perfect against the black background.


To finish my page I added some small randomly placed crosses (kisses) with a white gel pen and a few splatters of white ink spray.

Thanks for stopping by today so I could share this with you. If you haven't stopped by the Charms Creations store lately to see what's new you can find it HERE (And for anyone international who might be wondering, yes, I am sure Charm would be happy to post internationally, just pop over to the contact page HERE and get in touch if you are interested.)
I will be back again soon with another project to share. Until then, happy scrapping! X

Tuesday 22 August 2017

You Rock | Cocoa Vanilla Studio

Hi everyone! Popping in today to share my latest design team project with you all. This one was created for Cocoa Vanilla Studio for this week's 'All About Colour' theme we are focusing on.

Colour is such an integral part of creating, and the colour choices you make for your layout design can help influence the mood or theme you want to convey. For this page, I wanted to document this cute photo of my boys, so I allowed my colour choices to be dictated by the colours in the photo.

"YOU ROCK"

You can see that I selected the blue as my main tone; followed by the complimentary lime green; then some small pops of red as the accent colour. I used elements from the 'You Rock' and 'Totally Rad' boy collections for this page to achieve the combination of colours I was after.

I started with the 'Stellar' paper from Totally Rad; and applied some Colour Blast 'Cobalt' Colour Shimmer Dust, which I mixed with water and applied with a small brush to define the focal area of my page. I held my page vertically whilst doing so, which allowed the excess paint to run down the page. I then added some splatters of Colour Blast 'Carribean' Colour Spray to my page and allowed it to dry.


Once dry, I cut the background paper down to measure approx 11x11" and then adhered it to the B side of the 'Galactic' paper from the 'You Rock' collection to form a border. I then used more of the 'Galactic' paper to mat under my photo, and added an extra layer with the lime striped 'Mix Tape' paper from 'Totally Rad' and some frayed gauze and messy lime green thread for texture.


I then began embellishing around my photo, using pieces from the die cut ephemera packs from each collection; along with some fussy cut stars from the 'Starshine' paper to create clusters. I complimented each of the clusters with some 'Totally Rad' enamel shapes and added one of the 'You Rock' flair buttons to the one at the top.


I used one of the large 'You Rock' wood veneer shapes as my title, and coloured it using a Posca pen so that it would pop from the page. I then stamped the date and added a few splatters of Colour Blast 'Apple of My Eye' Colour Shimmer Spray and 'Road Base' Colour Spray around my page and I was finished.

Thanks so much for stopping by today so I could share this with you. Stay tuned to the Cocoa Vanilla Studio blog this week, so the team can inspire you to break out all those gorgeous bold colours in your stash and get creating with them!
Until next time, happy scrapping! X

Saturday 19 August 2017

Go Big or Go Home | Flutterby Designs

Hi everyone! Today I have a project to share that was created for Flutterby Designs using lots of goodies from the new 'Flawsome' collection. (I actually completed this one while I was away on the Flutterby retreat!) I scrapped a Snap Chat selfie that I took with my fave vampire filter (isn't it fabulous? I love how the blood trickles out when you open your mouth!)


I started with a mixed media background for this page - first some Colour Blast black heavy gesso smeared onto my cardstock, then I mixed some 'Grape Soda' Flutter Colour paint with a little water and splattered it around my page using a small brush.


I knew EXACTLY which quote from the new collection that I was going to pair with my photo and that was the reason for my colour choices for this page. (Could I have used anything else but - I already know I am going to hell. At this point it's really GO BIG or go home?! It was perfect!) I fussy cut the quote from one of the 'Flawsome' Everyday Etc cards.


I used a number of different filler cards for my layered photo mat behind my photo. Some were from the coordinating 'Flawsome' pack, and some from the 'Happy Together' filler card set. I also added a page tab from the 'Flawsome' sheet; some frayed gauze; and black cotton thread to my layers.


The next thing I did was to create a small cluster alongside my photo. I used the die cut quote from the 'Flawsome' Bits & Bobs pack, a flair button and a black Tiny Sticky Quote.


Next, I added a few circle wood veneer pieces (which I coloured with a white paint pen) randomly around my page and a Charms Creations arrow to help highlight my quote.


To finish off, I added a few stamped hell yeah phrases using a Typo stamp, and then splattered some black and red Colour Blast Colour Sprays around.


Thanks for stopping by today so I could share this with you. I will be back again soon with another project to share. Until then, happy scrapping! X

Thursday 17 August 2017

Adorable | Colour Blast

Hi everyone! I am popping in today to share my latest Colour Blast design team project with you.
I am sure I am not the only person who has lots of items in their stash gathering dust, and one of my big ones is flowers. It's been quite a while since I made a layout using them, so I thought it was time I dusted them off and got some onto a page. And as long as I was embracing flowers, I figured I might as well go the whole girly way, and create with some beautiful pink from the Colour Blast range!

"Adorable"

So how did I go about creating this page? Here's a pictorial step by step of my process using the various mediums.


1. I prepared my cardstock for my background by spreading with a thin coat of White Heavy Gesso. (I used an old gift card to achieve a smooth, even coverage.)

2. Once the gesso was dry, I took my cardstock outside (to minimise mess) and stood it up vertically.

3. Using Blush Colour Shimmer Spray, I sprayed along the top 1/3 of my page. I sprayed until the page was quite wet, which allowed the colour to pool and run down the page.


4. Once dry, I tore the edges from the page (I took off approx. 1/2" all around) and distressed them using my finger; then adhered it onto a sheet of coloured cardstock (another thing gathering dust in my stash) to form my page base.

5. I then took one of my older stencils with a baroque style pattern (because it was the day for stash busting) and used a palette knife to apply some Fire Engine Colour Paste to the top 1/3 of my page.

6. I then allowed the paste to dry.


7. Once the paste had dried, I then took my palette knife and used it to spread some Blush Colour Paste over the top to help further define the focal area where my photo was going to go. I used a fairly rough application, as I wanted the paste to have good, defined texture to contrast the smooth edges of the stencilled design.

8. You can see how the Blush Colour Paste has settled down in the areas between the stencilled pattern; and how it has helped soften the bright colour of the Fire Engine paste. I deliberately left some areas of the pattern untouched though, to allow the deeper colour to pop.


9. After the second Colour Paste had dried, I added some splatters to my page using Steel and Stormy Weather Colour Shimmer Sprays and some Bubblegum Colour Spray. (I simply took the nozzles from the bottles and flicked them around my page.)

10. Whilst my background was drying, I took a Blush Colour Shimmer Cube and used it to colour the Charms Creations fabric heart and two wood veneer hearts I was going to use to embellish my page. After spritzing the surface of the cube with water and leaving to stand for a minute, I used a small flat brush to apply the colour directly onto my embellishments then set them aside to dry.

Next, it was simply a matter of constructing my page.


I used layers of tissue paper, a paper doily and some frayed gauze as a mat under my photo. I also added some scrap cardboard to mount my photo up slightly.


I added the painted Charms Creations heart, which I topped with a flair button along the edge of my photo; then added small clusters of paper flowers on either side of my photo.


Below my photo I added another cluster of assorted flowers; a sequin bow; and then the two wood veneer hearts further down my page. (Flowers, bow, paper doily and flair button all from D-lish Scraps.)


To finish my page I added a few stamped phrases and I was done!

Thanks for stopping by so I could share this with you today. I will be back again soon with another project. Until then, happy scrapping! X

Monday 14 August 2017

Shameless | Scrap & Chat Retreat Challenge

Hi everyone!
Just a quick share from me today of a layout I completed whilst at the Scrap & Chat retreat in Victoria last weekend. It was one seriously AWESOME retreat with such a fabulous talented crew and I am already counting down until next year!
Here's our group photo...


Now, onto my layout. This page was completed for one of the many challenges we had available to participate in. We were each given a stencil, wood veneers and a DIY fabric button from the lovely Jo at Kinder Kreations that we had to use on a project.

Here's what I created (and yes, there is a swear word on it)...


I went with a black cardstock background for this one and then used some Colour Blast 'Sienna' Colour Paste, which I smeared around with a palette knife. Once dry, I applied 'Dusty Charcoal' Colour Paste using the Kinder Kreations alphabet stencil over the top of the 'Sienna' paste.


I then added some texture to my background using some plasterers joint tape and some frayed gauze, before adding my photo on top, which was mounted on some cardboard to give it extra dimension.


I then took the Kinder Kreations wood veneer stars and added some subtle colour to them using a Colour Blast 'Singin' the Blues' Colour Shimmer Cube and a small brush. I also added a few random painted spots to my background to provide some contrast. (The shimmer showed incredibly well on the dark background!)


While I had my paintbrush out, I also added a small swipe of the same colour to the Kinder Kreations fabric button, as well as some stamped words.


To finish my page I added some copper coloured wire (attached with staples); white ink splatters and my handwritten journaling using a white gel pen.

Thanks for stopping by today. I will be back again soon with another project to share. Until then, happy scrapping! X

Friday 11 August 2017

You & Me | Scrap the Girls August Challenge

Hi everyone!
Back again with another project to share - this time it's my take on the August challenge for Scrap the Girls. This month, the challenge is a fabulous mood board called "Mr Grey" that looks like this...


To say I was excited when I saw this board is probably an understatement - I LOVE grey! I didn't want to stray from the monochromatic tones of the board, so used that as my main inspiration. I also drew on the scripted quote in the top right corner, and put my own scripted quote in the same spot on my page. I was also inspired by the image of the ink(?) on the left, which spurred me to create a mixed media background that featured quite a bit of stamping.

"You & Me"

The photo I documented was a recent selfie of Brielle & I that I snapped while we were at Aussie World. I LOVE this pic of us together and I thought it was a pretty good effort for a quick selfie!

To create my page, I started by adding some grey colour to my cardstock using a Colour Blast 'Stormy Weather' Colour Shimmer Cube and a waterbrush; and then some stamping using stamps from Viva Las VegaStamps and Carabelle Studio. Next, I added some texture using Colour Blast 'Steel' Colour Paste, which I smeared randomly around the page with a palette knife.


I then began adding the layers that would form the mat for my photo. I used a random assortment of items, that I just kept adding to until I thought I had enough. My layers included silver tissue paper, a paper doily, grid print bitty bag, frayed gauze, a silver die cut glitter frame (which I cut in half) and some black punchinella. (Most of these items were from D-lish Scraps.) I used a stapler to secure all the layers together before adhering to my page.


For the quote, I used a Project Life card, which I simply cut into a circle. You can also see where I also added some stamped quotes randomly around my page.


To help frame my photo and draw the viewers eye in, (and also provide me with my title), I used a D-lish Scraps wood veneer frame, which had the words "you & me" on it. I altered the frame by colouring it black and then I tucked it around the corner of my photo before securing it on top of my layers.


To finish off my layout I added a grey Charms Creations heart, which I topped with a silver foiled flair button from Flutterby Designs. (No matter which way I angled it, I just couldn't get a clean shot without any reflection or colour cast, sorry.) I also added some black splatters using Colour Blast 'Road Base' Colour Spray.

Entries for this Scrap the Girls challenge close at the end of the month, so you still have plenty of time to get yours in. This month's winner will receive a prize from Colour Blast (yay!) who are our sponsor this month. Make sure you pop over to the STB blog to see what the rest of the design team created too!
Until next time, happy scrapping! X