Showing posts with label Colour Me Happy collection. Show all posts

Sunday, 10 December 2017

These Are the Days | Cocoa Vanilla Studio


Hi everyone!
Time again to share another design team page with you - this one for Cocoa Vanilla Studio. At the moment, the CVS design team are currently challenged with creating a Christmas themed project that doesn't use a Christmas collection. 
I had heaps of fun going through my stash and collecting items from all different collections that I could use for my page.

"These Are the Days"

There are such a variety of collections used here, starting with that gorgeous wood grain paper from the 'Make a Wish' collection that I used for my background. (It is actually the B-side of the beautiful floral print Fresh Cut paper from MaW - don't you hate it when your two favourite prints from a range are back to back?! haha)


To create my design, I layered assorted papers from the 'You Rock'; 'Totally Rad'; and 'Colour Me Happy' collections to form a basic Christmas tree shape. I cut each piece to varying widths and overlapped them to add extra visual interest. The these are the days piece that formed the title in the centre of my tree was cut from one of the 'Colour Me Happy' Snip-Its sheets. 


I then began "decorating" my tree. I started with the 'You Rock' wood veneer star on top, then added the red stars that were fussy cut from the 'You Rock' Starshine paper. I also added the amazing and awesome wood veneer shapes (also from the 'You Rock' collection). Next, I added some phrase stickers that were from the 'Wild at Heart' Accessory Sticker sheet.


To further tie the wood theme into my page, I added a few Woodies (from the 'Hello Sunshine' collection) and the small love word from the 'Colour Me Happy' wood veneer words. I then livened up my tree by scattering some 'Colour Me Happy' Enamel Dots - Cool randomly around. 

To finish off my page, I used some of the new 'Bohemian Dream' clear stamps with navy ink to stamp some hearts and the love this sentiment around my page; before splattering a small amount of Colour Blast 'Marine' Colour Artist Ink around.
So there you have it - a Christmas themed page without a Christmas collection anywhere to be seen! (And I managed to include items from SEVEN different Cocoa Vanilla collections!)
Thanks for stopping by today. Until next time, happy scrapping! X

Saturday, 25 June 2016

D-lish Scraps June Projects!

Hi everyone! Just popping in today to share a round-up of my D-lish Scraps June projects with you all. To start this month, I have a layout that features a photo of a very old friend and I, who I caught up with earlier in the year when she was visiting Queensland on holidays.


I wanted to keep this layout to black and white with only one colour accent, so I used Cocoa Vanilla Studio 'Colour Me Happy' papers. This allowed me to choose the colour I wanted to add and customise the paper to suit. I did this by colouring the floral print with Faber-Castell watercolour pencils and then going over it with a water brush. I chose yellow to represent happiness, as I was certainly happy catching up with my dear friend. 


D-lish Scraps embellishments included on this layout were - 'happy' flair button (from the Defining Words set); yellow mini paper doilypaper flowers (including one of my favourite Forget-Me-Nots and a Wild Rose); D-lish Dots enamels; tissue paper (left over from a previous Just Add Paper kit); a beautiful 6" lace paper doily; hand-dyed muslin; sequin bow; yellow resin deer and Journal Its Minifetti.


For my second layout, I took a completely different approach, opting instead to create a layout that was crisp, clean and linear. This one features a funny photo of my boys I snapped at the doctor recently, right after they had their immunisations.


In order to achieve the clean look I was after I wanted to use lots of white (including all white embellishments); minimal embellishing; and a grid-like design. I had lots of small paper scraps from the Cocoa Vanilla Studio 'Made of Awesome' collection that were perfect to use, so I drew up a 9x9" square on my cardstock and began shuffling everything to fit. Once I had them all stuck where I wanted them, it was time to embellish.


Most of the embellishments I used were raw wood veneers, which I coloured white with my trusty Posca paint pen. I also used a chipboard piece from Dusty Attic; a flair button from the "Defining Words - White" set; and a word strip from a Journal Its Wordfetti sheet.


My final share was my take on this month's Inspiration Board Challenge and it features a recent photo of my daughter on her birthday...


I used Cocoa Vanilla Studio Free Spirit papers for this layout, and complimented them with a range of D-lish Scraps embellishments; many of them from this month's Just Add Paper kit. To start, I first added an extra splash of colour to the background using Colour Blast Colour Paste, which I simply spread with a palette knife.


From the Just Add Paper kit I used - wood veneer embroidery hoop; Corbett Creations wood veneer butterflies; 6" lace paper doilies; journaling pieces; flair buttonsky blue tassels. Other D-lish items included Memory Maze chipboard 'celebrate' word (which I embossed with gold); gold coloured wiresequin bow; and a D-lish Dot enamel shape.


So there you have it - 3 quite different projects from me this month showcasing the versatility of the embellishments available from the D-lish Scraps store.

Until next time, happy scrapping! X

Wednesday, 8 June 2016

You + Me - a Colour Me Happy layout for Cocoa Vanilla Studio

Hi everyone! Today I am very excited to share my latest work that was created as part of the current collaboration between Cocoa Vanilla Studio and Faber-Castell. This layout was created using products from the Colour Me Happy collection as well as Faber-Castell Gelatos; Albrecht Durer watercolour pencils and PITT pens.

"You + Me

First of all that amazing red border on the Spotty Dot paper background was created using a red Gelato. Don't you love how vibrant the colour is? You can see that I have complimented it by using red Blossoms, (as well as other colours from the warm pack), and have topped them with Enamel Dots (also from the warm pack).


For my main feature paper, I took a piece of the Floral Fancy and added some highlight details using Fineliner PITT artist pens (from the warm colours pack) and then coloured it using Albrecht Durer watercolour pencils. I stuck to using warm tones only on this layout, so I deliberately chose not to colour the leaves which helped the flowers to "pop" even more.


I used a piece of the coloured side of the Doodle Dandy paper to mat my photo, and then used various pieces from the Snip-Its pack to embellish on, and around it.


If you would like to read more about how I used the Faber-Castell products to achieve this look, you can visit the Cocoa Vanilla Studio blog to read my post HERE

For all my scrappy friends who are attending the Brisbane Scrapbook & Papercraft Expo this weekend, make sure you come and see me and say hello! I will be working at the Cocoa Vanilla stand and will also be teaching a one hour workshop daily at 11am. (Workshop bookings can be made via the Cocoa Vanilla stand at the expo.)

Here's a sneak peek at the layout I am teaching using the 'Life is Beautiful' collection from Cocoa Vanilla Studio...


Thanks for stopping by today! Til next time, happy scrapping! X

Wednesday, 11 May 2016

'Grow' for Cocoa Vanilla Studio

Hi everyone!
Just popping in today to share my latest layout using the Cocoa Vanilla Studio new Colour Me Happy collection.
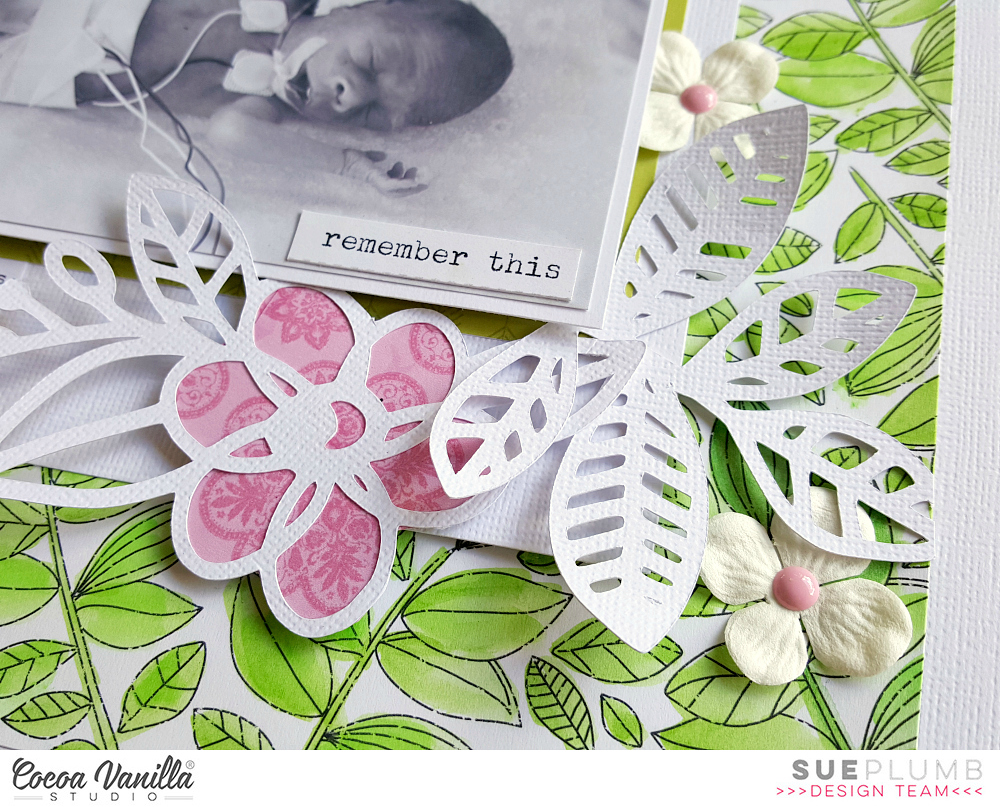
This layout features a photo of one of my twin boys (Hunter) when he was aged just 6 days old and still weighed under 1kg (2lbs). It was taken during a rare moment when he had no breathing gear on and I was watching a nurse change his tiny nappy (and was wondering how I would touch him without breaking him!) Looking back on photos like these makes me reflect on just how far he and his brother have come since those scary days, so I wanted to scrap a layout he can look at in the future and see that for himself.

(from little things, big things)
'Grow'

I used the Leaf Litter paper as my background because I wanted to convey the theme of growth. So I pulled out my Faber-Castell gelatos and set about giving it a customised watercolour makeover. I didn't aim for perfection with my painting, as I knew some imperfection would provide a good contrast to the cut files I also planned to use.


I used more than one shade of green to help give the background depth, and applied the colour using a water brush. I love the result!


I used some of the green from the B-side of the Leaf Litter paper to mat my photo, and then used a larger mat of white cardstock to help separate the photo further from the background. I also used some of the Snip-Its phrase strips adhered directly onto my photo.


This was my first time ever using cut files and I was thrilled with the result! I used one of the leafy branch cut files several times and one of the flowers as well. I backed the flowers with a small amount of pink paper from the B-side of the Paisley Patch paper to add a small pop of complimentary colour to the page. I added a few Blooms from the neutrals pack, which I topped with Enamel Dots from the warm pack.


Finally I added my title, using the grey spot Alphabet Stickers from the Free Spirit collection and the tiny pink butterfly sticker (also from Free Spirit).

I am thrilled with the result of this page, and I especially love the fact that my paper is completely unique because I hand-painted it myself! If you are a fan of colouring in or painting, I highly recommend you grab some of the papers from this collection! So. Much. Fun.
Til next time, happy scrapping! X

Saturday, 23 April 2016

Not Quite Perfect for Cocoa Vanilla Studio

Hi everyone!
Hope this finds you well on this long ANZAC weekend here in Australia? I'm in the midst of 8th birthday preparations for my ANZAC birthday girl here.

Today I am sharing a layout I created using the brand new Colour Me Happy collection from Cocoa Vanilla Studio. This collection features a mix of papers with bright colours on one side and printed black and white patterns on the other, which lend themselves to being coloured in or altered with mediums.

I thought that a super fun collection like this called for an equally fun photo, and I had the (not quite) perfect picture for it...


In keeping with the theme for this collection, I decided to stick with a black / white / grey colour palette with a single colour contrast. I used an orange mist applied to my background to give a watercolour effect, and then I used the same colour applied with a water brush to add some small highlights of colour to the Star Spangled paper.


To embellish my layout, I used elements cut from the Snip Its cut apart papers, which include a mix of labels, tags, words and other shapes. I also added one of the new wood veneer words, which I coloured black using a paint pen.


Of course this collection includes a range of coordinating flair buttons, and I added the black 'don't forget' one nested on some cotton thread. I also scattered a few enamel dots around my page, which are available in 'warm' or 'cool' colourways for this collection.


Colour Me Happy includes two sets of alphabet stickers. The first is black (as I have used here), which is perfect for bold titles; and the other is white, which allows you to colour yourself to suit your project. (I love this font!) You can also see how I used some of the phrases from the Snip Its to support my title.

That's all from me today, thanks for stopping by. If you would like to get your hands on your own stash of the new Colour Me Happy collection, it is available from next Friday (29th April) in the Cocoa Vanilla Studio shop or ask your favourite scrappy retailer.
Til next time, happy scrapping! X