Monday, 29 April 2019

Happy Easter | Cocoa Vanilla Studio


Hi everyone! 
Just wanted to "hop" in and share a layout that was designed for Cocoa Vanilla Studio. I was recently tasked with an "Easter" theme on the CVS blog, so I decided to do some stash-busting and pull out the 'Make a Wish' collection - largely because I knew it had that super cute little bunny it! Despite the fact that it is actually a birthday themed collection, the colour palette of this range is perfect for Easter pages; and it could easily be used for all sorts of other occasions.


I chose the gorgeous watercolour style pattern on the reverse of the Hip, Hip Hooray paper as my base, and then dry-brushed some Dina Wakley 'Ocean' acrylic paint where I wanted my focal area to be. I also watered down some extra paint and then used a soft, round brush to splatter it onto my page from a bit of height. (Tip - this step is definitely an outside activity peeps! hehe)


I then used strips of various papers (Hip, Hip Hooray; Party Mix; Loot Bag; and Fresh Cutwhich I layered together horizontally over the top of the paint so that only the edges of the painted area were peeking out.

I took the three photos of my kids, and framed two of them using small polka dot frames from the 'Make a Wish' chipboard accent stickers, and then framed the third using a spotty frame from the 'Wild at Heart' chipboard frames. I layered the frames together; using foam tape to support the outer two and help pop them up from the page. I also added some messy cotton thread underneath the frames to add some soft texture to the page.


I added a few assorted pieces from the die cut ephemera pack and the chipboard sticker sheet onto my layers, before adding the large "oh yeah" sentiment that I had fussy cut from the Party Mix paper near the top of my page. From the same paper, I also fussy cut a cute party hat; the word "happy"; and the little rabbit. I then used "happy" and the rabbit paired with some of the coordinating alphabet stickers to form my page title.


To finish off, I added a few of the small word / phrase stickers from the 'Make a Wish' Accessory Sticker sheet around my page. Despite the fact that a number of items from the 'Make a Wish' collection are now sold out, there are still more than enough pieces available in the Cocoa Vanilla store to create some beautiful pages with. Pop over and see what's available HERE
Until next time, happy scrapping! X

Saturday, 27 April 2019

Limited Edition | Colour Blast


Hi everyone!
Today I am sharing a mixed media layout I created for Colour Blast with the April release "Limited Edition" collection; as well as Colour Paste; Colour Shimmer Dust; and a Colour Shimmer Brush Marker. I even used some Colour Embossing Powder, AND dragged out my Big Shot to use the 'Going My Way' die. 

My layout features a photo of my daughter and one of her best friends, which is aptly titled "Limited Edition" (just like the collection)...


I've got a really detailed step by step process for you today, so you can follow along at home and create your own version of this page. Here's a look at what I stated with (if you don't have everything the same, just substitute in something similar).


I began with the Individual paper as my page base; then took the Stand Out cut apart paper, and cut it into all the individual pieces. I followed the design on the background paper which featured distressed / torn edges printed at the top and bottom, and created actual tears in both places, securing the edges with small staples. I took one of the cut apart pieces and used it to back both of the tears to add some pops of blue.


Next, I added some stamping to my background using the 'Peony Dreams' stamp set from the January "Spread Your Wings" collection and 'Faded Jeans' Distress Oxide. (You will note I stamped randomly with sections of the stamp - I did not use the entire stamp image as whole.)


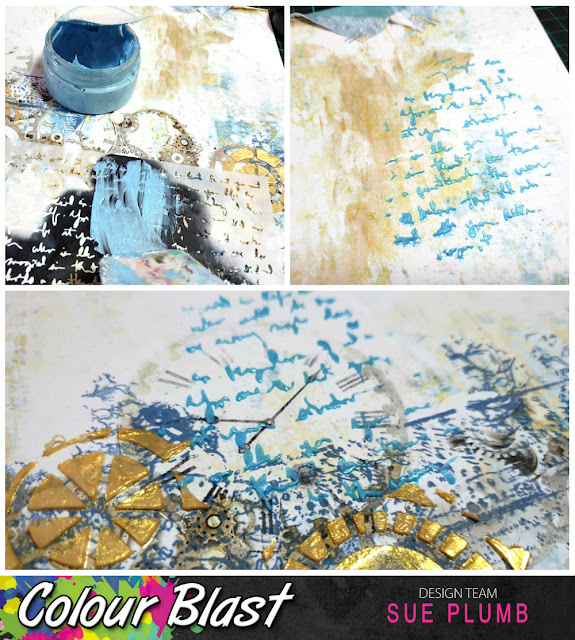
After the stamping, it was time to create some texture. I started with 'Bling' Colour Paste and a stencil from Flutterby Designs that featured a circular style design, so I could continue the circular theme from the background paper. After I added a few circles, I then wiped off the excess paste from my palette knife randomly around the page before drying it off with a heat gun.


I then went in with another stencil, this time a scripted design from The Crafters Workshop, and 'Singin' the Blues' Colour Paste. I chose this design so I could add more blue colour, as well as texture to the page, without any real structure. (And yes, you can totally layer one Colour Paste over another, as long as the first one is dry!)


At this point my background looked like this (you can see how I was working with the "rule of threes" which helps bring balance to your page)...


After the paste had dried, it was time to turn to paper again. I used pieces of the Stand Out cut apart paper I had cut earlier, as well as a larger piece of the Uniqueness paper to create a layered mat for my photo to sit on. I also fussy cut the quote from the Stand Out paper and adhered it along the bottom edge of the page.


I then took the 'Going My Way' die (from the 'Going My Way' collection) and another piece of the Uniqueness paper and cut it using my Big Shot. I then added some extra colour to it using 'Duke' Colour Shimmer Dust that I mixed with water and applied with a small brush.


Whilst that was drying, I turned my attention to the chipboard pieces I had chosen for my page, which were a mixture of circular style designs such as cogs and clocks; and a few stars as well. I stamped the pieces with embossing ink; then applied 'Steel' Colour Embossing Powder over the top; before tapping off the excess and using a heat gun to set it. (This is my favourite colour of embossing powder, as it makes the chipboard pieces look like chrome!)


With chipboard pieces ready, it was then time to start embellishing the page. I cut my die cut piece in half and added the two pieces on either side of my photo mat, as well as some frayed gauze on top of the paper layers. I then adhered my chipboard pieces, tucking some in under the edges of my photo mat, and following along the diagonal design of the page. 
With the embellishments in place, I then added my photo, using some scrap cardboard underneath to pop it up a bit.


For my page title, I fussy cut the limited edition plaque from the Exception Word Sheet and added a little extra colour using the 'Duke' Colour Shimmer Dust I had mixed earlier. I also used the brush to add small amounts of blue around the focal area of my page.


I then adhered my title piece onto the chipboard frame I had embossed earlier and tucked it into the layers above my photo.


With my page nearing completion, I took a Silver Colour Shimmer Brush Marker, and added a little extra definition and shimmer to some of the cogs and clocks printed on the page.


To finish off my page I added a scattering of pale blue Cocoa Vanilla Studio sequins.


The circular shape of the sequins helps bring the repeating circular theme of the whole page together and adds an extra layer of texture and interest. 


I hope this detailed insight into my process will help you create your own version of this layout. I love being able to inspire others to create, so make sure you share with me if you do! You can post your creations in the Colour Blast Creative Corner group on Facebook, or tag me @sue.plumb on Instagram.


Until next time, happy scrapping! X

Tuesday, 23 April 2019

F*ck the Road Not Taken | Viva Las VegaStamps


Hi everyone!
Popping in with my latest Viva Las VegaStamps design team project for you. Today I have a mixed media scrapbook layout to share that features a gorgeous poppy stamp and some photos documenting my tutor display at last year's Brisbane Scrapbook Expo here in Australia. Anyone who knows me, knows that I am not one for blindly following the rules, nor am I about being "fake". This layout celebrates the fact that my display was all about representing ME.


To create my page I began by brushing and splattering some black Dina Wakley acrylic paint onto my cardstock. (In hindsight I should have changed my shirt before doing this...another one ruined with paint splattered up my sleeve! haha)


While the paint was drying, I took the Poppy stamp and stamped it out several times onto another sheet of white cardstock using black StazOn ink. I then added colour to each of them using a small brush and a selection of Colour Blast Colour Artist Inks before cutting them out and setting them aside. 

On the same sheet of cardstock, I also stamped out the Triangle Banner stamp using 'Shaded Lilac' Distress Oxide, then fussy cut each of those out as well.


To assemble my page, I started by adding my photos, using some cardboard underneath them to pop them up from the background; and a few pieces of messy white cotton thread for texture. I then arranged the poppies and banners around my photos, using foam tape under some of them for extra dimension.


Alongside my photos I stamped the words Somebody Stop Me! (can anyone, really?) then I also stamped The Road Not Taken sentiment three times onto my page. I also added the Fuck You stamp to finish my title, which led into my handwritten journalling. (Which just explains about how I probably broke some of the unspoken etiquette rules about tutor displays but accurately represented myself.)


I finished off by stamping the Doodle Dots stamp randomly around my page used 'Picked Raspberry' Distress Oxide.

VLVS stamps used: 
Poppy

Until next time, happy scrapping! X

Sunday, 14 April 2019

Happy Times | Cocoa Vanilla Studio


Hi everyone!
Popping in today to share my latest layout created for Cocoa Vanilla Studio using the new 'Happiness' collection. For this page I chose to document some sweet photos of my daughter that were taken the night before her 10th birthday. I also decided to introduce some mixed media using Distress Oxides.


For this one I wanted to challenge myself to create a page without using ANY of the flowers or floral patterns from the range. (SO hard to resist!) Instead, I took my inspiration from the cute hearts pattern found on the reverse side of the So Fresh paper and use hearts as a theme of my page.

When it came to my page design, I started with a sheet of white cardstock and cut a piece of the So Fresh paper to cover the top half of my page. I then took a piece of the stunning Expressive paper with its abstract painted design and tore a piece to layer over the top. I added an extra tear near the centre and folded the edges back to expose some of the pink cross pattern underneath, securing it in place with staples.


At this point I wanted to "drag" some colour down to the bottom part of my page, so I added some 'Cracked Pistachio' Distress Oxide. I mixed it with a little water on my craft mat before applying it using a wide brush and a vertical stroke. I then layered some 'Tumbled Glass' Distress Oxide over the top using the packaging technique to soften it. Next, I added a thin strip of the Meadow paper that I had punched with a heart edge punch along the bottom edge of the So Fresh paper. 

I cut a piece of the Happiness paper to use as a photo mat, and positioned it so it sat on the punched horizontal line; then layered two fussy cut frames from the Frame Of Mind paper over it before adding my photo strip on top. I added a frame from the Die Cut Ephemera pack over the middle photo; then the die cut happy times words below the strip for my page title.


In the bottom section of my page I added some hearts that I had cut using metal dies from the Expressive paper, which I then layered with some small word stickers from the Accessory Sticker sheet. Amongst the larger hearts, I added a few heart stickers from the Clear Sticker pack; then a chevron sticker alongside my photo strip.

To finish off, I tucked in a butterfly above my photo, as well as the time to shine banner piece in top section of the page (both from the ephemera pack). I also added a couple more hearts that I had cut.


Finally, I stuck a small label from the Accessory Sticker sheet down the bottom of the page that I stamped with the date; and a then line of handwritten journalling and I was done.

Thanks for stopping by today so I could share this with you. If you haven't gotten your hands on the 'Happiness' collection yet, make sure you check with your favourite retailer. (I know many sold out in record time and have since re-ordered.) Until next time, happy scrapping! X

Thursday, 11 April 2019

Simply Amazing | Scrap the Girls April Challenge


Hi everyone!
Popping in today to share my take on the April challenge at Scrap the Girls. This month's challenge is called "Knock Your Socks Off" and it's about you at your best! I chose to document some photos of my daughter when she was all dolled up and wearing a pretty dress. (This is a rare occurrence for my little tomboy, and I was lucky to capture these just before she went off to a high tea birthday party.) 


I began this layout using a variety of products from Colour Blast - first, I chose the Fearless patterned paper from the 'Graffiti Grunge' collection as my base. Next, I used some 'Blush' Colour Paste, which I spread in small amounts randomly around the page using palette knife. I then added some stamping to my page using black ink and the 'Peony Dreams' stamp from Colour Blast.


Once the paste and ink had dried, I set about creating some layers for my photos to sit on. I gathered together some more pieces of patterned paper from the "Graffiti Grunge" collection and cut them into different shapes and sizes. I also fussy cut some of the tags from the Perfect Tags paper, then tied them off with green paper string. I then layered the tags and paper pieces over some pale pink tissue paper and tucked in a pale pink paper doily.


I then topped off the layers with some frayed gauze and messy black cotton - both for added texture, before adding my photos on top. Next, I added some small pieces of torn floral washi tape (from Chiyogami Designs) and some snippets of punchinella, which I secured in place with staples.


For my title and embellishments, I used various pieces from a couple of packs of die cut ephemera - one from Kaisercraft and the other from the Reject Shop. I tucked pieces in amongst my layers under and around my photos. I also added some small pieces of twisted pink wire (again, secured with staples); and a sequin bow under the bottom edge of my photo - both from D-lish Scraps.


To finish off my page I added a scattering of sequins; a few green butterfly stickers (these are From a Mothers Art by Kelly-ann); and then a few stamped phrases and my handwritten journalling.
I was really happy how this one came together and the balance between girly and grunge.

I hope you will join in with this month's challenge. We have the fabulous Charms Creations sponsoring us (and even though I didn't end up using a Charms embellishment on this page, you already know how much I love them!) Check out all the challenge details, plus inspiration from the rest of the design team on the Scrap the Girls blog.
Until next time, happy scrapping! X

Friday, 5 April 2019

Be Fearless | Colour Blast


Hi everyone!
I am here today to share my latest design team project with you - this one created for Colour Blast. This 12x12" mixed media scrapbook layout features the February release Graffiti Grunge collection; as well as Colour Paste and Colour Artist Ink. I chose to document a fun photo taken with my kids when we were at a theme park.


Before I started, I gathered together my supplies - I chose the Tough paper from the Graffiti Grunge collection for my page base; along with the Direct Links die (also from the GG collection); the Peony Dreams stamp set (from the January Spread Your Wings collection); and Bling Colour Paste.


I began by adding some stamping to my page using the Peony Dreams stamp. Rather than stamping the entire image as a whole, I used parts of the stamp randomly with black ink to define the focal area of my layout where my photo was going to go; along with a small amount of stamping in the bottom right corner where I planned to place my title.


I then chose a Seth Apter designed stencil from StencilGirl to add some Bling Colour Paste over the top of the stamping, to add further interest to the focal area of my page. With the excess paste on my palette knife I simply wiped it off randomly around my page. 


At this point I decided the page needed some extra depth of colour, so I added a splattering of Rust Colour Artist Ink to the page using a small, stiff brush and then dried the page off. (You can see the shine and depth the Bling Colour Paste has once dry.)


Next, I set about creating some layers as a mat for my photo to sit on. I chose additional papers from the Graffiti Grunge collection and cut a variety of pieces; which I layered with book paper and then stapled it all together, bending and scrunching the edges for extra texture.


With my layered photo mat complete, I then attached it to my page, adding some frayed gauze and messy black cotton on top for soft texture. I also cut the Direct Links die twice from the Epic paper, cutting one in half and layering it over the top of the gauze so it the arrow head and tail were sticking out on both sides of the photo mat.


With the second die cut, I cut some of the extra chain links from it and adhered them so they would protrude from below the photo, then stuck an extra arrow head on the right side; before sticking my photo down on top.


With my photo in place, it was now time to embellish my page. I began with my title cluster - adding a couple of small torn scraps of paper (left over from my die cutting) over the stamping and paste I had on the page. To tie in with photo cluster, I also added some messy black cotton; then a butterfly sticker and the words "Be Fearless", which I had fussy cut from the Be Yourself Word Sheet.


I then tucked two butterfly stickers into the photo cluster (because "rule of threes", right?) and a die cut star. I then used several pieces from the Cocoa Vanilla Studio 'Boys Rule' chipboard pack to add a few pops of dimension to the page. I added a few small pentagons, some chipboard stars and used the negative from another piece (cut in half) to frame my title words.
To finish off, I added the "fun and games" chipboard banner piece along the bottom edge of my photo and I was done!


Thanks for stopping by today so I could share this with you. The Graffiti Grunge collection is currently available to purchase in the Colour Blast online store, along with the die, stamp, Colour Paste and Colour Artist Ink I used on this page. Alternatively, you can ask at your favourite craft retailer. 
Until next time, happy scrapping!