Saturday, 25 August 2018

#4PIAP | Colour Blast


Hi everyone!
Today I have my latest Colour Blast design team project to share with you - a mixed media scrapbook layout that features Colour Artist Inks, Colour Paste and Colour Shimmer Dust. It also features a photo that was taken at a scrapbook retreat last year with some of my favourite people. 


To create my page I began with a sheet of white cardstock, which I brushed from side to side with 'Barley' Colour Artist Ink using a wide brush. (The key to making sure your brush strokes are visible is ensuring your brush is not too wet.)


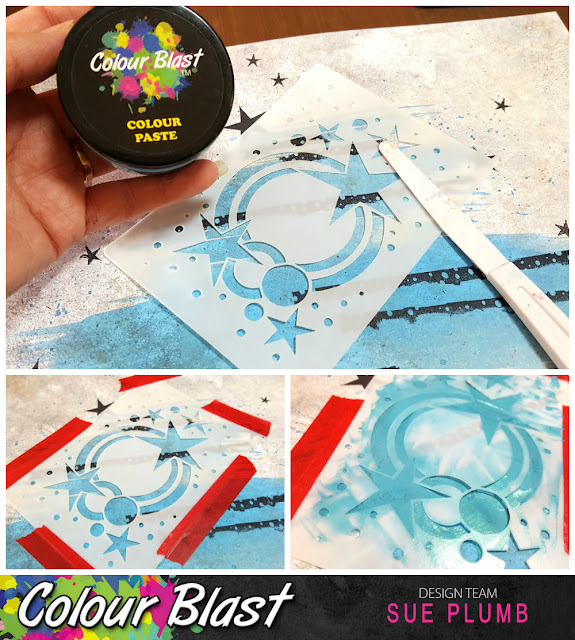
Over the top of the ink, I added some texture using 'Stormy Weather' Colour Paste and a stencil from Dusty Attic. I applied the paste to three areas on my page, then wiped off the excess paste from my palette knife randomly around.
Once the Colour Paste had dried, I used some stamps from Viva Las VegaStamps to add extra depth to my background.


Once my background was completely dry, I gathered together some papers from Cocoa Vanilla Studio that all featured navy. I cut several pieces in different sizes and shapes, layered them together and secured them with staples before adhering to my page. 


I then turned my attention to the embellishments for my layout, reaching for a pack of paintable Heidi Swapp ephemera. These pieces all feature "resist" details, that is revealed once the pieces are painted. I mixed up some 'Cobalt' Colour Shimmer Dust with a small amount of water and used a small brush to paint each of the pieces. I gave each piece more than one coat to ensure the colour really popped.


Once the ephemera pieces were dry, I added them to my page, along with some Cocoa Vanilla Studio chipboard frames and stickers, before adding my photo on top. I used a small amount of cardboard behind my photo to help pop it up from the page. 


I used foam Thickers to add my title to the page.


The final step in my process was to add some splatters of 'Marine' Colour Artist Ink around my page.


I am really happy with how this layout turned out. This is not a colour combination that I would have ordinarily opted to create with, but allowing my palette to be guided by the colours of the photo really did yield a fantastic result.


That's all from me today, I hope I have inspired you to perhaps try a colour combination that might be outside your "normal" choices.
Until next time, happy scrapping! X

Wednesday, 22 August 2018

Be a Mermaid | Viva Las VegaStamps


Hi everyone!
Today I have another design team project to share with you - a simple 12x12" scrapbook page I created for Viva Las VegaStamps using one of my favourite stamps as a focus. Having recently been sick in hospital and unable to sit up and create; a simple yet effective technique was just what I needed to get my hands dirty again.


I decided to create this layout to document my daughter's achievements at her school swimming carnival last year, and what better feature shape than with a star? The Squiggly Star Collage is one of my absolute fave pieces of VLVS rubber, so I decided to use it multiple times.

I started by painting some scrap pieces of cardstock using Ranger Dylusions paints. I then stamped out my stars using black StazOn ink, then cut them out and set them aside.


Next, I got a fresh sheet of white cardstock, and used the Row of Distressed Lines stamp to add some structure to my page to begin working from. I kept the background to simple black on white as I wanted the colours of the stars to pop.


I used a small piece of Miracle Tape on the back of each star to adhere them around my page. Once in place, I used the Grunge 2 to stamp a number two onto each of the red stars, and the Grunge 3 to stamp a three onto the green ones to represent the second and third ribbons she won.


I then arranged my photos together, added some cardboard to the back and stuck them onto my page. I used the She Spread Her Wings stamp several times around my page, along with the Star Sliding stamp to reinforce the star theme. 


To finish off, I used the Always Be Yourself/Mermaid stamp to provide a focal quote and title; before splattering some Colour Blast 'Citrus' Colour Artist Ink around my page.


I was really happy with how this page came out with the bright splashes of colour against the white background. 


Thanks for stopping by so I could share this with you. I hope I have inspired you to get inky too! Until next time, happy scrapping! X

Monday, 20 August 2018

Hello Happy | Cocoa Vanilla Studio


Hi everyone!
Popping in today to share my another design team project with you - this one for Cocoa Vanilla Studio. This layout was created for the recent "Geo" theme that the design team were challenged with. For my take on it, I decided to dust off my die cutting machine and use a gorgeous geo heart die to create some feature embellishments for my page.


I used the stunning 'More Than Words' collection for my layout; focusing on a pretty black / white / grey / blue colour palette to compliment the photo of my sister and I enjoying a wine while out to lunch.


I started by choosing the soft blue & white striped pattern on the B-side of the 'Treasure' paper as my background; then cut my geo hearts out from the black and white floral pattern on the reverse of the 'Gossamer' paper so they would stand out from the background. The gorgeous die I used is from Uniquely Creative, and I love how well these dies cut. I then arranged the hearts and adhered to my page using liquid adhesive.


I then created a layered mat for my photo using pieces from the 'Collage' paper and a paper doily from my stash. I arranged all the pieces then stapled them together before fixing the stack onto my page with tape and adding my photo on top. (I used some cardboard under my photo to mount it up from the page.)


Next, I sorted through the Die Cut Ephemera pack and selected a few floral and leaf pieces in shades of blue and grey. I added a small cluster near the top left corner of my photo, using some foam tape to pop up the smaller bloom and add some dimension. I also bent the leaves up slightly from the page. Under the right side of my photo I added a leafy branch; then another flower below the bottom right corner of my photo mat.


To create my title I used the words hello and happy from the Chipboard Title Stickers pack, which I adhered above and below my photo. I also added the little moments die cut from the ephemera pack, which I popped up with some foam tape.
I took 3 small phrase stickers from the Accessory Sticker sheet, adding two to the heart at the top of the page, and the other to the heart at the bottom. 


Although I was happy with how my page looked at this point, I still felt it needed another element, so I fussy cut 6 little black and white butterflies from the 'Collage' paper. I stuck the first three flat onto the page, then stuck the second three on top of them, bending the wings up away from the page.

I then took 3 small heart stamps from the Clear Stamp set and stamped them around my page using grey ink, as well as stamping the date. (I chose grey instead of my usual black ink, as I thought the black would be too harsh.) I also added some small splatters of Colour Blast 'Stormy Weather' Colour Shimmer Spray to my page and I was done.

Thanks for stopping by today so I could share this with you. Until next time, happy scrapping! X

Wednesday, 15 August 2018

Been There Rocked That | Scrap the Girls August Challenge


Hi everyone!
Today I am sharing a super fun scrapbook page I created for the Scrap the Girls August challenge. This month's awesome board is called "Wild Women Do" (which I totally love!) and it looks like this...


Our challenge this month is being sponsored by Charms Creations, and Charm kindly supplied us with some special embellishments to use on our pages. Unfortunately, with so many DT commitments I was working well ahead of time, so my page was complete before I received them. (Rest assured though, they WILL appear on a future page, you know I love my Charms embellishments!)
Here is my take on the challenge...


As soon as I saw the zebra print in this board, I couldn't resist scrapping these fancy dress retreat photos for it. (Given Mandy was wearing leopard print tights - that's close enough, right?!) I took the opportunity to do some stash-busting as well, using up lots of old supplies.


I used a sheet of black cardstock as my page base, adding pieces of some old Heidi Swapp and Shimelle patterned papers; and some music paper to create my design.


I wanted to include several extra photos besides the main focal image, so I printed them in strips and created a small pocket in the corner of the page to tuck them under; and then popped a paper doily behind them. In keeping with my music theme, I also added some music themed Shimelle ephemera pieces around the page.


For my page title, I used an awesome Kinder Kreations chipboard piece, which I painted white and highlighted with a small Cocoa Vanilla Studio wood veneer arrow (also painted white). (Seriously, could that title have been any more perfect for this page?) Around my page I added a few more Cocoa Vanilla Studio wood veneer arrows and stars just to add a little dimension.


To finish off, I sourced the Poison band logo online and then printed it out and cut around it, before adding it along the bottom edge of the page. I also added a few small splatters of white mist.

Thanks for stopping by today so I could share this with you. Don't forget you have until the end of the month to join in with this challenge and be in the running for the Charms Creations prize. (And if you have any Charms Creations in your stash, be sure to include one for bonus points!)
Head over to the Scrap the Girls blog HERE to link up and see what else the team created.
Until next time, happy scrapping! X

Sunday, 12 August 2018

Travelers Notebook Pages | Viva Las VegaStamps


Hi everyone!
Popping in with another catch up design team project to share with you.
Recently my kids had their winter school holiday break; and as much as I loved spending extra time with them, it did make it more difficult to find time to create than usual. It also meant that every time I did, my mini crafters were right there sharing my space. The solution was to work on a smaller scale, so I switched to working in a travelers notebook.
The beauty of working in the travelers notebook, meant I was able to create these pages with far less supplies than I would usually use for a traditional scrapbook layout. (It's also a great way to use up some of those phone photos that aren't the best quality as they are printed in a smaller size.)

Here are a couple of pages I created documenting some daily moments...


The process for creating the pages was simple. I started by deciding where my photos were going to be placed and then just sat them on the page without sticking them down. I then tore some pieces of washi tape and added them to the page to provide some structure to work from, and also a splash of colour. Next, I chose a stamp as my focal image that supported the theme of my photos and began constructing the page. 


For the bike riding page I chose the Whimsical Wheeley Dog as my main stamped image, and She Spread Her Wings as the title. I added the Let Fear Be quote at the bottom of the page; and the I Do All My Own Stunts quote at the top of the page; then used the Row of Chevrons stamp to draw attention to the title and main photo.  


I used Miracle Tape to fix my photos my photos in place before adding my handwritten journalling with a felt pen. Watercolour pencils were used to add colour to the page, which were blended out with a water brush. To finish off, I used the Doodle Dots stamp and green ink to add some extra interest, and tie in further with the green spotted washi tape I had used. I also stamped the date.


For my second page, which was about our outing to see "Hotel Transylvania" at the movies, I followed the same process as for the previous page - first deciding where my photos would go, then adding the washi tape before moving onto the stamps. 

To tie in with one of the characters from the movie, I chose the Mummy stamp as my main focal image. I also stamped the Freaks stamp several times for the title of my page. I then looked for other stamps that supported my theme, choosing the Blood Dripping and Escape stamps to use in the top part of my page. To draw attention to the main focal image, I used the Row of Chevrons stamp.


For the bottom portion of my page, which was about our trip to McDonalds after the movie, I used the Oh My! and Biohazard stamps. (Not sure McDonalds would appreciate the humour in that one! haha)
I then followed the same process to finish as for the previous page - fixing my photos in place with Miracle Tape; adding my journalling; using watercolour pencils to add colour; then stamping the date and adding extra interest with the Doodle Dots stamp.

Thanks for stopping by today so I could share this with you.
Have you tried working in a travelers notebook before? If not, I would highly recommend giving it a go! There are no limits to what you can create - you can use it for documenting memories like I have here; for making lists; or even like a mini art journal. The scale is perfect for stamping, and I know they will be fun to look back through in future.
I hope I have inspired you to get inky too!
Until next time, happy scrapping! X

Thursday, 9 August 2018

Awesome Adventure | Colour Blast


Hi everyone!
Today I am sharing a mixed media scrapbook layout that I created recently for Colour Blast. This page not only features Colour Blast mediums, but also some of the brand new release products designed by Michelle Grant exclusively for Colour Blast - including stamps, stencils and metal dies. Michelle designed these especially to coordinate with the 'Boys Rule' collection from Cocoa Vanilla Studio, so of course, I used items from that too!


I started this page with a sheet of Cocoa Vanilla patterned paper as my base; then mixed up some 'Duke' Colour Shimmer Dust with a little water and used a wide brush to apply it to my page. I also used a small, stiff bristle brush to add some splatters around my page.


Once the background was dry, I reached for the brand new 'Going My Way' stamp set. I used the long, distressed edge stamp from the set to add some horizontal lines'; then stamped some various sized stars around my page using Staz On ink.


After that, it was time to add a little texture to my layout. I used the new 'This Way' stencil and 'Deep Water' Colour Paste. I applied the paste by positioning my stencil, then used some washi tape to hold it in place while spreading the paste with a thin palette knife. I then removed the stencil and dried the paste off with a heat gun.


It was then time to start adding some papery layers. I used the new 'Going My Way' and 'Going My Way Frame' metal dies to cut some pieces from patterned paper, which I layered with some paper under and around my photos, along with some frayed gauze. (I was very impressed with how well these dies cut in my Big Shot, even the intricate parts cut beautifully.)


I then added my embellishments to my page. I used three die cut stars I had cut; along with some stickers, chipboard and die cut pieces from the Cocoa Vanilla 'Boys Rule' collection. I also added a Charms Creations star and layered a flair button over the top of it.
To finish my page, I added some splatters of 'Soot' Colour Artist Ink.


Here's a closer look at the finished page. 


I love how much depth the page has when you can clearly see the layers - Colour Shimmer Dust; stamping; stencilled Colour Paste; splattered ink; paper; and finally, embellishments.


I added the date and my handwritten journalling in the bottom corner of the page.


A couple of Cocoa Vanilla phrase stickers to the left of the photos.


Thanks for stopping by today so I could share this with you. I had so much fun creating this page with the new Colour Blast products. These are listed and available to order in the store now, so make sure you visit the store and check them out!
Until next time, happy scrapping! X

Wednesday, 1 August 2018

You Rock | Scrap the Boys July Challenge


Hi everyone!
Thanks to a recent nasty virus and a severe bout of pneumonia, it's been a little while between posts for me. I am slowly on the road to recovery, but really wanted to to get this post up, despite the fact I have just missed the end of July. Today I am sharing my design team layout that I created for the July challenge for Scrap the Boys, but it also marks my final layout as a member of the team. After FOUR years as part of StB, the time has come for me to step down.

So this was the challenge I was working with...

And this is what I came up with...


I used pieces from the 'You Rock' and 'Boys Rule' collections from Cocoa Vanilla Studio, along with some cute snaps of my boys on their first day of school for my star-themed page.


On my background paper I used some starry stamps from Viva Las VegaStamps to add some extra depth.


I also added a bit of extra sparkle to my page using Colour Blast 'Bling' Shimmer Spray, which I splattered around.


I would like to take this opportunity to say a big thanks to challenge owner Rachel Lowe (and all her predecessors over the past 4 years) for having me on the Scrap the Boys team. I have thoroughly enjoyed my time on the team and made some long lasting friendships.

Here's a selection of some of my layouts from my time over the past four years...


Now I am starting to get back on top of things I will have some catching up to do over the next week, so stay tuned for some more projects.
Until next time, happy scrapping! X